Faveo Helpdesk Installation on CentOS 7 with Apache on PHP 7.1
This document will list on how to install Faveo Helpdesk on a new CentOS server.
We will install following dependencies in order to make Faveo Helpdesk work
- Apache
- PHP 7.1
- PHP Extensions: listed in server requirement
- MySQL/MariaDB
- Composer
- Cron Job
Read the detailed list of server requirement
We are using vi editor throughout to open and edit file, you can use nano editor also
Please note that you have to make changes in the iptables configurations. This allows to open ports that are necessary in Faveo installation.
This is an optional step, If you are able to access your server remotely on Public IP. This step will not be required. Mainly on local network server this step is required. If you are purchasing/renting server in a data center this step might not be required.
iptables -A INPUT -p tcp --dport 22 -m conntrack --ctstate NEW,ESTABLISHED -j ACCEPT

iptables -A OUTPUT -p tcp --sport 22 -m conntrack --ctstate ESTABLISHED -j ACCEPT

iptables -A INPUT -p tcp --dport 80 -m conntrack --ctstate NEW,ESTABLISHED -j ACCEPT

iptables -A OUTPUT -p tcp --sport 80 -m conntrack --ctstate ESTABLISHED -j ACCEPT

iptables -A INPUT -p tcp --dport 443 -m conntrack --ctstate NEW,ESTABLISHED -j ACCEPT

iptables -A OUTPUT -p tcp --sport 443 -m conntrack --ctstate ESTABLISHED -j ACCEPT
PS:
- You have to reset the firewall and iptables to your specifications
- This step might vary for different data centres or cloud service providers, Please check with your hosting company on opening port number and correct settings
rpm -Uvh https://dl.fedoraproject.org/pub/epel/epel-release-latest-7.noarch.rpm

rpm -Uvh https://mirror.webtatic.com/yum/el7/webtatic-release.rpm
yum update -y
In this step we install following
- PHP and Extensions
- MariaDB
- Git
- Curl
- Openssl
yum install -y git curl openssl httpd

yum install -y  php71w-cli.x86_64 php71w-common.x86_64 php71w-fpm.x86_64 php71w-gd.x86_64 php71w-mbstring.x86_64 php71w-mcrypt.x86_64 php71w-mysql.x86_64 php71w-odbc.x86_64 php71w-pdo.x86_64 php71w-xml.x86_64 mod_php71w php71w-opcache php71w-imap.x86_64 php71w-bcmath.x86_64
systemctl start httpd
You can do a spot check right away to verify that everything went as planned by visiting your server's public IP address in your web browser (see the note under the next heading to find out what your public IP address is if you do not have this information already):
http://your_server_IP_address/
You will see the default CentOS 7 Apache web page, which is there for informational and testing purposes. It should look something like this:
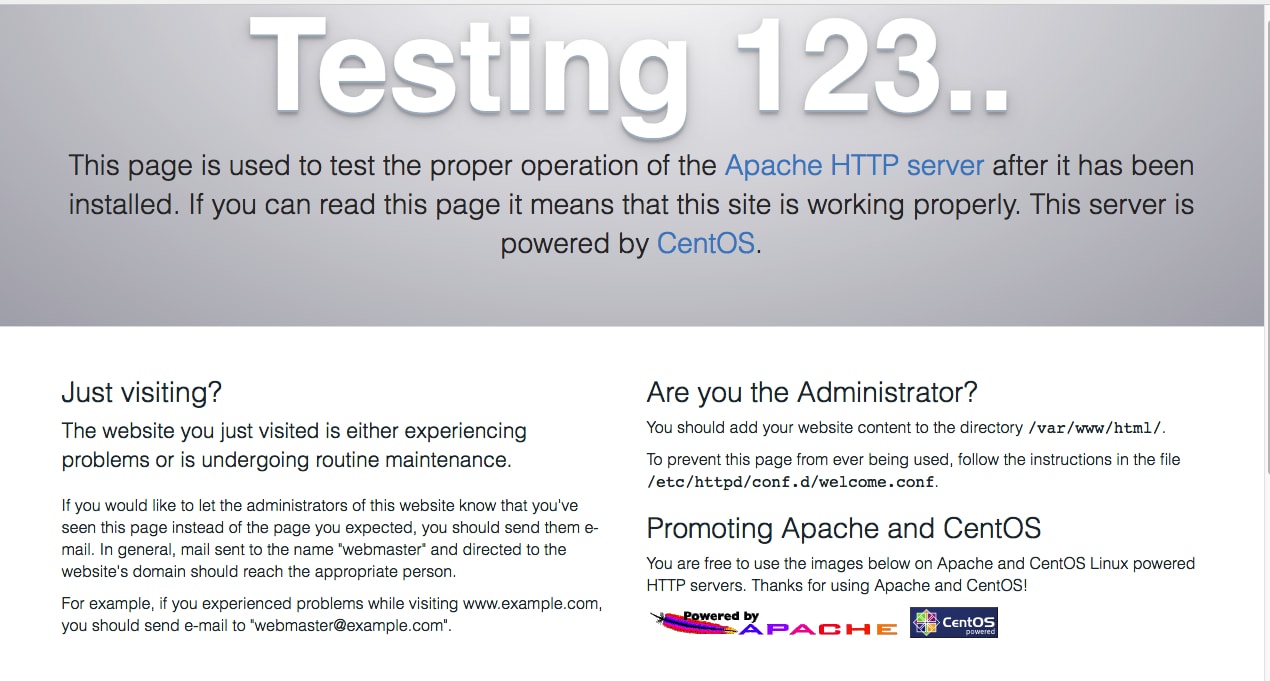
If you are able to see this default page then continue to next step. If not review your basic server settings again
yum install -y mariadb-server mariadb
systemctl start mariadb
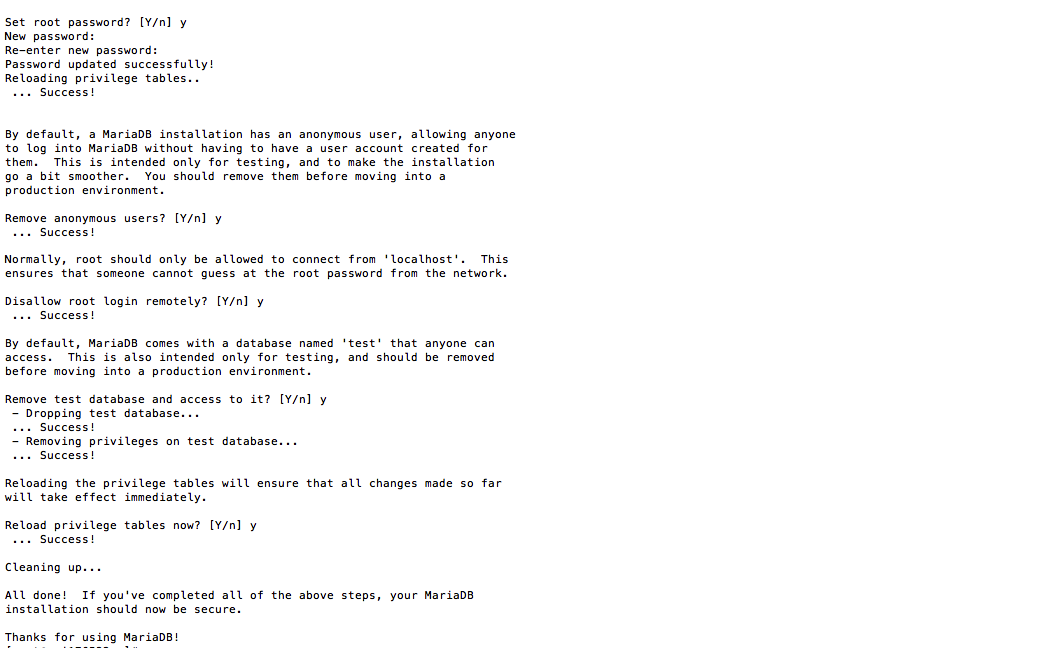
mysql_secure_installation
The prompt will ask you for your current root password. Since you just installed MySQL, you most likely won’t have one, so leave it blank by pressing enter. Then the prompt will ask you if you want to set a root password. Go ahead and enter Y, and follow the instructions:
mysql -u root -p

CREATE DATABASE faveo;

GRANT ALL PRIVILEGES ON faveo.* TO 'faveouser'@'localhost' IDENTIFIED BY 'faveouserpass';

FLUSH PRIVILEGES;

quit
ionCube is not required for Community edition
wget http://downloads3.ioncube.com/loader_downloads/ioncube_loaders_lin_x86-64.tar.gz

tar xfz ioncube_loaders_lin_x86-64.tar.gz

ls ioncube

php -i | grep extension_dir
Copy the Path for PHP modules according to your php v
cp ioncube/ioncube_loader_lin_7.1.so /usr/lib64/php/modules

where /usr/lib64/php/modules/ will be the php module path directory

vi /etc/php.ini
Add the below line to php.ini file
zend_extension = /usr/lib64/php/modules/ioncube_loader_lin_7.1.so
By checking php version we can verify the loader installed version
php -v
curl -sS https://getcomposer.org/installer | php

mv composer.phar /usr/bin/composer

chmod +x /usr/bin/composer
Faveo files can be manually uploaded to server or copied from Github, if you have access to Github account then use this step, else follow the next step Create a folder for Faveo and upload Faveo Help-Desk Community
mkdir -p /var/www/faveo/faveo-helpdesk

git clone https://github.com/ladybirdweb/Faveo-Helpdesk-Pro.git /var/www/faveo/faveo-helpdesk
Incase you want to upload the Faveo files from your local system to your server and not use Github, then follow this step Download the Faveo zip file from our billing site https://www.faveohelpdesk.com Use a File transferring client like Filezilla, WinSCP to upload the files to our server directory. Open Filezilla and enter the root Credentials of the server and login.
Create a folder for faveo inside that in the path /var/www/faveo/faveo-helpdesk
Now continue the process by logging in back to ssh terminal
Login to the File directory
scp faveo.zip username@destination:/var/www/faveo
Once the transfer is completed unzip the faveo.zip file and rename it to faveo-helpdesk. For unzip tool installation and unzipping you can use the below command
yum install -y unzip
then
unzip faveo.zip
chown -R apache:apache /var/www/
chown -R apache:apache /var/www/faveo/
chown -R apache:apache /var/www/faveo/faveo-helpdesk/
chmod -R 755 /var/www/
chmod -R 755 /var/www/faveo/
chmod -R 755 /var/www/faveo/faveo-helpdesk/
chmod -R 755 /var/www/faveo/faveo-helpdesk/storage/
chmod -R 755 /var/www/faveo/faveo-helpdesk/bootstrap/

systemctl start httpd
systemctl enable httpd
vi /etc/httpd/conf.d/faveo-helpdesk.conf
Copy the contents below to above file
<VirtualHost *:80>
ServerName localhost
ServerAdmin webmaster@localhost
DocumentRoot /var/www/faveo/faveo-helpdesk/public
<Directory /var/www/faveo/faveo-helpdesk>
AllowOverride All
</Directory>
ErrorLog /var/log/httpd/faveo-error.log
</VirtualHost>
Save and exit
systemctl restart httpd.service
Path can vary according to your server. This cron is set for every 1 minute fetching.
crontab -u apache -e
* * * * * /usr/bin/php /var/www/faveo/faveo-helpdesk/artisan schedule:run >> /dev/null 2>&1
service mariadb restart

systemctl restart httpd
Now you can install Faveo via GUI Wizard or CLI.
You can access Faveo url in the browser
PS:
- You have to reset the firewall and iptables to your specifications
- You need to follow steps yourself to harden the security of your server, server security is not covered in this article
- Redis is recommended for messaging que and improving system performance
- Always use SSL/HTTPS URL for Faveo