tutorial.basic.8
This tutorial is going to focus on a specific aspect of objects in uiz: Backgrounds. Backgrounds? No, not the type of backgrounds that fills your room like in the normal game maker, we are talking about “uiz object backgrounds”. Get ready, because to utilize backgrounds fully, you also need to use the manual. This tutorial will unfortunately, only get you partway there.
Sometimes you want your objects to look similar. Your button should look a little bit like your string input box, and that should look a little like the checkbox. In uiz, the way these objects are build in the same way for every object. Here is an example of an of a string box and a checkbox:
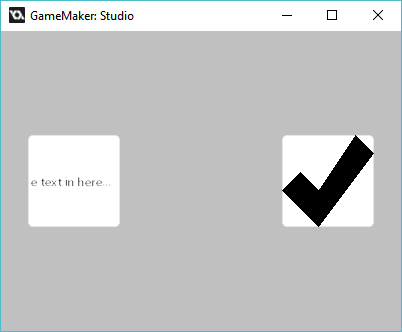 IMAGE 35: (see example 28)
You can see that they look somewhat the same. Although there is some text in the string box and a giant check mark in the checkbox, the “backgrounds” are the same. If the text and the check mark weren’t there, then the objects would look identical. This is what “background” means, and it has been made so you can easily customize one object, and then easily change that for other objects.
So I do specify a background? Well, easy. You just need to know what functions to use. To find out, open the manual and click backgrounds. Here you can a lot of information on backgrounds. For now, just look scroll down to "Available backgrounds and stitching modes". Here you see a collection of background scripts. A background script can be just a normal game maker script that has some code in it that draws the background for the object. Here is an example of 3 different backgroundscripts:
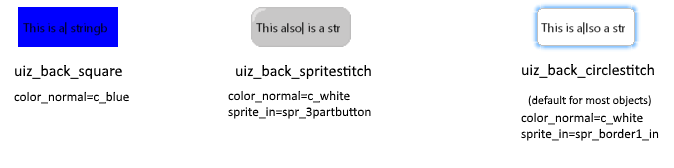 IMAGE 36
Now to set a different background for an object, you need to use the function uiz_background_texturescript. For most objects, this is set to uiz_back_circlestitch by default. Just set texture script to another backgroundmode if you desire so. Like this:
EXAMPLE 29:
//initialize uiz
uiz_init()
//create our stringbox object
stringbox=uiz_c(obj_uiZ_stringbox)
//setup some variables
uiz_position(stringbox, 25,px, 0,uiz_center);
uiz_size(stringbox, 1,dp, 1,dp);
//fix our stringbox object.
uiz_fix(stringbox)

//create our checkbox object
checkbox=uiz_c(obj_uiZ_checkbox)
//setup some variables
uiz_position(checkbox, 375,px, 0,uiz_center);
uiz_size(checkbox, 1,dp, 1,dp);
uiz_setPoint_x(checkbox, uiz_right);
uiz_background_texturescript(checkbox, uiz_back_square);
uiz_background_normal(checkbox, 0, c_white, 0);//we need to call this function in order to set the margin to 0.
//fix our checkbox object.
uiz_fix(checkbox)
Which looks like:
 IMAGE 37
On the left you can see a stringbox with texturescript=uiz_back_circlestitch, and on the right a checkbox with texturescript=uiz_back_square.
In example 29, we also called uiz_background_normal. If we didn't do this, out bland white square would have been too small for the check mark. That sounds weird right? Well, uiZ objects have "outside" size and position and an "inside" size and position. This is done so backgrounds such as uiz_back_circlestitch have space to draw, without interfering with the contents of the object. For example, in the corner of stringbox, you can see some empty space. It would be weird if stuff was drawing in that little corner. Therefore, we need inner margins. For the square, this space doesn't exist and we can use the entire object space. Things in this area can get confusing because every single background handles inside vs outside position very differently. For example, uiz_back_circlestitch will draw it's edges outside the inner area whereas uiz_back_square only draws within the inner area. If you ever notice that you background is too small, or if a piece of your background is cut off, you should check your background margins.
Now, besides specifying a background, we can also customize it. There are tree properties every background has:
- a texturemode
- a sprite
- a color
- a margin.
Not all of these values have to be used for every background script. The uiz_back_square for example only uses only color and margin. The variable names for the way a background should look is:
- sprite_texturemode
- border_texturemode
- sprite_normal
- color_normal
- margin_normal
- sprite_over
- color_over
- margin_over
- sprite_in
- color_in
- margin_in
- sprite_out
- color_out
- margin_out
What? That’s way more than the 4 mentioned before. Well, a background still takes 5 values (a texturemode, a bordertexturemode, a sprite, a color and a margin), but it switches which values it uses. It chooses this by the mouse.
If the mouse is not over the object, than the background will use all the _normal values. If the mouse hovers over the object, but doesn’t click it then the _over values will be used. If the mouse hovers over the object, and clicks the object, then the _in values are used. The _out values can be ignored for now.
To setup all of these values, these functions can be used:
-
uiz_background_normal(instanceid, sprite, color, margin): Set the settings of the background when the mouse is not hovering over the object. (May be slightly different for different objects). The interpretation of each of the following values differ per script.
- instanceid: the instance id of the instance you want to modify
- sprite: What sprite the texturescript should use.
- color: What (blending) color the texturescript should use.
- margin: What margins the texturescript should handle.
-
uiz_background_over(instanceid, sprite, color, margin): Set the settings of the background when the mouse is hovering over the object. (May be slightly different for different objects). The interpretation of each of the following values differ per script.
- instanceid: the instance id of the instance you want to modify
- sprite: What sprite the texturescript should use.
- color: What (blending) color the texturescript should use.
- margin: What margins the texturescript should handle.
-
uiz_background_in(instanceid, sprite, color, margin): Set the settings of the background when the mouse is clicking the object. (May be slightly different for different objects). The interpretation of each of the following values differ per script.
- instanceid: the instance id of the instance you want to modify
- sprite: What sprite the texturescript should use.
- color: What (blending) color the texturescript should use.
- margin: What margins the texturescript should handle.
-
uiz_background_out(instanceid, sprite, color, margin): Set the settings of the background when it is in the "out" state. (Implementation is different for different objects and most objects never use this state). The interpretation of each of the following values differ per script.
- instanceid: the instance id of the instance you want to modify
- sprite: What sprite the texturescript should use.
- color: What (blending) color the texturescript should use.
- margin: What margins the texturescript should handle.
This way if we hover the mouse over our object, our color can change for example. Then when we click again, our color can change again. Here is an example in which we change the color of the checkbox to blue when the mouse hovers over it, and to red when the mouse clicks it.
EXAMPLE 30:
//initialize uiz
uiz_init()
//create our stringbox object
stringbox=uiz_c(obj_uiZ_stringbox)
//setup some variables
uiz_position(stringbox, 25,px, 0,uiz_center);
uiz_size(stringbox, 1,dp, 1,dp);
//fix our stringbox object.
uiz_fix(stringbox)

//create our checkbox object
checkbox=uiz_c(obj_uiZ_checkbox)
//setup some variables
uiz_position(checkbox, 375,px, 0,uiz_center);
uiz_size(checkbox, 1,dp, 1,dp);
uiz_setPoint_x(checkbox, uiz_right);
uiz_background_texturescript(checkbox, uiz_back_square);
uiz_background_normal(checkbox, 0, c_white, 0);//we need to call this function in order to set the margin to 0.
uiz_background_over(checkbox, -1, c_blue, -1);
uiz_background_in(checkbox, -1, c_red, -1);
//fix our checkbox object.
uiz_fix(checkbox)
This results in the mouse interacting like this:
 IMAGE 38
The color part was the easy to understand part, but what about the others?
There is not one single way that every background scripts implements/handles margins and sprites. Some background scripts will require a sprite with one image, while others would need 12 images or something. How these react to sprite and margins can be found in the manual in the page backgrounds. Just note that some objects also use the margin variables inside their own code. For example, the stringbox will not draw any text outside it’s given margin.
Sprite stitching is a term, and a way a background script can work. For example, a button might have seem like one single image, but it is in fact build up out of several sprites.
 IMAGE 39
When these different sprites are being combined into one sprite that is called "stitching" in uiz.
A texturemode is another thing you need to understand. It influences the way sprites are stitched together. There are 3 texturemodes:
- uiz_texturemode_fill
- uiz_texturemode_tile
- uiz_texturemode_tilefit
Let say we have a sprite of 16x16, and we want that sprite to fill an area of 30x30 pixels. We could stretch the sprite and “fill” out the area with one big sprite.
We could also choose to not stretch the sprite at all, meaning that for the width, we can fit one sprite in, and then still have 30-16=14 pixels left. We can just take 14 pixels in width of the sprite, and put it there. We are now only drawing this sprite partly. This approach is called “tile”.
Using uiz_texturemode_tile, we are cutting only 2 columns of pixels from the sprite. Two sprites almost fit, for this reason we can choose to cram 2 slightly resizes sprites into the space. Making each sprite 15 pixels wide, and thus filling the 30 pixels space without cutting any sprites off. This approach is called “tilefit”. Here is a picture showing the different texture modes:
 IMAGE 40
You might not need to fiddle around with all these values if you think the default background is ok, but considering you’re making a game, you might want to make a custom theme. So in that case, even which texturemode to use must be considered. Just set it for the object using:
-
uiz_background_texturemode(instanceid, sprite[uiz_texturemode_fill], [border[-1]]): Specifies how sprites should be drawn by the texturescript.
-
instanceid: the instance id of the instance you want to modify
-
sprite[uiz_texturemode_fill]: What this exactly means differs per texturescript. In most cases it determines the texturemode for sprites drawn across or in the middle of your background If border_texturemode is set to -1, the sprite_texturemode also says something about the border. Look at "texturemodes" for more info and pictures for each mode. These values can be given as argument:
- Fill will strech out the sprite.
- Tile will repeat the sprite where every pixel on the sprite will be a pixel on your screen.
- Tilefit will repeat the sprite, but it will make sure that no halves of sprites are used as can occur with the normal tile.
-
border_texturemode[-1]: This texturemode refers to the texturemode to use around the edge of your background. The exact implementation may differ per texturescript. This can be either uiz_texturemode_fill, _tile or _tilefit. For more info see the sprite argument or "texturemodes". Can also be -1 meaning that the texturemode of sprite_texturemode will be used.
-
Whats the difference between sprite_texturemode and border_texturemode? If you use circle stitch for example, your sprite exist out of two type of images, a lot of borders pieces, and one large center piece. You might want the border to be tilefit and the big middle to be fill. That's why there is a distinction. What's hard to explain about this is that every background type handles these values differently. You should therefore pay close attention to the wiki, and play around yourself.
A lot of times, when you don’t want to specify some values or just want to use default values, setting some variables to -1 will automatically handle it. This doesn’t work for every single variable, so it’s a good thing to read the manual article about backgrounds. Often, when you set variables to -1 for _over, and _in variants, they inherit their value from _normal.
That concludes stuff for this tutorial. This tutorial didn’t get into every single variable into detail and had way less example codes, so I do hope you understand everything, and are able to make your own backgrounds for uiz objects. (making your own background scripts will be covered in another tutorial) If you are left with any questions, please contact me.