Integration With The Actions on Google Smart Home Provider
"Actions on Google" (AoG) is a Google program for developers that allows for the development of actions/applications that interact with the Google Assistant, which is the "brain" that powers smart speakers like the Google Home, as well as smart phones. For more details visit the Actions on Google homepage (https://developers.google.com/actions/).
Actions on Google has a "Smart Home" component that allows anyone to integrate a "Smart Home" solution (like MisterHouse) with the Google Assistant. This component is called the "Actions on Google Smart Home Provider", and its documentation is available at https://developers.google.com/actions/smarthome/.
The Actions on Google Smart Home Provider relies on Google's Home Graph, which, according to https://developers.google.com/actions/smarthome/, is a "database that stores and provides contextual data about the home and its devices".
This page documents how MisterHouse can be integrated with the Google Assistant by using the Actions on Google Smart Home Provider.
Notes:
-
The images below might be hard to see because they are too small. They have been uploaded to the wiki at full size but the GitHub wiki is reducing them. To see a larger version just right-click on an image and select "View Image" or similar.
-
The MisterHouse code that allows integration of MisterHouse into the Actions on Google Smart Home Provider is still not officially part of MisterHouse. A pull request will be submitted if there is interest from other MisterHouse users so the official contributors can decide whether to add the code to the official repository. In the meantime, if you would like to try this code clone my fork of hollie/misterhouse and use the "actions_on_google_smart_home_provider" branch (my branch is following hollie's master). The link to my fork is https://github.com/peloy/misterhouse/tree/actions_on_google_smart_home_provider
The following figure shows how things work once MisterHouse has been integrated with the Google Assistant via the Actions on Google Smart Home Provider:
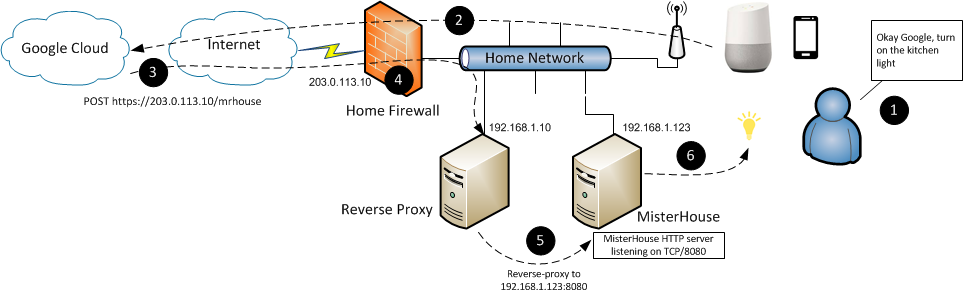
The above picture shows the steps involved when a user asks the Google Assistant to turn on a light. The steps are as follows:
-
The user asks the Google Assistant, running on a smart speaker like the Google Home, or on a smart phone, to turn on the light.
-
Because the Google Assistant has been previously integrated with MisterHouse via the Actions on Google Smart Home Provider, a command to "turn on a light" is a "built-in" action, which means that the device on which the Google Assistant is running does not need to "talk" to an external entity to be told how to handle the action. Instead, it handles the request by forwarding it directly to the Actions on Google Smart Home Provider.
-
The Actions on Google Smart Home Provider, which knows through the Home Graph database about devices in your house that MisterHouse can control, sends a command to turn on the specific light to a "fulfillment" URL that was specified during the setup process. In the above example, that URL is https://203.0.113.10/mrhouse.
-
The request from the Actions on Google Smart Home Provider reaches the Internet firewall in front of your home network. The Internet firewall is configured to forward all HTTPS (TCP/443) requests to an internal (on the private network) reverse proxy.
-
The reverse proxy at 192.168.1.10 receives the request and reverse-proxies it to 192.168.1.123:8080. 192.168.1.123 is the machine where MisterHouse is running, and 8080 is the TCP port on which the MisterHouse HTTP server is listening.
-
MisterHouse finally receives the request and turns on the right light.
The process does not end there, however -- after MisterHouse has received from the Actions on Google Smart Home Provider the HTTP POST that contains an "execute" action to turn on the light (and acted on it by turning the light on) it still needs to respond to that HTTP POST to indicate how the operation went. This process is shown in the following figure, and explained immediately after:
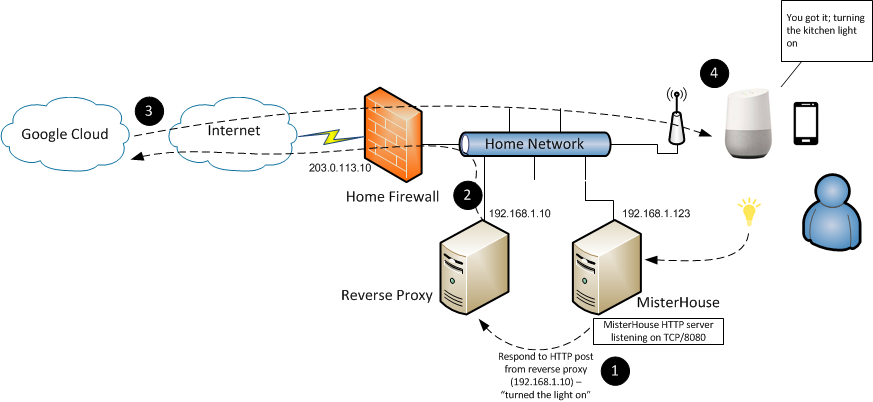
- MisterHouse generates a response to the HTTP POST. The contents of the response depends on what the request was. In the case of the example above (turning on a light), the request is an "execute" to turn on a light, so the response has to indicate if the operation was successful. That is used by the Actions on Google Smart Home Provider to provide feedback to the user, e.g. "Okay, turning the light on", or "There has been an error".
Because the incoming HTTP POST request was reverse-proxied, MisterHouse thinks that it is talking to the HTTP client at 192.168.1.10 (the reverse proxy), so the response actually goes back to the reverse proxy first, not directly to the Actions on Google Smart Home Provider.
-
The reverse proxy sends the response from MisterHouse to the Actions on Google Smart Home Provider. The home firewall is most likely doing Network Address Translation (NAT) so as traffic passes through the firewall, it is untranslated from the private address 192.168.1.10 to the public address 203.0.113.10.
-
The Actions on Google Smart Home Provider processes the response from MisterHouse and tells the Google Assistant what feedback to provide to the user.
-
The Google Assistant on the device that initially received the command from the user provides the feedback from the user.
And that's it; the process ends there.
Similar traffic flows happen for the other two types of requests that the Actions on Google Smart Home Provider can send -- "sync", and "query".
Not that it is very important from an end user point of view, but to provide a little bit of context, the Actions on Google Smart Home Provider can send three types of requests:
- "sync" -- it is used once, when the user links their Google account with their MisterHouse account, to obtain a list of devices controlled by MisterHouse.
- "query" -- the Actions on Google Smart Home Provider sends "query" requests to find out the state of a device. For example, if you ask the Google Assistant "dim the dining room light", the Actions on Google Smart Home Provider needs to know what the current dim level is because what it will send to dim the light is an absolute (not relative) dim level. So, before sending the command to tell MisterHouse to actually dim the light it sends a "query" command to find the current dim level.
- "execute" -- the Actions on Google Smart Home Provider will send "execute" commands to change the state of devices, for example, to turn on a light.
It is important to note a few points about the integration of MisterHouse with the Actions on Google Smart Home Provider, and about the process described in the previous section:
- There is always a request that comes from the "cloud" to finally activate (turn on or off) the light. The exchange is authorized, authenticated, and secure (encrypted over SSL/TLS), but if you have concerns with this arrangement then this solution is not for you. Instead, look at integration via MisterHouse's native Philips Hue emulation as a possible alternative. See this wiki page for details:
- MisterHouse does not support HTTPS, only HTTP, and Actions on Google fulfillment requests must take place over HTTPS. This makes it necessary to introduce a reverse proxy, like the Apache HTTP server, so the fulfillment request sent over HTTPS can be reverse-proxied to the port on which MisterHouse's HTTP server is listening (TCP/8080 in the above example).
There a couple of ways to set up the proxing mechanism. One involves the use of local reverse-proxy (the case depicted in the figure above), and another involves the use of ngrok (see the ngrok section below). In either case, if you are not comfortable setting up a proxing mechanism then this solution is not for you and you may have better luck with the native Philips Hue emulation mentioned in the previous point.
-
This solution requires creating a developer project at the Actions on Google Developer Console and using the Actions SDK (this is free and anyone with a Google account can do it). It also requires using your developer project in "test mode" because it is unlikely that Google will approve your project/application if you submit it for approval (nor would you want to see your integration with MisterHouse as a Google Assistant action that anyone can run). None of this is complicated, but it does require some configuration and effort on your part and there is a learning curve. It is pretty cool what can be done with the Google Assistant using your voice, though, so it is worth the effort.
-
In the figure above, the revese proxy and the machine on which MisterHouse runs are different. However, they can actually be the same machine, in which case communication between the reverse proxy and the MisterHouse web server takes place over the loopback (lo) interface, not over the network.
-
Response time: In my testing, response time has been very good -- after I say something like "hey Google, turn on the kitchen light", the "execute" request from Google (what tells MisterHouse to turn on the light) comes very quickly, and the light turns on before Google responds with "Okay, turning on the kitchen light" (MisterHouse actually tells Google in the response to the "execute" request that it has suceeded turning the light on, so a better response would probably be "Okay, I have turned on the kitchen light", but that is something for Google to improve).
The first thing you have to do is to create your developer project. Your developer project is what tells Google where to find your MisterHouse installation for the required account linking step, and later for the fulfillment requests (requests to get a list of devices controlled by MisterHouse, to get the state of one or more devices, or to set the state of one or more devices).
Start at the following page for instructions on how to create your developer project:
The following document, linked to from the previous page, also has good information on how to create your project:
https://developers.google.com/actions/sdk/create-a-project
An important piece of information that you need to provide is the "fulfillment" URL, which in the page linked to above is "https://example.com/google-assistant/endpoint". You need to think about how you will handle the fulfillment request that will come from the Actions on Google Smart Home Provider via HTTPS so it ends up being handled by the MisterHouse HTTP server. This involves port forwarding on your Internet firewall or router and the use of a local reverse proxy like Apache, or the use of ngrok.
The fulfillment URL is provided as part of the "action package", which is just a file in JSON format, and that is documented at the first page linked to above. The action package is later sent to the Google cloud when the command gactions update --action_package PACKAGE_NAME --project PROJECT_NAME is executed. (Note, you must download the gactions executable. It is available for download from https://developers.google.com/actions/tools/gactions-cli for Windows, Mac, and Linux.)
What follows is a few screenshots of what a sample project at https://console.actions.google.com looks like. The screenshots can be used as a reference for creating your own project.
First, the project overview page:
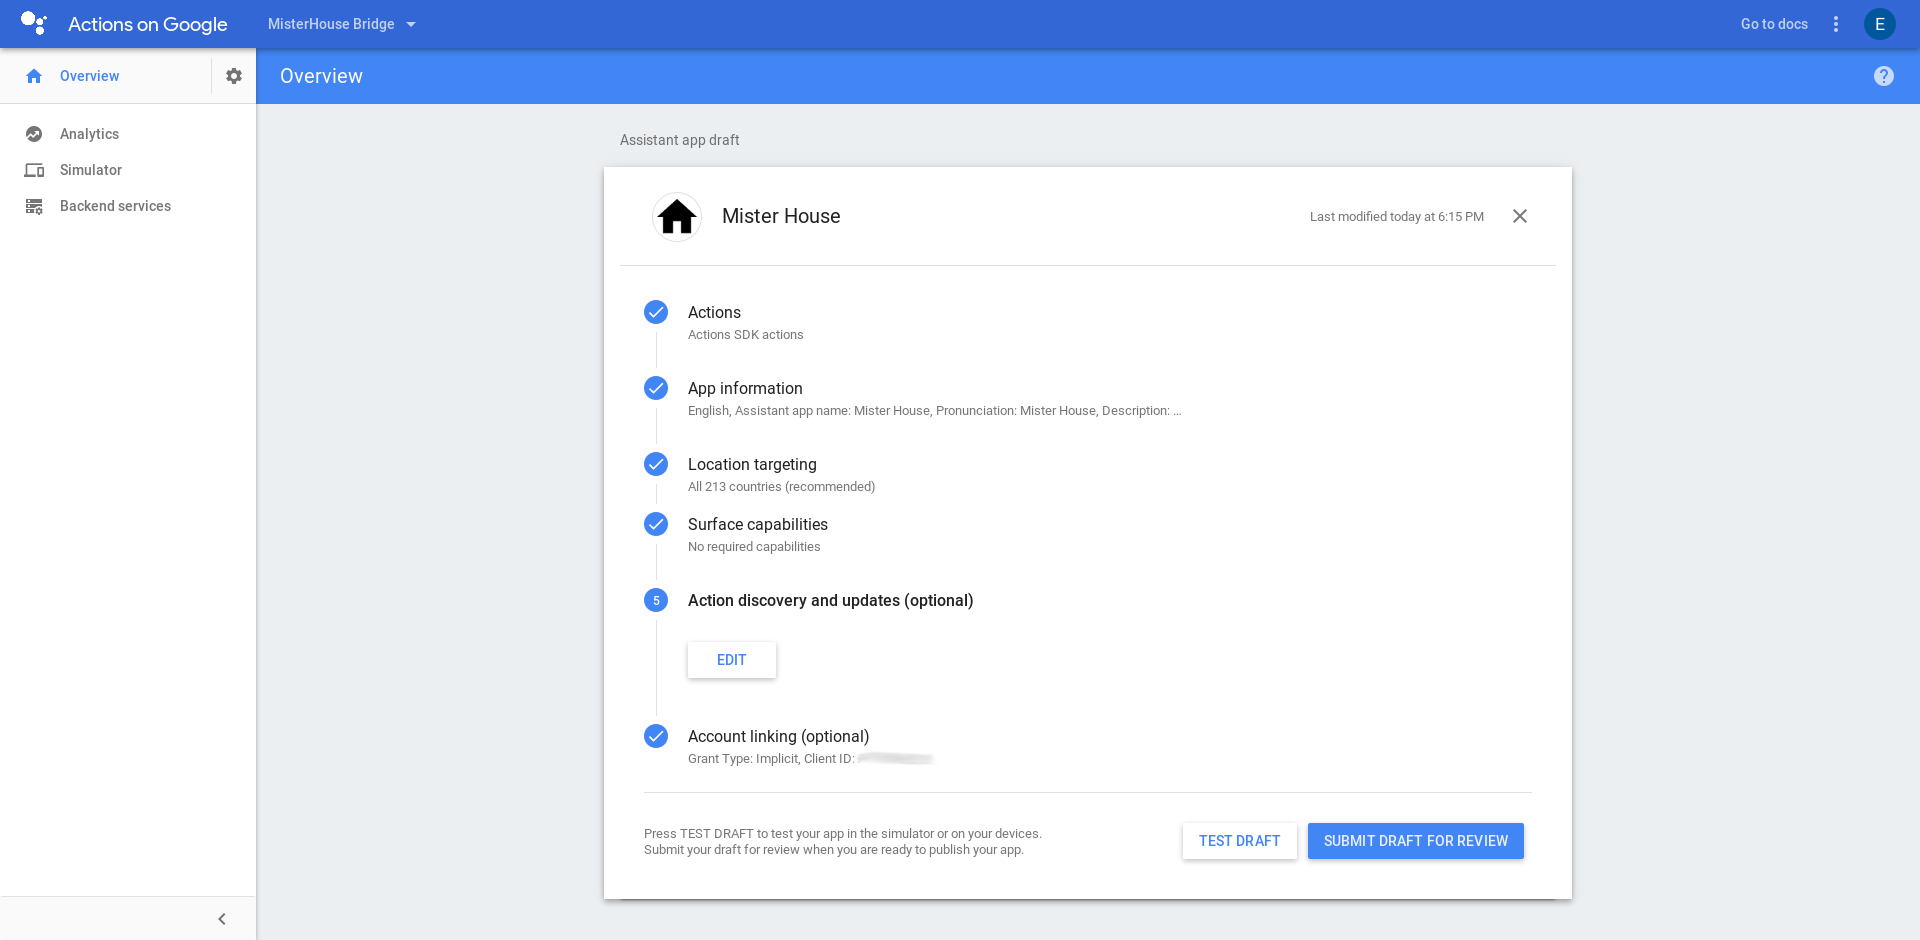
Make sure you visit each category. Some pieces of information are optional. The web application will tell you if you have not provided some mandatory information and you try to move away.
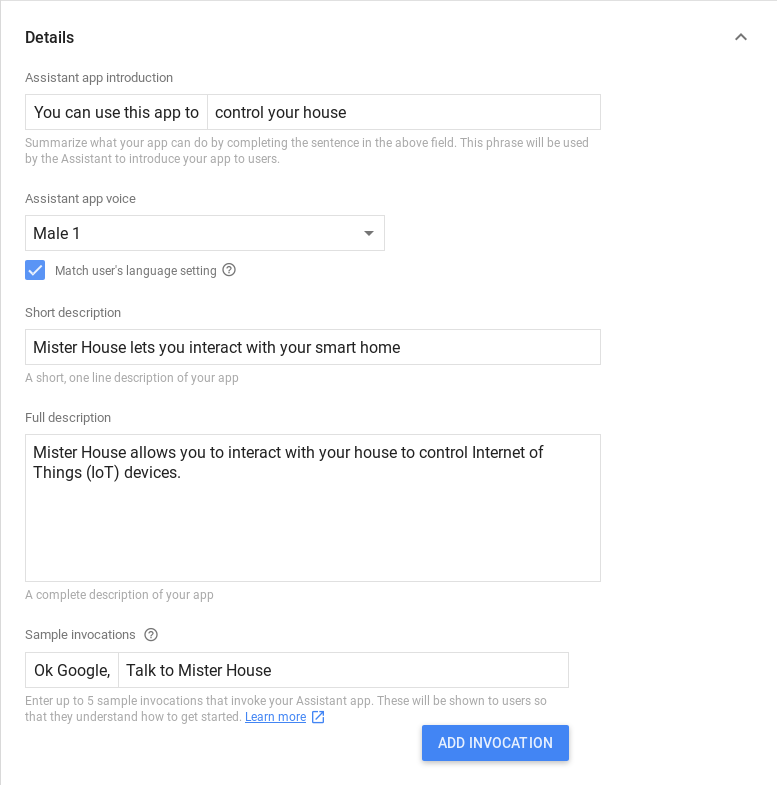
Next, the Overview -> App information -> Details page:
The Overview -> App information -> Images page:

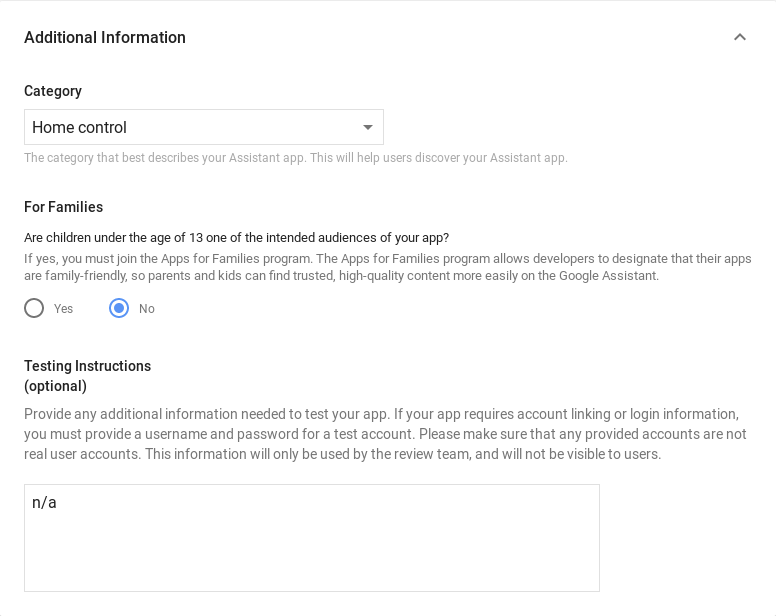
The Overview -> App information -> Additional Information page:
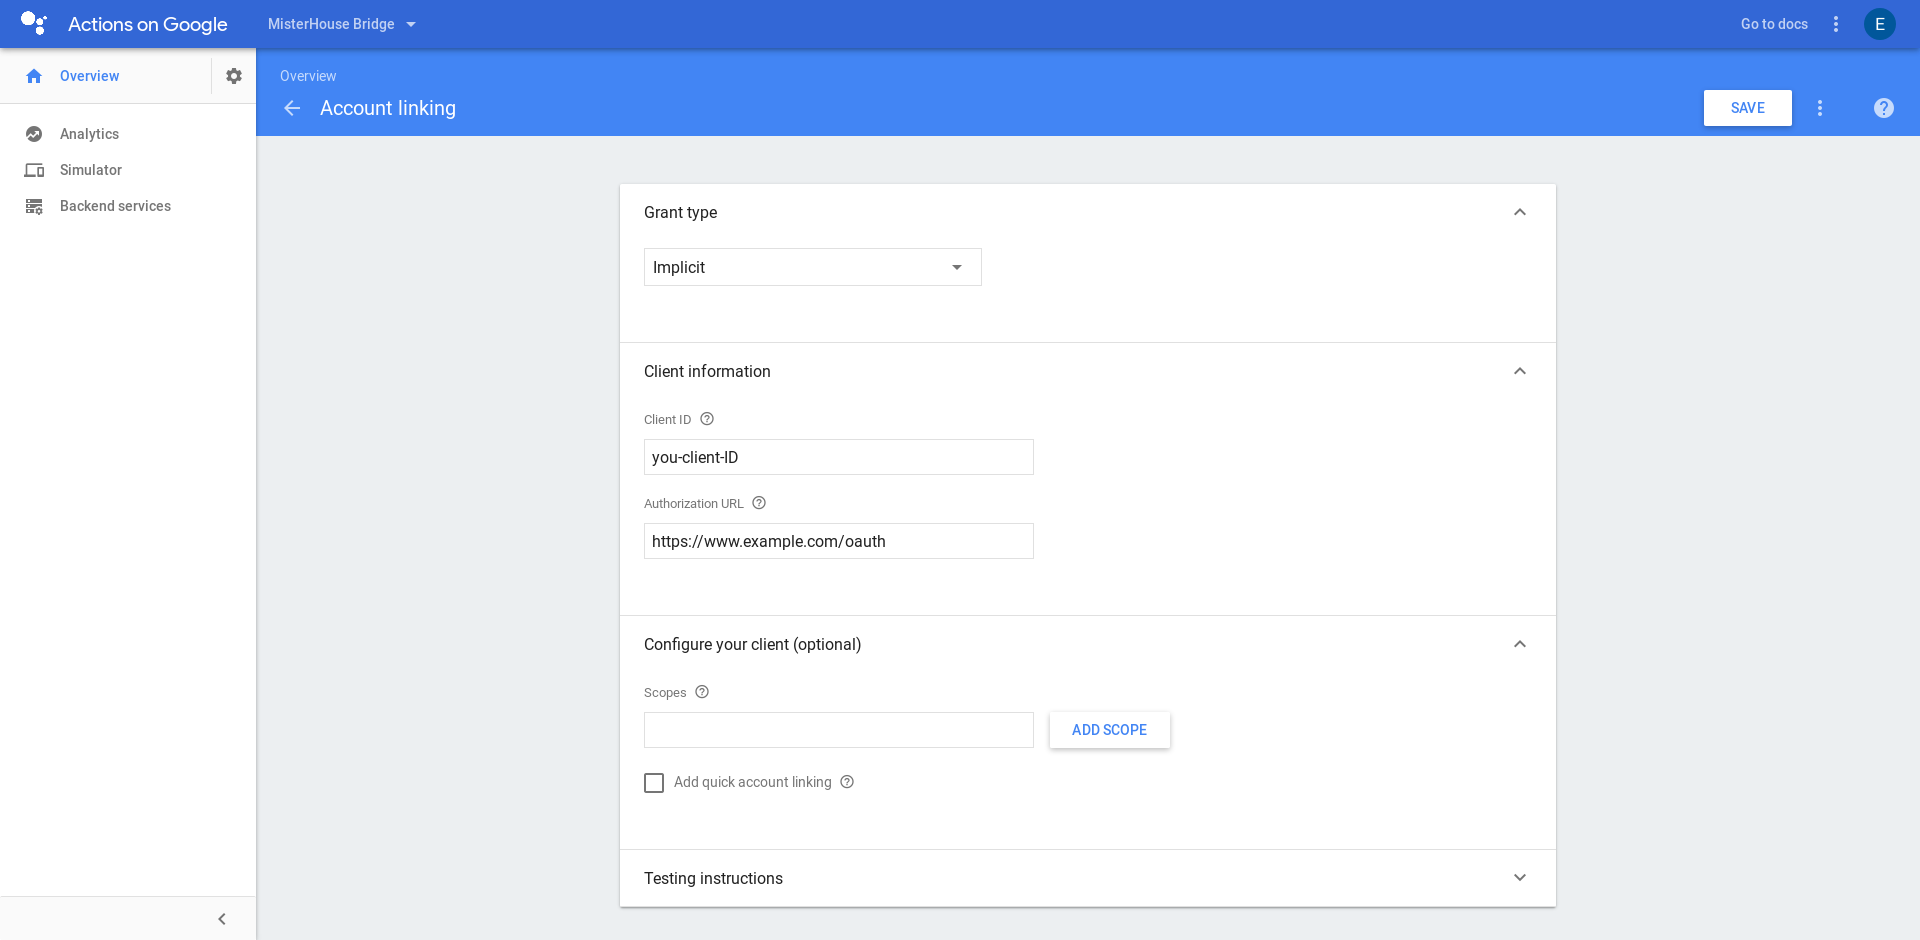
The Overview -> "Account linking (optional)" page is very important, and regardless of what the word "optional" in the link says, there is nothing optional about it -- it is actually required to be able to use the Actions on Google Smart Home Provider). On this page you configure the "grant type", which for the MisterHouse integration is "Implicit", the client ID (a random string that you come up with), and the authorization URL for account linking (which MisterHouse will handle). The "Account linking" page looks like this:
Clicking on the gear icon on the top left (right next to "Overview") will take you to the project's setting page, which looks like this:
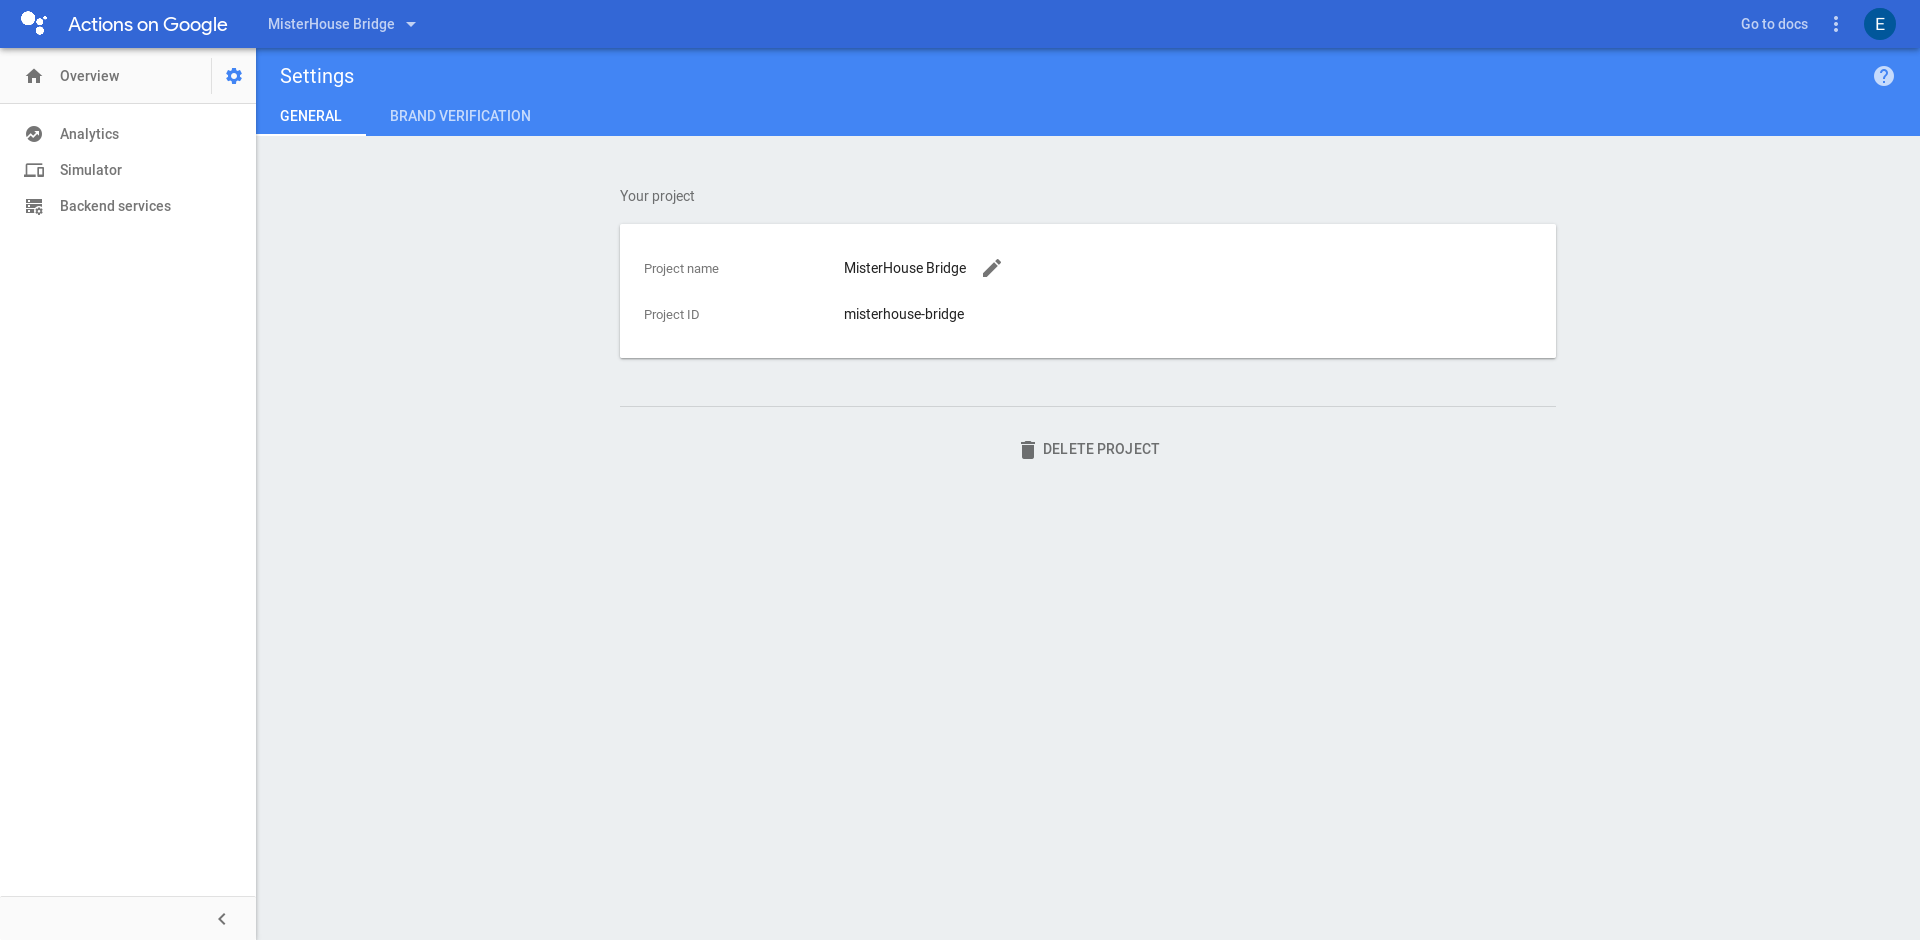
Of note on this page is the "Project ID" -- you will need this when you run the gactions command to let Google know about your project.
After you have created your developer project you need to configure account linking -- when you set up the integration of MisterHouse with the Google Assistant you need to authenticate, and after you authenticate, MisterHouse generates an "access token" that will be sent by the Actions on Google Smart Home Provider to MisterHouse with every request. MisterHouse checks this access token and only accepts requests that have a valid access token.
Account linking for the MisterHouse integration with the Google Assistant uses Open Authentication (OAuth) implicit flow. To set up account linking using OAuth implicit flow follow the instructions at the following page:
https://developers.google.com/actions/identity/account-linking#enabling_account_linking
The Actions on Google Smart Home Provider code in MisterHouse handles the OAuth pieces needed to be able to do account linking so you do not need to know the details of how OAuth with implicit flow works, but if you are interested in knowing, the following page has the gory details:
https://developers.google.com/actions/identity/oauth2-implicit-flow
A screenshot of the Account Linking page where the OAuth parameters are configured is shown in the previous section.
There are a few .ini file parameters that must be set up.
You also must tell MisterHouse what objects you want to expose to the Google Assistant. To do this you can add the devices via a .mht file, or via user code.
The following .ini file parameters must be set up. Most parameters have no defaults so they must be explicitly configured.
Note: All .ini file parameters start with "aog", which stands for "Actions on Google".
- aog_enable = 1
This enables the Actions on Google integration. It is basically a flag that is checked while handling an HTTP request to determine if the Actions on Google handler must run to look at, and handle, the request from Google.
- aog_auth_path = /oauth
This is the path that is configured on your Google developer project, in the Account Linking section as the "Authentication URL" parameters, for Open Authentication (OAuth). This can be anything, e.g. /authentication, /auth, /oauth, etc. but whatever is set here must match what is set in the Account Linking section -- the MisterHouse HTTP server will check the URI in the incoming request and if it matches the path set with this parameter then it will perform the OAuth workflow.
Also, if you are using a reverse proxy to proxy HTTPS requests from Google to the non-HTTPS web server in MisterHouse, then this parameter will come into play. For example, your Apache configuration would look like this:
    <Location /oauth>
        # For Actions on Google account linking
        ProxyPass http://www.example.com:8080/oauth
        ProxyPassReverse http://www.example.com:8080/oauth
    </Location>
- aog_fulfillment_url = /mh
This is the path that is configured in the action package for the fulfillment URL -- the MisterHouse HTTP server will check the URI in the incoming request and if it matches the path set with this parameter then it will handle the fulfillment request ("sync", "query", or "execute"). The path can be anything, e.g. /myhouse, /mrhouse, /mh, /smarthome, etc., but what is set here must match what is set in the action package.
Also, if you are using a reverse proxy then the reverse proxy will be configured to use this URI as well. For example, if you are using Apache as your reverse proxy, you will have a configuration similar to the following:
    # Actions on Google Smart Home fullfillment
    ProxyPass /mh http://www.chapus.net:8081/aog
    ProxyPassReverse /mh http://www.chapus.net:8081/aog
Note: The above two Apache configurations accomplish the same thing -- one puts the ProxyPassXXXX commands inside tags and specifies the path as parameter to the "Location" tag, and the other does not use the "Location" tags and specifies the path as part of the ProxyPassXXXX commands.
- aog_client_id = Come_up_with_a_random_string
The client ID is the OAuth2 Client ID that identifies Google to MisterHouse -- during the account linking process (see below), this client ID will come to MisterHouse in the OAuth request. MisterHouse will check that this client ID, which is configured in the "Account linking" page of the developer project overview, matches what is set in this .ini file parameter. If they do not match then the MisterHouse web server will return an error. This is only used during the OAuth/account linking process.
You must come up with a string for the client ID -- again, you must configure the client ID in the .ini file and in the Google developer project, in the Overview -> "Account linking (optional)" page (remember: it is not optional).
An easy way to generate the client ID on a Linux machine is by running this command:
shell$ dd if=/dev/random bs=1 count=16 2> /dev/null | base64
KoyE+VIgTy3h8OmM9qNdGQ==
Your client ID would be "KoyE+VIgTy3h8OmM9qNdGQ==".
I am not sure if they will work but it is prudent to avoid using whitespaces (tabs, spaces, newlines) in the client ID string.
- aog_oauth_tokens_file = $config_parms{data_dir}/.aog_tokens
The OAuth tokens file is maintained by MisterHouse and it contains an authentication token for MisterHouse users that link their accounts to the Actions on Google Smart Home Provider (typically it is just one user who links his/her account; there is no need for more). This parameter specifies the location of this file. The name and location of the file can be anything but what is shown above is a good value.
- aog_project_id = misterhouse-bridge
The project ID is used during the OAuth/account linking to validate the OAuth request. You obtain this parameter from the project's settings page. Whatever you configure here must match what is shown there. Otherwise, the MisterHouse HTTP server will return an error when handling the OAuth HTTP request.
You do not choose the project ID -- that is set by Google when you create your project; you just have to get the correct project ID by visiting the project's settings page.
- aog_agentuserid = mrhouse-myhouse
The agent user ID is optional, but it is recommended to be set -- it is sent with the response to the "sync" fulfillment request, and allows to send a request to Google's Home Graph to do a re-sync, i.e. request a list of devices without having to unlink and re-link the account in the Google app. You can use anything you want but when you send a re-sync request to Home Graph, whatever you set here must match what you send in the request. See the section "Re-Synchronizing" below for more details on on-demand sync requests.
The following contains sample .mht entries that expose certain MisterHouse items to the Actions on Google Smart Home Provider:
Format = A

#
# Actions on Google MisterHouse items.
#

#
# AOGSMARTHOME_ITEMS, <object name>
#
AOGSMARTHOME_ITEMS, AoGSmartHomeItems

#
# AOGSMARTHOME_ITEM, <object name>, <arg1>, <arg2>, <arg3>, <arg4>, <arg5>, <arg6>
#
# <arg1>: Real (MisterHouse) object name
# <arg2>: Friendly name
# <arg3>: Subroutine used to change the object state
# <arg4>: State mapped to AoG Smart Home ON command
# <arg5>: State mapped to AoG Smart Home OFF command
# <arg6>: Subroutine used to get the object state
# <arg7>: AoG Smart Home device properties
#
# AoG Smart Home device properties (arg7) is a colon-separated list of
# properties that will be sent to the AoG Smart Home Provider in the
# response to the SYNC request. For example:
#
# type=switch:room=Dining Room
#
# Currently only the 'type' and 'room' properties are supported.
#
# 'type' can be 'light', 'switch', and 'scene'. These values align with the
# same device types documented at:
#
# https://developers.google.com/actions/smarthome/guides/
#

AOGSMARTHOME_ITEM, AoGSmartHomeItems, appliance_linc, Appliance Linc, &set_if_needed, , , , type=Switch
AOGSMARTHOME_ITEM, AoGSmartHomeItems, outdoor_module, Outdoor Switch, &set_if_needed, , , , type=Switch
AOGSMARTHOME_ITEM, AoGSmartHomeItems, driveway_light, Driveway Light, &set_if_needed, , , , type=Light:room=Driveway
AOGSMARTHOME_ITEM, AoGSmartHomeItems, garage_hallway_light, Garage Hallway Light, &set_if_needed, , , , room=Garage Hallway
AOGSMARTHOME_ITEM, AoGSmartHomeItems, garage_light, Garage Light, &set_if_needed, , , , room=Garage
AOGSMARTHOME_ITEM, AoGSmartHomeItems, dining_room_light, Dining Room Light, &set_if_needed, , , , room=Dining Room
AOGSMARTHOME_ITEM, AoGSmartHomeItems, master_closet_light, Master Closet Light, &set_if_needed, , , , room=Master Closet
AOGSMARTHOME_ITEM, AoGSmartHomeItems, family_room_light, Family Room Light, &set_if_needed, , , , room=Family Room
AOGSMARTHOME_ITEM, AoGSmartHomeItems, foyer_light, Foyer Light, &set_if_needed, , , , room=Foyer
AOGSMARTHOME_ITEM, AoGSmartHomeItems, breakfast_light, Breakfast Light, &set_if_needed, , , , room=Breakfast
AOGSMARTHOME_ITEM, AoGSmartHomeItems, upstairs_hallway_light, Upstairs Hallway Light, &set_if_needed, , , , room=Upstairs Hallway
AOGSMARTHOME_ITEM, AoGSmartHomeItems, kitchen_light, Kitchen Light, &set_if_needed, , , , room=Kitchen
AOGSMARTHOME_ITEM, AoGSmartHomeItems, playroom_light, Playroom Light, &set_if_needed, , , , room=Playroom
AOGSMARTHOME_ITEM, AoGSmartHomeItems, front_porch_fan, Front Porch Fan, &set_if_needed, , , , type=Switch:room=Outside
AOGSMARTHOME_ITEM, AoGSmartHomeItems, front_porch_light, Front Porch Light, &set_if_needed, , , , room=Outside
AOGSMARTHOME_ITEM, AoGSmartHomeItems, kitchen_mode, Kitchen Mode, voice-cmd: everybody is in the kitchen, , , , type=Scene
AOGSMARTHOME_ITEM, AoGSmartHomeItems, christmas_lights, Christmas Lights
Notes:
- Note that for the "set" parameter for my lights I use a subroutine called "set_if_needed". The reason is that I use INSTEON and the regular "set" method of MisterHouse INSTEON objects sends a request to the device regardless of the state, i.e. if the light is on, a set('on') will still send the command to the light, which generates unnecessary INSTEON network traffic. The set_if_needed() subroutine will call the "set" function only if the requested state is different than the actual state. This is usually perfectly fine, and a welcome optimization, because INSTEON is (usually) very reliable and tries hard to get a command to a device (re-transmitting commands if necessary), so the state that MisterHouse keeps is normally the actual state of the device. My set_if_needed() function is shown below (I believe set_if_needed() should be a method of the INSTEON objects in MisterHouse so perhaps I'll submit a patch for that, but I digress).
- If you do not use INSTEON, or if you do not want to use my set_if_needed() function, you need to remove "&set_if_needed" -- leave the field blank (but maintain the same number of commas), or replace "&set_if_needed" with "set" (note that it is "set", not "&set"). Leaving the field blank, or explicitly putting "set" in, will cause the object's set() method to be used to set the state of the object.
- If you do want to use my set_if_needed() function to avoid having MisterHouse perform unnecessary actions then leave "&set_if_needed" in your AOGSMARTHOME_ITEM lines and add the actual function (shown below) to one of your user code files. Otherwise you will get an "Undefined subroutine: main::set_if_needed" error when the Actions on Google Smart Home Provider sends MisterHouse an "execute" fulfillment request.
#
# Change the state of a device only if the device is not in that state
# already.
#
sub set_if_needed($$$)
{
    my ($device, $newstate, $setby) = @_;
    my $msg;

    $msg = "set_if_needed(" . $device->get_object_name() . ", $newstate, \"$setby\")";

    if ($device->state() eq $newstate) {
        print_log("$msg: state is already " . $device->state() . "; not updating.");
    } else {
        print_log("$msg: state is " . $device->state() . "; changing state.");
        $device->set($newstate, $setby);
    }
}Follow the instructions at the following page to deploy and start testing your project:
https://developers.google.com/actions/smarthome/testing-deploying
The actual command that you need to run to deploy (in test mode) your project to devices (Google Home smart speakers, smartphones) linked to your Google developer account will be something like this:
shell$ gactions test --action_package action.json --project misterhouse-bridge
"action.json" is a file that has this content:
{
    "actions": [{
        "name": "actions.devices",
        "deviceControl": {
        },
        "fulfillment": {
          "conversationName": "automation"
        }
    }],
    "conversations": {
        "automation": {
            "name": "automation",
            "url": "https://www.example.com/mh"
        }
    }
}
"https://www.example.com/mh" is the "fulfillment URL" -- the Google cloud will make an HTTP POST over HTTPS to tell MisterHouse what to do, i.e. one of three things: "sync" (get a list of devices), "query" (ask for the state of a device), or "execute" (set the state of a device).
"misterhouse-bridge" is the project ID. You get that from the "Settings" screen (see screenshots in the previous section).
Note that you will not be deploying your project for everybody to see as that requires submitting your project/application for formal review and approval. Instead, you will be "testing" your project, which actually deploys the application for "private" use on your devices (smart speakers and phones).
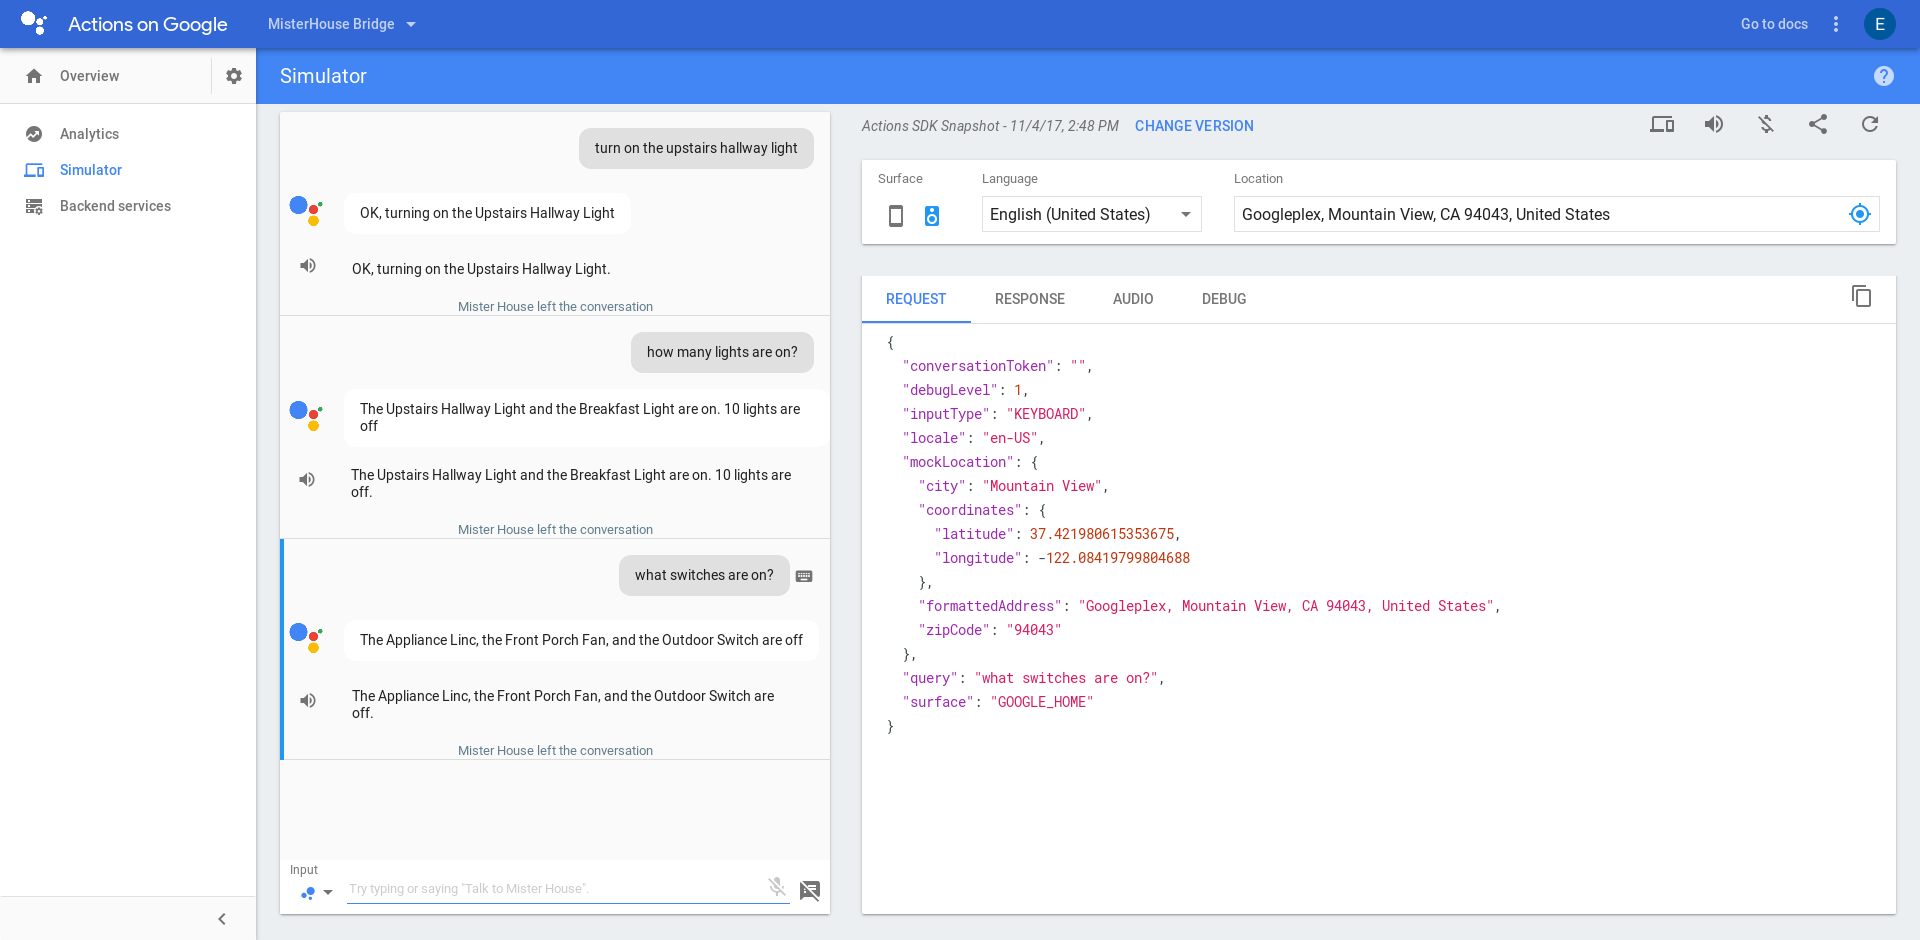
At this point you can do some testing using the Actions on Google Simulator: You get to it from https://console.actions.google.com/ -- it will be in the menu on the left, under "Simulator". Here is a screenshot:
Note: The Actions on Google Smart Home Provider FAQ page says that the gactions test command must be run at least once in a three-day period to prevent the project from disappearing from the list of services in the "Smarthome Control" section of the Google app. See https://developers.google.com/actions/smarthome/faq. To accomplish this you will want to run gactions from a cron or systemd job. You could even use a MisterHouse trigger for this.
After your project has been deployed in testing mode, and after you have configured MisterHouse to interact with the Google Assistant via the Actions on Google Smart Home Provider you need to tell the Google Assistant about your devices. This is done from either the Google Home app on a smartphone or tablet, or from the "Settings" pages of the Google app (also on a smartphone or tablet).
Detailed instructions on how to set up the Google Assistance on smartphones to interact with your MisterHouse project are available at the following location:
https://support.google.com/assistant/answer/7540702
Detailed instructions on how to set up the Google Assistance on smart speakers (like the Google Home) to interact with your MisterHouse project are available at the following location:
https://support.google.com/assistant/answer/7540703
Use the previous two links for detailed instructions but, at a high level, the process goes like this (when using the Google app; the process is similar when using the Google Home app):
- Open the Google app
- Tap on the "hamburger" menu at the bottom (varies by version)
- Select "Settings"
- In the "Google Assistant" section, tap on "Settings"
- Scroll down and tap on "Home control"
- Click on the blue circle with a plus ('+') sign
- You will see a list of services that you can choose from. If you set up your project correctly, and deployed it with the "gactions test" command mentioned above, you should see your project in that list of services -- it will be something like "[test] Mister House" (the name of the service is something you control via the "App information" page of the project; see above).
- Tap on your service -- that will kick off the account linking, i.e. your MisterHouse account will get linked to Google's Home Graph and an access token will be generated. All this is handled by MisterHouse. You will be redirected to a MisterHouse-generated page where you have to enter your MisterHouse credentials. (Patches to improve the look and feel of this page are welcome.)
- If everything goes well all the devices you have exposed to MisterHouse via AOGSMARTHOME_ITEMS as described above will show up in the app.
At this point you will be able to control MisterHouse items via the Google Assistant. Some examples of what you will be able to tell the Google Assistant are:
- Turn on/off [light name].
- Turn on/off all of the lights.
- Turn on/off lights in [room name].
- Dim the [light name].
- Brighten the [light name].
- Set [light name] to 50%.
- Turn on/off the [outlet name].
- Turn on/off the [switch name].
- What lights are on?
- What switches are on?
- Activate [scene name] (for example, I have a scene called "kitchen mode" that turns off all the non-kitchen lights. We can say "activate kitchen mode", or "turn kitchen mode on", and the Google Assistant will ask MisterHouse to run voice command that puts the house in "kitchen mode". This is a good way to easily change MisterHouse modes, i.e. "activate away mode", "activate night mode", etc.)
See this page for additional details and examples: https://support.google.com/assistant/answer/7314909?hl=en
You can use your voice (smartphone or on smart speaker like the Google Home) to send commands. You do not even have to be at home to send commands (as long as you have a smartphone or tablet with you). A nice additional benefit is that you can send commands by typing on the on-screen keyboard of your smartphone or tablet; here's a screenshot (ignore the broadcast bits; I was just messing with the little ones at home):

If you make changes to your .mht file (like adding, removing, or renaming devices), those changes will not be automatically propagated to Home Graph. Instead, you have to do one of two things:
- From the Google app on your smartphone or tablet, unlink the MisterHouse account and then re-link it -- this will cause a new "sync" request from Home Graph to MisterHouse to be sent, which will then cause MisterHouse to send the latest list of devices in the .mht file.
OR
- Send a request to Home Graph to perform an on-demand "sync". This does not require unlinking the account and works well, but it requires obtaining an API key (a one-time operation). Once you have the API key all it takes is an HTTP request, which can be done with
curl:
shell$ curl -i -s -k -X POST -H "Content-Type: application/json" \
  -d "{agent_user_id: \"your-agent-ID\"}" \
  "https://homegraph.googleapis.com/v1/devices:requestSync?key=your_API_key_goes_here"
The details on how to obtain the API key, etc. are documented here:
https://developers.google.com/actions/smarthome/create-app#request-sync
Note: "agent_user_id" is specified via the "aog_agentuserid" .ini file parameter. See the .ini file section above for details.
The Actions on Google Smart Home Provider is in its very early stages -- Google is still in the process of developing this "API" and adding new device types and device traits to it.
The list of supported device types is available at:
https://developers.google.com/actions/smarthome/guides/
And the list of supported device traits is available at:
https://developers.google.com/actions/smarthome/traits/
You will notice that there are no device types to represent common things like doors and blinds; hopefully they will be added soon.
The integration of MisterHouse with the Actions on Google Smart Home Provider is also in its very early stages. Some additional work will be needed to expose more MisterHouse items to the Actions on Google Smart Home Provider.
If you do not have reverse proxy software like Apache that is reachable from the Internet, using ngrok (https://ngrok.com/) is an easy alternative to getting the HTTPS requests from the Actions on Google Smart Home Provider to MisterHouse's HTTP-only web server.
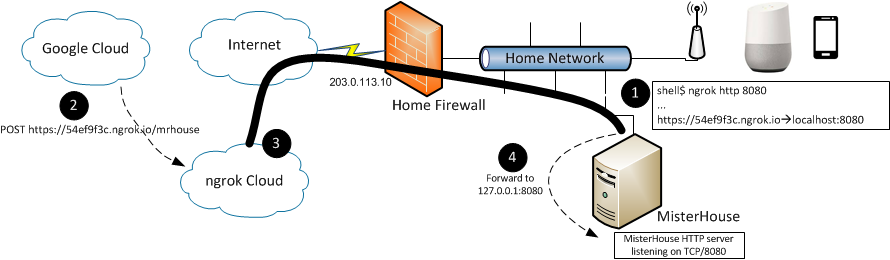
When using ngrok, the traffic flow changes slightly from the flow that takes place when using a reverse proxy (depicted in the first figure above). The ngrok traffic flow is shown in the following figure, followed by an explanation of the steps involved:
-
The user runs the
ngrokexecutable on the machine where MisterHouse is running. This will cause a tunnel to be built between the machine and the ngrok cloud, which is represented by the tick black line in the figure above.ngrokwill print out a message that indicates the HTTPS termination point. In this example, that termination point is https://54ef9f3c.ngrok.io. HTTPS connections to 54ef9f3c.ngrok.io will end up on the machine where ngrok is running and then forwarded to 127.0.0.1:8080 (the 8080 is a parameter provided duringngrokinvocation; see below), which is where the MisterHouse HTTP-only web server is listening. -
At some later point, when the Actions on Google Smart Home Provider needs to talk to MisterHouse, either as part of the account linking process (the OAuth workflow), or to send a fulfillment request, it will send the request to https://54ef9f3c.ngrok.io.
-
The ngrok infrastructure receives the request from the Google Smart Home Provider and sends it across the tunnel to the machine where
ngrokis running. -
ngrokreceives the request and forwards it to 127.0.0.1:8080, where the MisterHouse HTTP server is running. MisterHouse then receives the request and acts on it.
In terms of specific instructions, to use ngrok, you would download the executable from https://ngrok.com/ and run it (on the same machine where MisterHouse runs) like this:
shell$ ./ngrok http 8080
Note: 8080 is the port on which the MisterHouse HTTP server is listening. ngrok will set up a tunnel between the machine on which it is running (which should be the same machine on which MisterHouse is running, or you will have to set up another reverse proxy, which defeats the purpose of running ngrok) and the ngrok infrastructure. Google will send the OAuth and fulfillment requests to the ngrok infrastructure, which in turn will use the tunnel to forward the request to the port specified in the ngrok program invocation.
ngrok will produce output like the following:
ngrok by @inconshreveable                                                      (Ctrl+C to quit)

Session Status                online
Version                       2.2.8
Region                        United States (us)
Web Interface                 http://127.0.0.1:4040
Forwarding                    http://54ef9f3c.ngrok.io -> localhost:8080
Forwarding                    https://54ef9f3c.ngrok.io -> localhost:8080

Connections                   ttl     opn     rt1     rt5     p50     p90
                              0       0       0.00    0.00    0.00    0.00
The https "Forwarding" URL ("https://54ef9f3c.ngrok.io" in the example above) is important -- when you specify the "Authorization URL" in the "Account linking" page of the project's overview, and when you specify the fulfillment URL in the action package, you must use this URL with the OAuth and fulfillment paths appended to it, e.g. "https://54ef9f3c.ngrok.io/oauth" and "https://54ef9f3c.ngrok.io/mh", respectively, if "aog_auth_path" is set to "/oauth" and "aog_fulfillment_url" is set to "/mh" in the .ini file.
Using ngrok makes the set up a lot easier. One downside is that the entire MisterHouse web server is exposed to the Internet over HTTPS through the tunnel to localhost that ngrok creates. When using a reverse proxy you limit what is exposed by only proxying the OAuth and the fulfillment URIs.
The "aog" debug attribute will cause the MisterHouse AoG code to generate useful debugging information. This information is sent to the standard error I/O stream, so look there (and not in the print log) for them.
A value of 3 (debug = aog:3 in your .ini file) will generate debugging information at the highest verbosity level.
Here's an example of the debug messages generated with "aog" enabled at level 3:
[AoGSmartHome] Debug: Processing fulfillment request.
[AoGSmartHome] Debug: fulfillment request has correct token 'xxxxxxxxxxxxxxxxxxxx' for user 'admin'
[AoGSmartHome] Debug: set_state(uuid='11', state='on', name='Upstairs Hallway Light' realname='$upstairs_hallway_light' sub='CODE(0x65be050)')
[AoGSmartHome] Debug: running sub CODE(0x65be050)(set, on)
11/17/17 08:17:18 AM set_if_needed($upstairs_hallway_light, on, "AoGSmartHome"): state is off; changing state.
11/17/17 08:17:18 AM [Insteon_PLM] DEBUG2: Sending obj=$upstairs_hallway_light; command=on; extra=00 incurred delay of 0.00 seconds; starting hop-count: 3
11/17/17 08:17:18 AM [Insteon::BaseObject] $upstairs_hallway_light::set(on, AoGSmartHome)
[AoGSmartHome] Debug: action.devices.EXECUTE response:
{
 "requestId": "7200031305856772185",
 "payload": {
  "commands": [
   {
    "ids": ["11"],
    "status": "SUCCESS"
   }
  ]
 }
}
[AoGSmartHome] Debug: end of response.
Note that AoG debug messages start with "[AoGSmartHome] Debug:" so they are easy to identify.
In no particular order:
-
Right now we use a "fire and forget" approach when responding to "execute" commands from the Actions on Google Smart Home Provider -- for example, we send the command to turn on or off a light but don't check that the command succeeded. Not only that but we tell the Actions on Google Smart Home Provider that we actually succeeded so that is lying. We should find a way to wait for a few seconds (configured by the user) until we have confirmation that the command succeeded, and then and only then, respond to the "execute" request with the status of the operation. This way the Google Assistant will tell the user what really happened, e.g. "Okay, I have turned on the light" or "Sorry, there was an error turning on the light".
-
Add more device types that can be exposed to Home Graph. Right now we only support lights, switches, and scenes.