Microphone Transceiver
Checking Portapack-Havoc repository , we can see , that this excellent app was initially developped by Furrtek in 2017.
- "Microphone FM transmit with CTCSS", providing support to Narrow Band FM Transmitter + CTCSS & Receiver in Half Duplex operation, like a walkie-talkie (two-way directional voice communication but one at a time).
Later on , thanks to many other great sw developers , gradually it has been added many more nice functionalities (VOX control, Roger Beep,...) ,and improving it day by day ... And from Sept -2020, it was also added the support of multi analogue mic Modulation types in half duplex TX / RX, highly appreciated specially by all ham amateur radio community. Those mod types are widely used in LF, HF , VHF, 2m band , maritime communications ,airport airband communications, UHF PMR446,... And since them we are currently supporting those following ones (valid from , Nightly Release - 2022-10-17 onwards) :
- Narrow and normal band FM (NBFM/FM),
- Wide band FM (WBFM),
- Double side band AM with carrier,(DSB-C,AM),
- Upper Side Band (USB),
- Low Side Band (LSB)
- Double Side Band with suppressed carrier (DSB-SC).
-
VU-meter: Just launching that Mic App, the left side peak audio VU-meter is active, and you can plug your head mic set and confirm its sensitivity and correct operation. The sensitivity of the microphone is shown on the lefthand side of the LCD screen, and should be configured so the range is green for most of the audio and never hits red to limit over deviation of the signal. Note, this feature is not working once we activate below "Rx audio listen" ; but in any case, when pressing PTT, in TX mode, it always works.
-

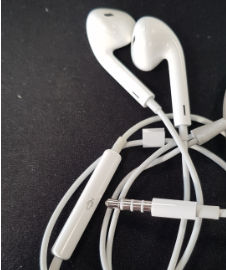
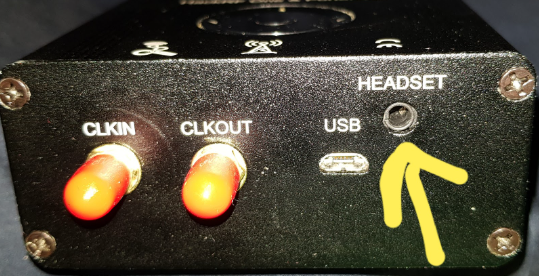

- MIC. GAIN: Cursor selection and use rotary encoder is used to select a fixed gain of x0.5, x1.0, x1.5, x2.0. The setting needs to be selected based, on the Microphone used which is connected via the Headset/ Microphone socket (standard smartphone 4 segment 3.5mm connector).
That mic gain adjustment is in fact a post scaling by above factors (x0.5, x1.0, x1.5, x2.0) , of each captured mic voice data . Then ,that adjustment should be only used,to make mic gain fine tuning of the non distorted voice . But if the captured data is already distorted , due to too much mic sensitivity , or to close mic-mouth distance, or too loud voice , the ADC saturation , should be addressed by other means (ALC or Boost adjustment (*1) , or increasing mic-mounth cms distance , or reducing the voice loudness.)
If you want to know the audio codec IC of your Portapack board, you do not need to dissassembly the boards, just go to the "debug" -> peripherals menu , and you will see which peripheral device, you can explore, looking its register map values. In the audio block icon , you will see the audio codec IC name , mounted on your Portapack board : AK4951 or WM8731. (see annexed photo of both two devices)


Automatic mic Level Control "ALC" (AK4951 sound codec IC) or "Boost" pre-amplifier mic control adjustment (WM8731 audio codec IC) : (*1)
To minimize that mic ADC saturation (and consequently, audio distortion , and spectrum harmonics radiation), we introduced ALC(AK4951) and Boost(WM8731) control options.


With proper adjustment , we can solve that mic ADC saturation, and adapt correctly to our mic gain sensitivity , and the distance mic-mouth from the speaker , and the user voice loudness ... That proper settings , can be done, selecting the best ALC or Boost option (checking that the mic voice sound Vumeter (left mic volume peak bar indication) is below 80-90%, in the green area, see annexed pictures ) (example LSB with low modulation index)
-
- ALC Automatic mic volume Level Control (available in Portapack boards that uses AK4951 audio codec platform) : With those "ALC" GUI options, user can adjust from +12 dB's to -12 dB's mic gain. For instance , if we want ,to talk , like handsfree mode , and pick up all the voices and sounds inside our room (from 50 cms till several meters distance from the mic, we can select +12 dB’s ) , If we want to talk around 15 to 20 cms , we can select +0dB’s or -3dB’s depending on the loudness of our voice … If we want to avoid saturation when shouting , or talking touching the mic with the lips , you can reduce it til -9, -12 dB’s If you leave the default OFF settings , you will have exactly same Mic settings as in previous Mayhem FW versions <=1.4.3 , without activating any digital ALC block of in the AK4951. When we saiy , “OFF - 12Khz” it just means that the audio base band output from the IC 4951 has this initial max bandwith, but obviously ,later , when it is post-processed and used for modulation , it is also reduced it. We tried to use and combine several nice programmable digital features, like , ALC , Wind Nose Filter, LPF , and boosting peaking Equalizer, and also Pre-amp mic level. Ex. +12dB-6Khz , means activated ALC with maximum gain of 12dB’s and with digital Low Pass Filter of 6kHz .


-
- Boost mic (in Portapack boards that uses WM8731 audio codec platform) :
With those "Boost· GUI options, user can adjust from +12 dB's to -08 dB's mic gain. We have added five user "Boost" options , activating on/off , the mic-boost pre-amplifier (+20 dB's) and playing with internal captured data, to allow smaller steps. In order to avoid mic distortion, We only recommend to use the pre-amplifier boost on , when we are using low sensitivity mics or when we are keeping some distance (example >15 cms) to the mic :


We also added several new features : a new check box (next to Roger beep) to the user to be able to select Separated (default) ) / Common freq. RX tuning control respect TX freq., another one "Hear Mic" (see attached new updated GUI pictures), and small new TX feature, new GUI about IQ TX phase calibration adjustment . (It is in the bottom right part of the screen) : "TX-IQ-CAL", and a TXBW selection in SSB mode :

-
F: This field set the TX Frequency for the transmitter. Use encoder dial to adjust by Step value (uses a default step value, or step value saved in SETTINGS\tx_mic.ini file if "Load App Settings" is enabled). A long press of the Select button allows adjusting frequency digits individually.
-
F_RX: This field set the RX Frequency for the receiver.
-
TXBW: This field sets the FM BandWidth of the transmission under normal conditions from 0-150 kHz. (In fact,in FM mode it is the +/- FM deviation in Khz that we will apply to the modulator.). Recently , also in SSB mode (USB or LSB) , we allow to the user to set up audio baseband BW to be transmitted (2KHz, 3kHz). (sse annexed example spectrum)

-
GAIN: Is set for TX LNA(IF) and (0-47)
-
AMP: RF TX amplifier , 0dB or 14dB.
-
MOD: to set the selected analogue TX & RX modulation type : NFM-FM // WFM // AM // USB // LSB // DSB
- Narrow band FM (NFM-FM) TX ,and supporting NFM-FM RX : BW: 8K5 (8K50F3E) , 11Khz (11K0F3E) ,and FM RX BW :16Khz (16K0F3E)
- Wide band FM (WBFM) TX , and supporting WFM RX of the following BW: 200kHz (Emissions Designator 200KF3E), 180khz and 40khz (see more details below)
Amplitude Modulation (AM) TX fixed to the standard AM-6K00A3E, but supporting AM RX with two selectable receiver bandwidth filters, BW : 9 and 6kHz (covering both side lateral bands, AM DSB with carrier AM-9K00A3E / AM-6K00A3E)
Upper Side Band (USB) TX , supporting USB RX with BW : 3kHZ (SSB-3K00J3E)
- Lower Side Band (LSB) TX, supporting LSB RX with BW : 3kHZ (SSB-3K00J3E)
- Double Side Band with suppressed carrier (DSB), supporting DSB RX with BW : 6 kHZ (covering both side lateral bands)
- TX Activation: Field can be selected for one of three settings. Off, PTT, AUTO. In the PTT setting, the PortaPack will transmit when the TX button and the bottom of the App screen is pressed on the touch screen. The AUTO is also known as a VOX control (automatic PTT transmission activated by voice). In AUTO the Receiver section below ("Rx audio listening") is not available , but the triggering is set by the following 3 settings.
- LVL: The level that triggers the transmission is set by the audio level going over the threshold value set (0-255). This can be seen as a grey dash marked next to the vu-meter and shows its current setting compared to the microphone level.
- ATT: This is the attack time of the microphone audio level must be above the set threshold to start transmitting (0 to 999mS). Higher attack helps avoid false triggers but might cut off the first words you say.
- DEC: This is the decay time of the microphone audio signal falls below the threshold level be for the transmission is stopped (0 to 9999mS). Lower decay avoids silence at the end of the message but might cut you off in the middle of a sentence. Adjust levels depending on your speaking habits.
-
TONE KEY (CTCSS) : Continuous Tone-Coded Squelch System or CTCSS is one type of in-band signaling that is used to reduce the annoyance of listening to other users on a shared two-way radio communication channel, sometimes referred to as tone squelch.
-
Note1 the level of the Tone % compared to the Microphone setting is set in Options >Audio.
-
Note2, that feature is only available in both FM modes (NFM-FM / WFM).
-
Check box Roger beep: This tick is activating an ending sequence of six consecutive digital synthesized audio tones , to indicate that the operator has concluded speaking.
-
Note: that feature is not available in SSB modes (USB , LSB)
-
Check box Hear Mic: This feature will allow to the user to check his Mic through the combined headphone and mic headset , without the need to use an additional receiver.It works for both Portapack audio codec platforms : AK4951 / WM8731 . You can adjust the Mic sound volume with the same below receiver VOL .
-
Notes: to avoid user confusions, that audio sound feature is disabled when user selects to hear the receiver demodulated sound . In both audio codec platforms, when clicking that “Hear Mic” , we are changing the default pre-setting ALC or BOOST option to the best that has maximum audio codec volum sound …
-
Check box F = F_RX: (Added from [Nightly Release - 2023-04-05] It allows to the user to select Separated / Common tuning frequency from Receiver(RX) to the Transmitter(TX). Once is marked , we have a common same frequency (F = F_TX) and therefore, to not confuse to the user , we hide the bottom independent F_RX field . (as you could see in the two above GUI pictures)
-
Check box RX audio listening: The Tick box to select this item is difficult to select with cursor having to go down and up though item, and with some luck you may enable the box. It is better to select from the touch screen. If this is enabled then it will turn on the Audio Receiver and with the following setting will allow you to listen to a receive channel when not transmitting. The TX-RX timing gap is not known. The frequency can be set separately or Common to that of the transmitter section above. The following setting can be applied to the receiver.
-
Note : this feature is not available when we are in AUTO VOX control .
-
VOL : Audio receiver volume control.
-
RX BW: This GUI option , allows several analogue demodulation options :
in NFM-FM mode to set up the receiver Bandwidth setting. It can be set to either
- 8k5kHz- NFM (delta FM deviation +/- 1,25 khz, FM index modulation:0,4)
- 11Khz - NFM (delta FM deviation +/- 2,50 khz, FM index modulation:0,75)
- 16kHz - FM (delta FM deviation +/- 5,0 khz, FM index modulation:1,6)
In WFM mode
- 200Khz FM bandwidth , for commercial FM stations with soft band pass transition. And recently also added the bandwiths BW: 180khz and 40khz (that last one, mainly for NOAA analog FM APT - 137 Mhz reception), both with sharp stop band transition.
In AM
- DSB1 -9Khz, DSB2-6Khz bandwidth.
In USB , upper +3khz single side band.
In LSB , lower -3khz single side band.
In DSB-SC , we can select to demodulate any of both SSB bands (LSB, USB). In DSB-SC mod type , both side bands has exactly the same modulated content, but sometimes we may have more particular interference signals in one side than the other.
-
F: The RX frequency can be set in the usual way with text pad when selected
-
SQ: This can be set between 0 and 99 typically 50 is threshold.
-
GAIN: The RX gain setting of LNA(IF) (0-40)
-
VGA: RX (Baseband)(0-62)
-
AMP: RX LNA pre-amplifer 0=0dB or 1=14dB.
-
TX-IQ-CAL: TX I/Q channel phase calibration, to adjust the imbalance IQ modulator phase error. The adjustment range is (+4º ...-4º). Specially usefull to optimize the SSB (USB-LSB) or DSB-SC , Suppressed carrier . In Hackrf versions r1 to r8 , we are using max2837 , that has a calibration register settings of 5 bits , in Hackrf r9 , we are using max2839, that has 6 bits to cover the same range (+4º,..., -4º phase adj).
At the moment we do not have any automatic IQ imbalance phase error calibration process. You will need some other SDR receiver , and check the suppressed carrier level when you push PTT _TX in SSB (USB or LSB) without any modulation, and then go to the right modify the "TX-IQ-CAL" value , and press again PTT_TX till getting the lower attenuated "suppressed carrier.
As example , see the attenuation of the residual SSB carrier effect, when adjusting that IQ Phase calibration value in an H1R1 with max2837,


Note this Mic application while performing a transmit function may well over deviate and generate unwanted harmonics.