Linting and Testing
For the latest code-coverage information, see codecov.io, for the latest benchmark results, see the benchmark results wiki page.
Currently, flowR contains two testing suites: one for functionality and one for performance. We explain each of them in the following.
The functionality tests represent conventional unit (and depending on your terminology component/api) tests. We use mocha as our testing framework and chai as our assertion library. To run these tests, simply issue:
npm run testWhat may be counter-intuitive is that this does not run all tests by default but only those that do not try R's package installation (as this can require more time). To run all tests, installation tests included, use:
npm run test-fullHowever, depending on your local R version, your network connection and potentially other factors, some tests may be skipped automatically as they do not apply to your current system setup (or can't be tested with the current prerequisites). Each test can specify such requirements as part of the TestConfiguration, which is then enforced by the ensureConfig function.
It is up to the ci to run the tests on different systems to ensure that those tests are ensured to run.
All functionality tests are to be located under test/functionality.
This folder contains two special elements:
-
main.spec.tswhich is the entry point if all tests are run. It should automatically disable logging statements and configure global variables (e.g., if installation tests should run). -
_helperwhich contains helper functions to be used by other tests.
Besides folders can (theoretically) arbitrarily structure their tests. We use the following convention:
-
*.spec.tsdenotes a test file which is to be collected when all tests are run, it may require other files to avoid big testing files and improve structure, but those should never end in*.spec.ts. .-tests.tsdenotes test files which are required by*.spec.tsfiles. To require them, there is also the helper functionrequireAllTestsInFolderwhich performs sanity checks to avoid forgotten tests.
Currently this is heavily dependent on what you want to test (normalization, dataflow, quad-export, ...) and it is probably best to have a look at existing tests in that area to get an idea of what comfort functionality is available.
To run only some of the tests, the mocha test runner allows several options. You can specify so in the code or via the command line. If you modify the code, please make sure to remove the changes before committing!
The performance test suite of flowR uses several suites to check for variations in the required times for certain steps. Although we measure wall time in the CI (which is subject to rather large variations), it should give a rough idea of the performance of flowR. Furthermore, the respective scripts can be used locally as well. To run them, issue:
npm run performance-testSee test/performance for more information on the suites, how to run them, and their results. If you are interested in the results of the benchmarks, see here.
If the tests are too slow for your taste, you may want to check out how to run only some of the tests.
From your IDE of choice, you can also run all or some of the functionality tests that flowR provides.
With Visual Studio Code (or Codium), you also require the Mocha Test Explorer add-on. To run functionality tests, follow these steps:
- Install and enable the Mocha Test Explorer.
- In your copy of the flowR repository, open the Testing menu. You should see all functionality tests available for execution, like this:
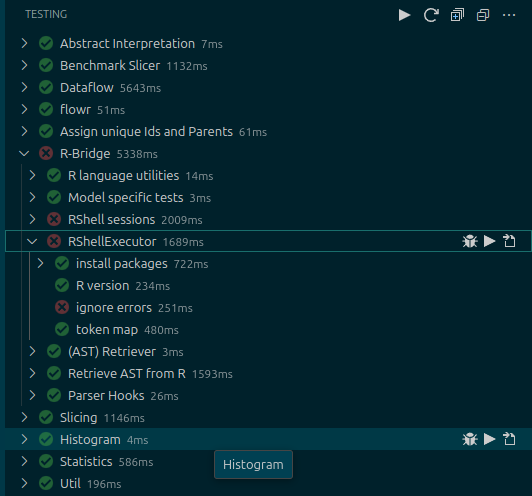
- To run the full test suite, press the Play button (
▶️ ) above.- To only run a single, or some of the tests, navigate to it, and press the Play button, too.
- You can cancel running tests by clicking on the Stop button (⏹️).
- Successful tests are marked with a checkmark (✅), while failing tests are marked with a cross (❌).
- To debug a failing test, navigate to it, and then press the Debug (🪲) button. This will automatically open the Run and Debug menu of VS Code.
With WebStorm, you can set up Run and Debug configurations from the IDE to run tests without additional add-ons.
-
If you only want to run those tests from a single test file, navigate to that file in the Project view, and then right-click on it. Then select
Run (file), orDebug (file). You can also open the test file directly, to run a single test from it. -
If you want to run the whole test suite, you need to set-up a new Run/Debug configuration:
-
In the Run/Debug Configurations part of WebStorm, click the Drop-Down menu, and then
Edit Configurations. -
Click on
+to add a new configuration, and then selectMocha. -
Set the name of this new configuration, and select
File patternsto run all specified functionality tests, like in the example above.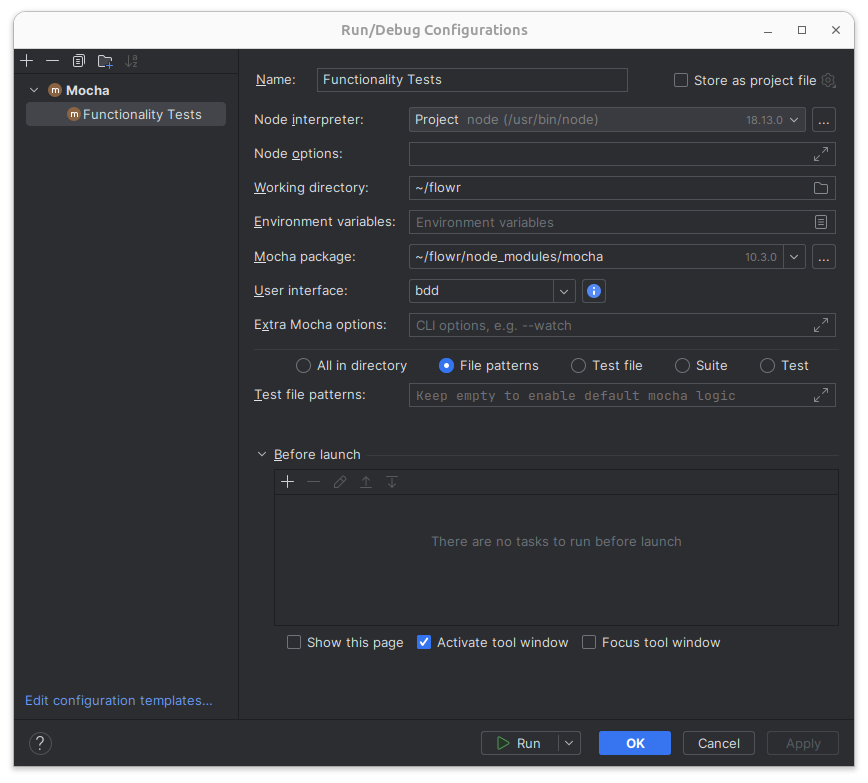
-
Press
OKto save the test run configuration.
Afterwards, you can run or debug the flowR functionality test suite from the Run/Debug configurations part, by clicking on the Play and Debug buttons (
▶️ /🪲), respectively. -
We have several workflows defined in .github/workflows. We explain the most important workflows in the following:
-
qa.yaml is the main workflow which will run different steps depending on several factors. It is responsible for:
- running the functionality and performance tests
- uploading the results to the benchmark page for releases
- running the functionality tests on different operating systems (Windows, macOS, Linux) and with different versions of R
- reporting code coverage
- running the linter and reporting its results
- deploying the documentation to GitHub Pages
- running the functionality and performance tests
- release.yaml is responsible for creating a new release, only to be run by repository owners. Furthermore, it adds the new docker image to docker hub.
- broken-links-and-wiki.yaml repeatedly tests that all links are not dead!
There are two linting scripts. The main one:
npm run lintAnd a weaker version of the first (allowing for todo comments) which is run automatically in the pre-push githook as explained in the CONTRIBUTING.md:
npm run lint-localBesides checking coding style (as defined in the package.json), the full linter runs the license checker.
If you are unaware, several linting problems can be automatically fixed by eslint. So you may be fine by just running:
npm run lint-local -- --fixBy now, the rules should be rather stable and so, if the linter fails it is usually best if you (if necessary) read the respective description and fix the respective problem. Rules in this project cover general JavaScript issues using regular ESLint, TypeScript-specific issues using typescript-eslint, and code formatting with ESLint Stylistic.
However, in case you think that the linter is wrong, please do not hesitate to open a new issue.
flowR is licensed under the GPLv3 License requiring us to only rely on compatible licenses. For now, this list is hardcoded as part of the npm license-compat script so it can very well be that a new dependency you add causes the checker to fail — even though it is compatible. In that case, please either open a new issue or directly add the license to the list (including a reference to why it is compatible).