Firmware Repo Setup
<< Previous Chapter | Home | Next Chapter >>
[[TOC]]
This guide assumes that you have already setup the following
Now you are ready to clone our repo to your Ubuntu Virtual Machine and build petalinux, create a petalinux SDK for Vitis, and start developing applications in Vitis!
Clone the repo to your home directory
cd ~git clone https://git.ece.iastate.edu/sd/sdmay23-47.gitcd ~/sdmay23-47/petalinux/ossource petalinux tools if you haven't already
source /opt/pkg/petalinux/2020.1/settings.shSet petalinux to build using our custom hardware
petalinux-config --get-hw-description ../hwbuild
petalinux-buildNote: This will take a LONG time the first time through (1+ hour) Note: If you get a nasty error about a broken pipe, chances are the process ran out of available memory. Try closing other applications on the VM or giving it more memory.
(Optional but useful) Build the bootable image using petalinux-tools
petalinux-package --force --boot --fsbl ~/sdmay23-47/petalinux/os/images/linux/zynq_fsbl.elf --fpga ~/sdmay23-47/petalinux/hw/CyDAQ_proto_1.bit --u-bootNote: The build files are placed in
<repo root>/petalinux/os/images/linux/and you must moveboot.scr,BOOT.BIN, andimage.ubto the SD card.
Note: Vitis also does this with the SDK, so it's not necessary, but makes things much faster if you are re-building petalinux on the command line a lot
Petalinux tools provides commands to auto-generate an SDK that allows for the petalinux filesystem to show up in Vitis as a platform.
cd <project root>/petalinux/os/images/linuxpetalinux-build --sdk./sdk.shThe above command will ask you to enter a target directory. Enter the following.
<root project>/petalinux/sw/linux_files/
For example
/home/corbin/sdmay23-47/petalinux/sw/linux_files/
Note: Make sure it's a full path from root
Now build the sysroots
petalinux-package --sysrootNow copy the needed files from the petalinux build to the sw directory
cp u-boot.elf ../../../sw/linux_files/boot/ && cp zynq_fsbl.elf ../../../sw/linux_files/boot/fsbl.elf && cp boot.scr image.ub rootfs.cpio ../../../sw/linux_files/image/Launch vitis and set the workspace to the following
/home/<your-home-dir>/sdmay23-47/petalinux/sw/platform/
You should now be greeted with a welcome screen and... nothing else.
Import the projects. Go to file > import
Select Eclipse workspace or zip file and click next
Click browse next to Select root directory and select ~/sdmay23-47/petalinux/sw/platform
It should already be on that directory
Under options, unselect Copy projects into workspace
Under projects (on the right) click Select All
Your screen should look like the following

Click Finish
You should now see four projects in your project explorer:
- CyDAQ_comm_system
- CyDAQ_platform
- CyDAQ_sampling_system
- CyDAQ_standalone
Unfortunately Xilinx is very bad at making their products work with git, so the following steps need to be taken to make sure everything in the project is pointing to your home directory, not the last person who committed to the repo.
Note: You might have to do these steps when checking out somebody else's branch, or just after somebody else commits. Yes it's quite annoying and time consuming. Trust us we know.
Expand CyDAQ_platform, open platform.spr, and click on linux on ps7_cortexa9 in the platform viewer. Here you will see a few directories and paths that need updated to your correct paths. They should all point somewhere inside of ~/sdmay23-47/petalinux/sw/linux_files, and there will be existing paths there, but just with wrong home directories. You will need to click browse and select the correct path locations for each.
Below is an example of what a proper configuration looks like:

Note: For the
Sysroot Directoryfield, sometimes an error will pop up when you set it. This is a Vitis bug, and setting it a second time to the same path should work.
Right click on CyDAQ_platform in the explorer view and select Update Hardware Specification. Click browse and navigate to ~/sdmay23-47/petalinux/hw/CyDAQ_proto_1.xsa then click Ok.
You should now be able to build CyDAQ_platform. Simply right click on CyDAQ_platform in the explorer and click build.
Expand CyDAQ_comm_system and open CyDAQ_comm_system.sprj. On the right you should see an options section. Sysroot, Root FS and Kernel Image all need their paths changed to your virtual machine's user home directory. You can just manually change the file path in this window thankfully.
Here is an example:
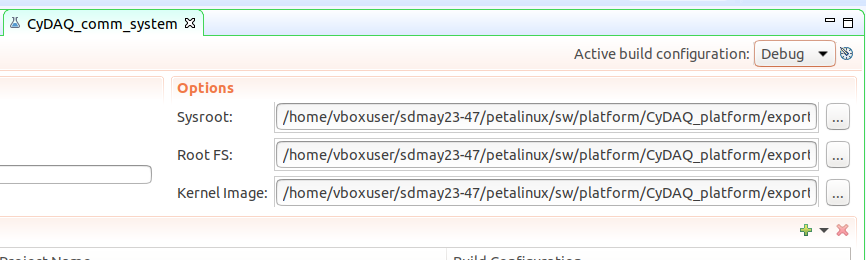
Simply replace
vboxuserwith your VMs username
You can now build the comm app. Right click on CyDAQ_comm_system in the explorer view and click build.
In the explorer view, expand CyDAQ-sampling_system then expand CyDAQ_sampling. Open the file CyDAQ_sampling.prj. In the window that opens, click on Navigate to BSP Settings.
You should now be in the settings for CyDAQ_standalone. In that window, click on Modify BSP Settings. You should be greeted with a window that looks like the following:
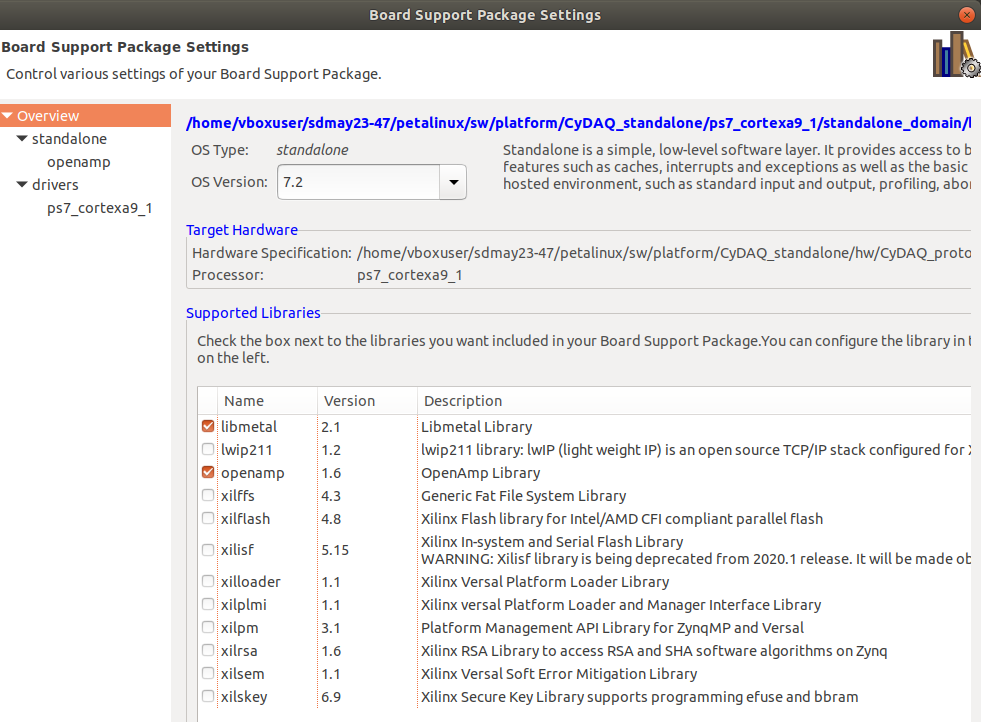
Uncheck libmetal and openamp and click Ok. Then immedately after, click Modify BSP Settings and re-check libmetal and openamp and click Ok.
Note: It does seem strange to uncheck and recheck these libraries, but their paths get messed up between different users. This is the only way we could get things to work consistently.
Now build standalone. Right click on CyDAQ_standalone in the explorer view, and click Build.
It's a good idea to clean the sampling app at this point, as sometimes Vitis creates random errors otherwise. Click on CyDAQ_sampling_system in the explorer and click clean.
You can now build the sampling app. Right click on CyDAQ_sampling_system and click build.
Copy the .elf files generated from comm and sampling projects into the petalinux botscript recipe folder, so they get included the next time you build petalinux.
cp ~/sdmay23-47/petalinux/sw/platform/CyDAQ_comm/Debug/CyDAQ_comm.elf ~/sdmay23-47/petalinux/os/project-spec/meta-user/recipes-apps/bootscript/files/CyDAQ_comm.elf && cp ~/sdmay23-47/petalinux/sw/platform/CyDAQ_sampling/Debug/CyDAQ_sampling.elf ~/sdmay23-47/petalinux/os/project-spec/meta-user/recipes-apps/bootscript/files/CyDAQ_sampling.elfNow rebuild petalinux
source /opt/pkg/petalinux/2020.1/settings.shcd ~/sdmay23-47/petalinux/os && petalinux-buildpetalinux-package --force --boot --fsbl ~/sdmay23-47/petalinux/os/images/linux/zynq_fsbl.elf --fpga ~/sdmay23-47/petalinux/hw/CyDAQ_proto_1.bit --u-bootYou should now have the required boot files for petalinux. They are all located in the folder ~/sdmay23-47/petalinux/os/images/linux. The files are:
boot.scrBOOT.binimage.ub
Simply copy those three files to an SD card formatted as FAT32, and Petalinux will boot!
When making incremental changes to either CyDAQ_comm or CyDAQ_sampling, the quickest way to build and run your changes is to manually copy the .elf files over to petalinux and run them in the terminal. Before you can do this though, you must have a petalinux build that doesn't auto-start the CyDAQ_comm app in the background. To do this, comment out the two lines which start the CyDAQ_comm app in the bootscript located here (it's at the bottom).
Then rebuild, re-package, and copy the boot files like before onto the SD card.
Once the CyDAQ is booted up again, make sure you can ping it at address 169.254.7.2. If not, re-do the steps in the Ubuntu Setup Docs.
Now, make sure both the CyDAQ_comm and CyDAQ_sampling projects are built in Vitis, then run this command to copy them to the correct location on the Petalinux filesystem.
sshpass -p "root" scp -o UserKnownHostsFile=/dev/null -o StrictHostKeyChecking=no ~/sdmay23-47/petalinux/sw/platform/CyDAQ_sampling/Debug/CyDAQ_sampling.elf root@169.254.7.2:/lib/firmware/CyDAQ_sampling.elf && sshpass -p "root" scp -o UserKnownHostsFile=/dev/null -o StrictHostKeyChecking=no ~/sdmay23-47/petalinux/sw/platform/CyDAQ_comm/Debug/CyDAQ_comm.elf root@169.254.7.2:/home/root/CyDAQ_comm.elfNow, you must connect to a Petalinux terminal session. This can be done either over SSH or the serial debug USB port if you have the other USB connected. Once connected, run the following command to manually start the CyDAQ_comm app.
./CyDAQ_comm.elfYou can use ctrl + c to stop the app when it's running, or ctrl + z if it freezes.
Note: There is currently a bug where the shutdown process of the two apps doesn't clean up resources correctly. This can cause the app to not want to start up again. This can be avoided simply by re-booting petalinux with the command
reboot