Compiling G2 on Windows 10 and Atmel Studio 7
This page is for setting up and compiling the g2 project on Windows 10 with Atmel Studio 7
These instructions apply if you are running a VMware virtual machine on OSX or Linux. If you are on a native Windows system or running another VM you can skip these
- Set up the virtual machine with at least 4 GBytes of RAM and 30+ GB of hard drive allocated in 2 Gb chunks
- When asked for integrated / isolated it's best to chose integrated so you can share files across filesystems. This way you can use native OSX or linux tools for git and other functions.
- It's advisable to snapshot the VM before installing so you can recover from errors w/o burning through Windows activations. You can delete the snapshot later to recover that space.
- Some VMware voodoo that can be useful
- https://communities.vmware.com/thread/419693
- Enable sharing in order to mount an OSX drive. This is usually your Home directory and shows up as Z:
- There are some issues with Windows 10 and VMware 8 that may or may not have been resolved. In any case, you need to get VMware tools recognizing the Z: drive or AS7 will not compile - as it cannot use UNC paths.
Atmel Studio 7 weighs in at a portly 2.01 Gb, so you need this much space on your C: drive (virtual or otherwise). The g2 project itself downloads the entire tool chain (in g2/Motate/Tools/win32) so it's also pretty big - currently almost 800Mb. You should have at least 1 Gb free on your Z: drive if you are installing it there.
To compile G2 on Windows with Atmel Studio you will need the Atmel Studio 7 build 1006 (or greater), Service Pack 1 Installer – with .NET. We recommend a clean machine or VM.
-
Go to Atmel and download the Atmel Studio 7 Installer – with .NET install package.
- Be sure to get the one with the .NET part (about 800 Mbytes) unless you are sure you already have the .net revision that AS needs (Framework 4).
- There may also be USB driver updates that are not in the main file. If so, you might want these as well. You should not need any of the Part Packs or other files.
- They require you to either register or fill out a "guest" form. Otherwise it's free.
-
Walk through the entire installation process.
- It should install .NET, Microsoft Studio, Atmel Drivers, Atmel Studio
- Fire up AS7 for the first time
- You do not want the Atmel Solutions Framework (ASF) when asked. You won't want to update it and you can turn off notifications about it. Do NOT use an ASF project (like the Arduino Due board) if you are playing with G2 Core or you will have a lot of stuff to back out. (We provide projects for you to use.)
- You will need the USB drivers when asked.
The project Makefiles rely on Git for Windows, so even if you use Git on your native OS for all your other activities it needs to be installed in your Windows environment.
- Go to the official Git site and download and install the Git for Windows. Get the right one for your VM - 32 bit or 64 bit (version 2.9.3 at the time of this writing).
- Option Dialog 1: Choose BASH (default, but any should work)
- Option Dialog 2: Choose option 2, Checkout as-is, Unix style line endings
- Option Dialog 3: Choose MinTTY (default, but doesn't matter for our uses)
- Option Dialog 4: Both boxes checked ON, but turn OFF if windows weirdness (works for us)
- when it asks you if you want icons on your desktop you might want this to get Git Bash so you can debug the Windows environment (should it come to that)
There is more than one way to clone the Git repository.
- Direct clone in a terminal window
- Use Github Windows app
If you already have Git on your host machine (i.e. you are on Windows and already have git credentials or are running a VMWare Windows instance and have git credentials on the host) you can simply do a git clone. We use the ssh form as in our experience it's more troublefree than the http form. Open a terminal window and navigate to the parent directory in which you want to install the g2 github repo. Type:
  git clone git@github.com:synthetos/g2.git
  git submodule update --init
  git config fetch.recurseSubmodules on-demand
That should do it.
the GitHub Windows app is an easy way on Windows.
- Download and install the GitHub app.
- Log into the GitHub web site -- register if needed, it's free.
- Browse to the G2 project page and then click on the
Clone in Desktopbutton.
- The GitHub application should open up, and ask where to save the new repository. The default location will probably be sufficient.
-
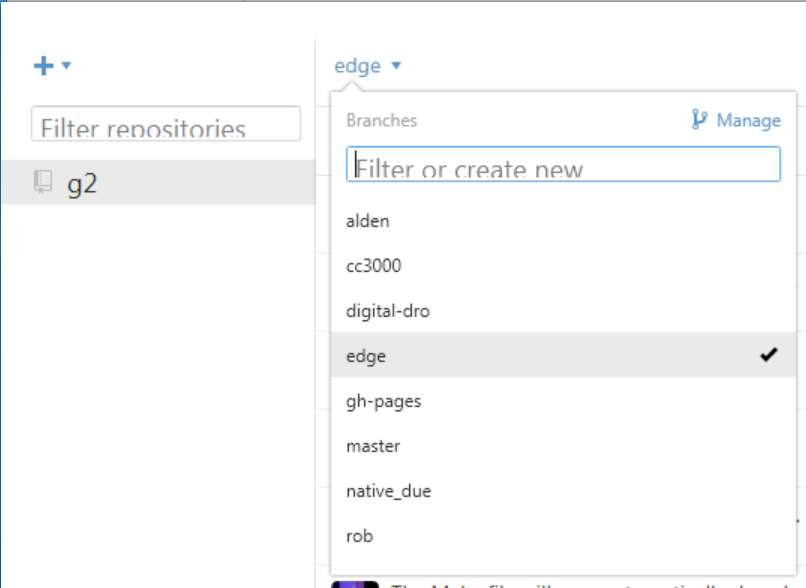
In the GitHub app, click on the unnamed menu in the top-left and then click on
edgeto checkout the edge branch.
-
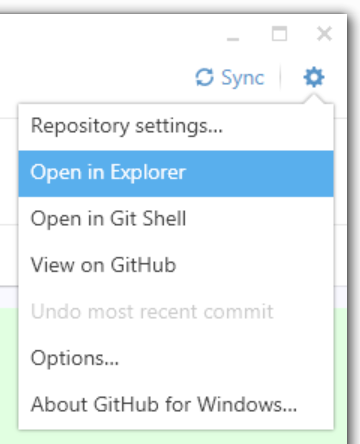
From the gear menu in the top-right of the Github window choose "Open in Git Shell" to start a terminal session.
1. In the terminal that appears, run the following command:git submodule update --init git config fetch.recurseSubmodules on-demand
-
(Convenience) From the gear menu in the top-right of the Github window choose "Open in Explorer" to show the location of the newly checked-out repo.
Note: These instructions are for the Atmel-ICE debugger. Many of these instructions will work with the Atmel SAM-ICE as well. It's also possible to upload directly through the USB or serial ports, but there is no real-time debugger in that case.
-
The
g2project directory is the parent for all of the source files and the Atmel project files. theg2coresubdirectory contains the main project and the g2core project fileg2core.cppproj, andMotatecontains the module and its project file. Generally you shouldn't need to work in Motate. -
If you have changed your git branch you should run
git submodule updateto make sure the right commit of Motate is associated with the g2core you have. It's a good idea to run this before opening the project in any case. -
Open AS7 by double clicking on
g2core.atslnin the parent g2 directory. AS7 should fire up - tell it to trust us. AS7 has a bug so you might get this warning which can be ignored:[warning] Error updating project settings:Object reference not set to an instance of an object
Note: Git is configured to ignore the changes to some of the project's dependent files so that they don't cause havoc. This means that to commit changes to those files, they need to specifically be added to the commit by name.
To compile the project:

- Choose the platform you are building for (for the Due with gShield pinout, choose
gShield) - Click either the "Build Project" or "Build Solution" buttons -- they are the same in this case. (These can also be found in the Build menu.)
- This will create a file named
g2core.elfand in the /bin directory for the board you are building - This will also create a
g2core.elffile in theg2coredirectory - You will need one of these files to upload to the board. With option 5, below, it will use this file automatically. All other ways of uploading to the board will require you to locate this file manually
- The first time it compiles the projcet it will download the entire toolchain and install it in the Motate Tools directory. This can take a while (~200 Mbytes). You will want a good Internet connection.
- Configure the Device and Atmel-ICE Tool in the g2core project Properties window, which can be found by right clicking the g2core root directory in the Solution Explorer pane
- In the Device tab select one of:
ATSAM3X8Cfor a v9 board, orATSAM3X8Efor the Due, or the right M4 or M7 processor for your particular board - In the Tool tab select your
Atmel-ICE, which must be plugged in for it to appear. If you have more than one plugged in you can identify them by the last 4 digits of the serial number - The Interface should be
SWD. JTAG doesn't always work - You can now program and debug the buttons labeled '5' in the picture, as per step 5, below.
- (Alternately) Connect, configure and test the Atmel-ICE Tool in the Device Programming window:
- The Tool should be Atmel-ICE. If you have more than one connected identify by the last 4 digits of the serial number.
- The Device is one of:
ATSAM3X8Cfor a v9 board, orATSAM3X8Efor the Due, or the right M4 or M7 processor for your particular board - The Interface should be
SWD. JTAG doesn't always work - Hit Apply
- You can hit Read the Device Signature to verify that you are connected. Or just hit the Memories tab
- Program from the Memories tab. Make sure the file selected is the g2core.elf in the main g2core directory or the correct /bin directory. You can also use this option to program any binary (particularly useful if you didn't compile it)
- To compile and upload without debugging (left) or with debugging (right) click one of these two buttons. These are also available from the Debug menu.
To flash G2 (using the TinyG2.bin file you just made in step 2 above) onto a target board without using a debugger such as the Atmel ICE or Atmel SAM-ICE, please visit the Flashing G2 with Windows page.
The following tags are used. They can apply to the problem, and also the possible solutions:
- [w32], [w64]: This problem affects Windows32 / Windows64 configurations
- [all]: This problem affects all configurations (that we know of)
These are things we have seen fail. Please feel free to add to this list if you find issues that have solutions.
- You get this error:
mkdir -p win32 && \
cd win32 && \
../7za/7za x -ogcc-arm-none-eabi "gcc-arm-none-eabi-4_9-2015q2-20150609-win32.zip"
/usr/bin/sh: ../7za/7za: Invalid argument- Solution - Only one copy of AS6 can be open. CLose all copies of AS6, restart ONE, and run the build again.
It's actually really easy to get more than one instance of AS6 running. When you click on it sometimes there is no feedback that the click was received. Then some 15 - 30 seconds later you might see some indication. But usually by that time you have clicked it again, thinking that you must of mis-clicked the first time. Voila. 2 instances.
- Git is not installed in your windows instance. Instructions for installation is above in the What's Needed.