Authorization
In order to use the Learning Layers authorization service, the application has to be registered.
- Go to the Learning Layers website where the OpenID Connect authorization service is provided.
- If you do not have an account yet, create a new one.
- Login with your Learning Layers account
- In the left toolbar go to "Self-service client registration"
- Click on the button "Register a new client"

- Enter a client name and any optional information about the application like a logo or contact list.
- Under "Redirect URI(s)" enter the custom URL-scheme that should be associated with the app. (For this app
gamr://was chosen)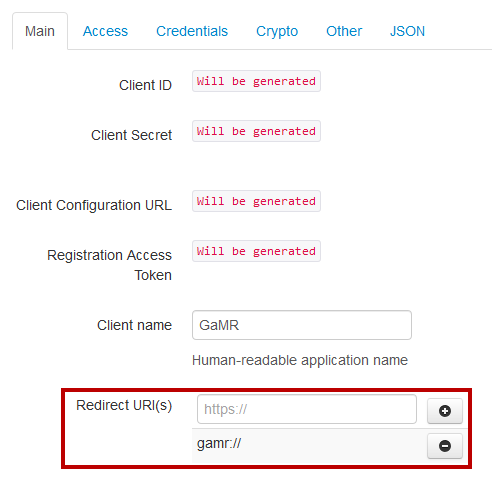
- At the top of the page, navigate to the register card "Access"
- Set the "Grant Types" to "implicit". This is a streamlined autorization flow which will directly return an access token with the redirection instead of issueing an intermediary authorization code which is used to request the access token separately.
- Under "Response Types" uncheck "code" and check "id_token" and "token id_token". With this settings the implicit flow returns the access token in the redirection.

- Navigate to the register tab "Other" and adapt the "Default Max Age". This value will determine how long the access token will be valid before it is necessary to request a new one.
- Click "Save". Now the new client is created and you will receive information like the client id, client secret, client configuration url and a registration access token. Save these values somewhere or write them down because the client id and the registration access token are needed in order to change the client's settings at a later point. The client id also needs to be contained in the initial query to the authorization service.
If the user clicks on the login button in the application, the Learning Layers' login page should be opened. Here, the user can enter the credentials and give the permissions for the app. When opening the login page it is important to include the correct parameters so that the authorization workflow can proceed. The following URL is used to open the login page: https://api.learning-layers.eu/o/oauth2/authorize?response_type=token&scope=openid%20profile%20email&client_id=yourClientID&redirect_uri=gamr://
The query needs to be addressed at the "authorize" endpoint of the OAuth2 service. Furthermore, it is necessary to specify the response type which in this case is token. The query also contains the scope of the client. If the user authorizes the client for the first time, the webpage will ask for permission for the specified scopes. Here, the query asks for access to the OpenID profile and the email address. Additionally, it is necessary to replace "yourClientID" with the ID of the client that was just generated. The last parameter specifies the redirect URI and needs to be the same custom URL scheme which was specified in the client settings.
In Unity, the URL can be opened using the command Application.OpenURL(url);. Substitute the url with the constructed URL above.
If the authorization process is started, the standard web browser opens and the user can login. This means that the application looses the focus and is paused. Thus, the application needs to re-open if the login was successful and it also needs to retrieve the access token which has been created by the authorization service. On most platforms, applications can react to a custom URL schemes. On Android this is possible by specifying Intent Filters and on Windows, UWP apps can define Protocols. For UWP apps, the protocol needs to be specified in the appmanifest. This is done in the following steps
- Generate the UWP app.
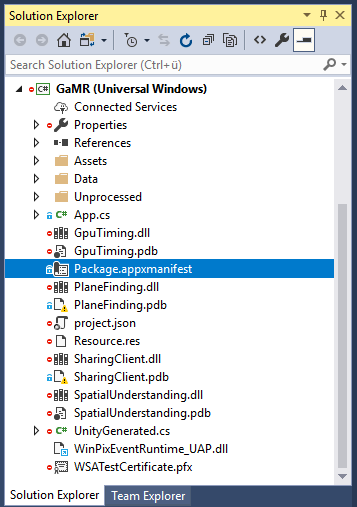
- Open the generated Visual Studio solution of the app.
- In Visual Studio's Solution Explorer search for the file "Package.appxmanifest" and open it.
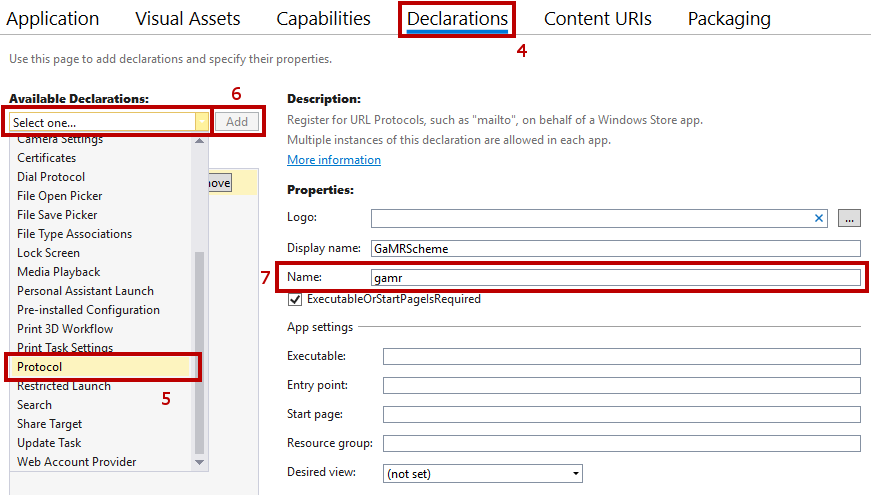
- Visual Studio now shows a manifest editor. At the top, go to the tab "Declarations".
- Open the dropdown menu on the left under "Available Declarations" and select "Protocol"
- Click the "Add" button next to the dropdown menu.
- Select the created protocol and edit its properties. The custom URL scheme is entered in the name field. Note that it is specified without the
://so in this case the name isgamrinstead ofgamr://. All other property fields can be filled out but are optional. - Save the manifest file
With the protocol in place, the app is registered to handle the custom URL scheme. Whenever a URL is opened which fits this custom URL scheme, the system will activate the app.
The access token is included in the redirection URL of the OpenID Connect service as a parameter. If the UWP app is started, the callback method ApplicationView_Activated is triggered. The app can query whether it was started by a protocol: The callback method receives IActivatedEventArgs which contain a Kind property. If the app was started by a protocol it is set to ActivationKind.Protocol. In this case it is possible to cast the IActivatedEventArgs to ProtocolActivatedEventArgs which contain a Uri property with the URL that initiated the protocol. This URL contains the access token.
The access token needs to be stored in a place where the Unity scripts can access it.
As a preparation the following steps need to be executed in order to receive the access token and store it in the scene:
- Create a game object in the scene which is uniquely identifiable, e.g. by a tag or its name. In this application the game object "AuthorizationManager" was created.
- Create and attach a script to the game object. In the framework the
AuthorizationManagerwas chosen. - In this script, a method needs to be defined which can receive an
Urias an argument, e.g.void StartedByProtocol(Uri uri). - The URL is expected to contain the access token and so it can be extracted at this point, e.g. by string operations or regular expressions. Search for the parameter "access_token" and extract its value.
The goal is to access the StartedByProtocol function from the ApplicationView_Activated and pass the URL to this.
This is achieved by calling the function UnityEngine.WSA.Application.InvokeOnAppThread (callbackItem, waitUntilDone) which performs a method specified as callbackItem in the main thread of the application. If the statement using UnityEngine is added, the callbackItem-method can access all game objects in the Unity scene similarly to any script:
- Find the game object with
GameObject go = GameObject.Find(nameOfCreatedGameObject) - Call the created function on the attached script with
go.SendMessage("StartedByProtocol", url).
The implementation of the authorization initiation, administration of the access token and login validation can be found in the AuthorizationManager
For UWP, the redirection is handled in the App.cs of the generated app. Its functionality is platform-dependent and is also described here.