Gateway
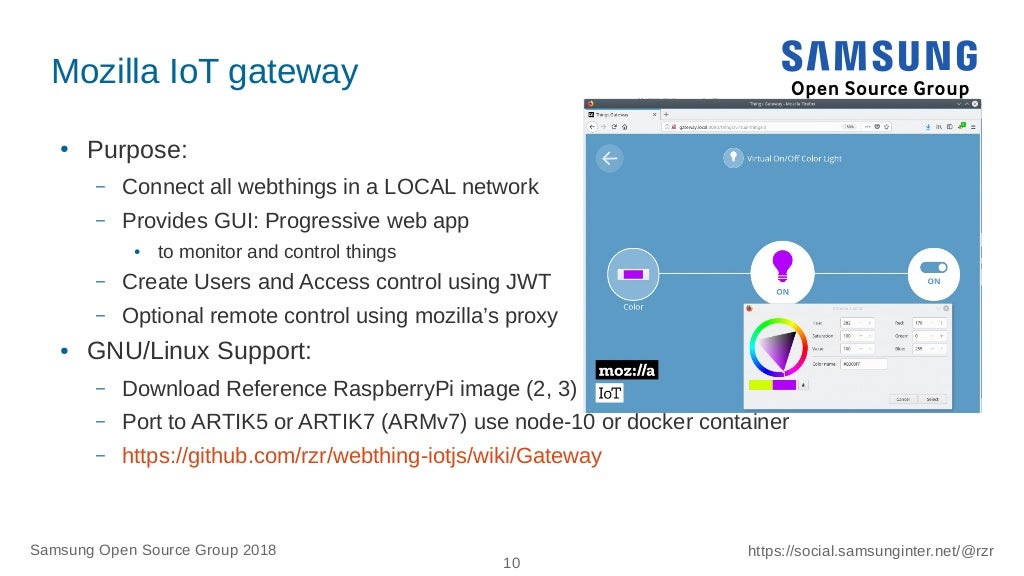
WebThings are not standalone, even if they are serving REST API, they must be connected to a Gateway to become smarter and behave along others things, events or just user control thought the Web GUI or WebApp.
Gateway is hosted inside user's local network, and can run on a GNU/Linux system like a cheap Single Board Computer.
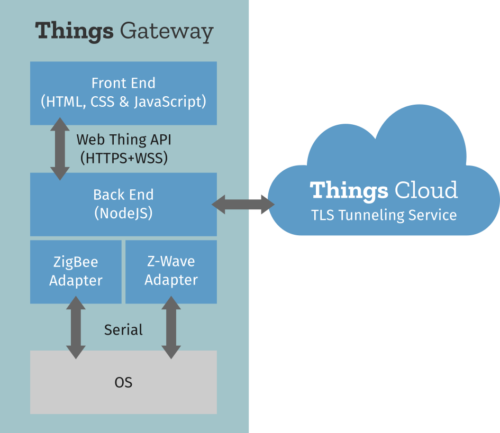
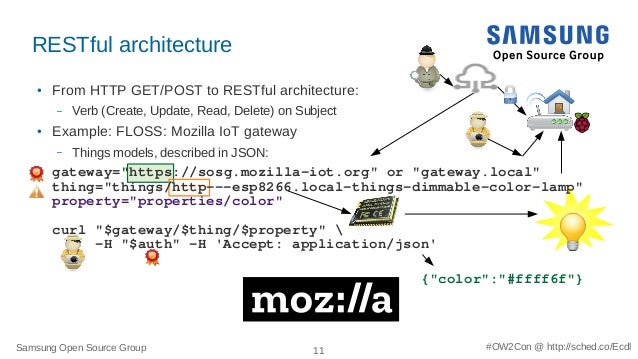
Technically, Things project is architectured using RESTful principles:
The Raspberry Pi 3 is the reference platform, but it should be possible to port to other single board computers (like ARTIK, etc).
To avoid any miss-configuration issue, it is recommended to flash the reference image to RaspberryPi 3, but more hints will shared anyway for rebuilding for other platforms.
Once installed, we will check by adding virtual things to dashboard (using "virtual-adapter").
It is recommended to use RaspberryPi reference, but if you rebuilt it for different targets then skip parts mentionning about RPi, login and setup parts are generic.
Use Mozilla Gateway 0.6 or later, here are the step to install it on RaspberryPi 3 (or 2):
- https://iot.mozilla.org/gateway/
- https://www.raspberrypi.org/documentation/installation/installing-images/
To sum up above instructions: first download Raspbian based archive gateway-0.6.0.img.zip and then dump it to SD card,
On a GNU/Linux system, I used these command lines:
baseurl="https://github.com/mozilla-iot/gateway/releases/"
version='0.6.0' # file is <1GB o be expanded to <4GB
url="$baseurl/download/${version}/gateway-${version}.img.zip"
lsblk # List disk:

disk='/dev/disk/by-id/usb-Generic_Mass-Storage-0:0' # TODO: adapt to your SDCard

sudo apt-get install funzip wget sudo time # TODO: adapt to other OS (if different than Debian)
wget -O- "$url" | funzip | sudo dd of="$disk" bs=8M oflag=dsync
sync
Then place sdcard in RPi, and let it boot, if ethernet is wired, after some minutes you should be able to login.
Next, place the SD card in your Raspberry PI 3 (Older RPis could work too, particularly if you have a wifi adapter, but it's not mandatory).
When it has completed the first boot, you can check that the Avahi daemon is registering "gateway.local" using mDNS (multicast DNS):
ping gateway.local
# PING gateway.local (192.168.1.28) 56(84) bytes of data.
# 64 bytes from b827XXXXXXXX.mac (192.168.1.28): icmp_seq=1 ttl=64 time=0.758 ms
Note that If a WiFi adapter is available a WiFi open access point should be visible too and you can connect to it too to configure WiFi credentials to onboard it in your LAN.
| Welcome
| Connect to a WiFi network?
| (...)
| [ Skip ]
We'll skip this for now
| WiFi setup skipped
| The gateway is now being started. Navigate to gateway.local in your web browser while connected to same network as the gateway to continue setup.
| Note that gateway.local may take some time to become active. The gateway can also be accessed directly via its local IP address or discovered using a Bluetooth Eddystone beacon scanner.
Don't expect to connect to SSH because it is disabled by default.
After a couple of minutes (longer on Pi2) you should be able to access the web server, which is running on port 80 (and also 8080):
Then welcome page should appear:
 | Mozilla IoT
 | Welcome
 | Choose a secure web address for your gateway:
 | [subdomain].mozilla-iot.org
 | [Email]
 | [Create]
 | [Skip]
The gateway can be registered on mozilla.org for remote management, but let's skip creating a subdomain for now, as we won't use the gateway from the Internet for our experiments.
Normally, gateway will redirect you to a mandatory page to create admin user:
 | Mozilla IoT
 | Welcome
 | Create your first user account:
 | [Name]
 | [Email]
 | [Password]
 | [Confirm Password]
 | [Next]
Note that more local users can be created lately.
And we’re ready to use it:
 | Mozilla IoT
 | No devices yet. Click + to scan for available devices.
 | [Menu]
 |  [Things]
 |  [Rules]
 |  [Floorplan]
 |  [Settings]
 |  [Log out]
 | [+]
Optionally you can enable SSH feature in "Burger menu" : Settings/ Developer/ Enable SSH
Filling dashboard
You can start filling your dashboard with Virtual Resources,
First hit the “burger menu” icon, go to settings page, and then go to the addons page.
Here you can enable a "Virtual Things" adapter:
 | virtual-things-adapter 0.1.4
 | Mozilla IoT Virtual Things Adapter
 | by Mozilla IoT
Once enabled It should be listed along ThingURLAdapter on the adapters page:
 | VirtualThingsAdapter (virtual-things)
 | ThingURLAdapter (thing-url-adapter)
You can then go back to the 1st Things page (it’s the first entry in the menu):
We can start adding "things" by pressing the bottom menu.
 | Virtual On/Off Color Light
 | Color Light
 | Save
Then press “Done” at bottom.
From this point, you can decide to control a virtual lamp from the UI, and even establish some basic rules (second entry in menu) with more virtual resources.

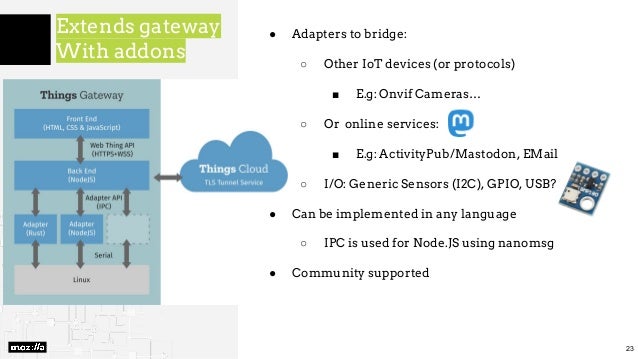
The gateway is extensible by design using adapters, to bridge to other technologies, previously we used the "VirtualThingsAdapter" which is good for testing.
To interact with the physical world, extra adapters can be installed and configured:
- "GPIO adapter" is generally used for binary input or output (switch or LED, Relay etc)
- "Generic Sensor" support of couple of I2C Sensor that can be connected to gateway
More details explained in this blog post:
- https://hub.samsunginter.net/adding-sensors-to-the-web-of-things/
- https://s-opensource.org/2018/04/25/mozilla-iot-generic-sensors/

Gateway can also be installed on regular system. For instance on Debian based system (ie: Ubuntu-18.04 LTS):
sudo apt-get install sudo git curl npm # Adapt to other distros
mkdir -p ~/mozilla-iot ; cd ~/mozilla-iot
git clone --recursive https://github.com/mozilla-iot/gateway ; cd gateway
sudo npm install yarn -g
yarn
yarn start
Then you can browse the welcome page on unprivileged port 8080 (on loopback or host's IPs):
Install is done, now go back to configuration to setup adapters or things.
While developing I made my own Docker file:
Usage is straightforward, install docker and run from source it will pull a OS layer and install gateway in container.
project="gateway"
url="https://github.com/tizenteam/${project}"
branch="sandbox/rzr/devel/artik/master"
git clone --recursive --depth 1 -b "$branch" "$url" ; cd "$project"
image="ubuntu:18.04" # or debian:latest ...
sed -e "s|^FROM .*|FROM $image|g" -i Dockerfile
time $sudo docker-compose up
Expected log:
Starting gateway_web_1 ...
Starting gateway_web_1
(...)
+ nvm_echo 0.33.8
+ command printf '%s\n' 0.33.8
0.33.8
+ echo 'node version'
+ node --version
node version
v8.11.4
npm version
+ echo 'npm version'
+ npm --version
5.6.0
+ echo 'Starting gateway ...'
+ npm start -- --check-wifi
Starting gateway ...

> things-gateway@0.6.0 start /root/mozilla-iot/gateway
> webpack && node build/gateway.js "--check-wifi"
(...)
web_1  | 2018-08-23 10:06:21.249 HTTP server listening on port 8080
web_1  | 2018-08-23 10:06:21.262 DNS config is: fb2d8ee911af
web_1  | 2018-08-23 10:06:21.262 Service Discovery: changing profile - local domain is now: fb2d8ee911af
web_1  | 2018-08-23 10:06:21.310 Service Discovery: state changed to: true
web_1  | 2018-08-23 10:06:31.262 Checking for add-on updates...
(...)
Then you can browse the welcome page on unprivileged port 8080 (on loopback or host's IPs):
Welcome

Choose a secure web address for your gateway:
.mozilla-iot.org

Skip
On benefit of having docker files in sources, is that project can be built on reference OS, and be deployed on any as long as docker is supported.
This could be good also for tracking regressions (using git-bisect ?).
For deeper integration, maybe you should try out upstream's Docker images:
- TODO: image is currently broken, I am upstreaming fixes
- https://github.com/mozilla-iot/gateway-docker/pull/9# (Status: Merged)
etcdir=/home/node/.mozilla-iot
datadir=/tmp/$etcdir
sudo docker run \
    -d \
    --rm \
    -v $datadir:$etcdir \
    --net=host \
    --name mozilla-iot-gateway \
mozillaiot/gateway:latestRebuild project by typing:
sudo="sudo"
project="gateway-docker"
url="https://github.com/mozilla-iot/${project}"
branch="master"
git clone --recursive --depth 1 -b "$branch" "$url" ; cd "$project"
time $sudo docker-compose up
Expected log:
# web_1 | 2018-08-23 08:49:17.469 HTTP server listening on port 8080Related:
- https://github.com/mozilla-iot/gateway-docker/pull/9# (Status: Merged)
- TODO: This part is not ready consider to run on regular desktop or reference hardware (RasberryPi)
sudo="sudo"
project="gateway"
url="https://github.com/mozilla-iot/${project}"
branch="master"

sudo sync
sudo mount --bind .. /home/$USER # TODO
git clone --recursive --depth 1 -b "$branch" "$url" ; cd "$project"
bash ./install.sh
# nvm use 10
ARTIK 5,7 or even 10 should be able to support Mozilla-IoT's gateway which was originally targeting RaspberryPi as reference platform and thus Raspbian OS.
My ARTIK710 was shipped on Fedora-24 ( the same OS I build IoTivity 1.3.1 package for )
I have myself managed to make the gateway running ARTIK7 on fedora 24, with nvm node10 because node LTS failed to run, so I upgraded it and rebuild some adapters.
A couple of fixes were needed and are already upstreamed hardcoded path or environment issues, but didn't land in latest release 0.5.0.
Build step can be a bit intensive, because some packages like sqlite3 are only distributed as source
-
TODO: package sqlite for node 10 on various arch:
- https://github.com/mapbox/node-sqlite3/commits?author=rzr
- https://github.com/mapbox/node-sqlite3/issues/994# (Status: Closed)
- https://github.com/TizenTeam/node-sqlite3#
- https://github.com/mapbox/node-sqlite3/issues/418# (Status: Open, Docker)
- https://github.com/mapbox/node-sqlite3/pull/1076# (Status: Released)
- https://github.com/mapbox/node-sqlite3/pull/1028# (Status: Open)
- https://github.com/mapbox/node-sqlite3/blob/master/CHANGELOG.md#401
- https://github.com/mapbox/node-sqlite3/pull/1147# (Status: Open)
- https://dl.bintray.com/rzr/devel/
Like explained in Home page, we can bind an extra disk as docker directory, but before let's plug an other USB disk (4GB or any) and make some extra swap memory.
sudo="sudo"
lsblk # Upper USB slot is sdb
swap=/dev/sdb # TODO: update if needed
$sudo sync
$sudo mkswap -f  $swap
$sudo swapon $swap
free
While I use a bigger space for docker :
cat /etc/os-release # PRETTY_NAME="Fedora 24 (Twenty Four)"
sudo=$(which sudo) || echo "" # Or configure your sudoers
$sudo sync

$sudo dnf install docker docker-compose screen time git etckeeper jq
screen # Press "Ctrl+a c" : to open a new terminal


disk='/dev/disk/by-id/usb-Generic_Mass-Storage-0:0'
lsblk # Bottom USB slot is sda

# disk="/dev/sda" # TODO: update if needed (ie: /dev/disk/by-id/usb-*)
$sudo umount /dev/sda
$sudo mkfs.ext4 -L webthings "$disk" # TODO: verify $disk variable

dev='/dev/disk/by-label/docker'
mnt="/var/lib/docker"
$sudo systemctl stop docker
$sudo mkdir -p "$mnt"
$sudo mount "$dev" "$mnt"
$sudo systemctl restart docker
$sudo docker version # docker-common-1.10.3-55.gite03ddb8.fc24.armv7hl

cd "$mnt"
sudo mkdir -p ./${HOME}
sudo chown ${USER} ./${HOME}
cd ./${HOME} It is easy to build a docker image on ARTIK710 (armhf) device :
project="gateway-docker"
url="https://github.com/mozilla-iot/gateway-docker"
branch="master"
git clone --recursive --depth 1 -b "$branch" "$url" ; cd "$project"
image="node:10-stretch"
sed -e "s|^FROM .*|FROM $image|g" -i Dockerfile
time $sudo docker-compose up
We rebased on later version of Node because Node8 (or 9) segfault on arm7l:
time $sudo docker build https://github.com/tizenteam/gateway-docker.git#master
+ npm install yarn
Illegal instruction (core dumped)- https://github.com/nodejs/docker-node/issues/862# (Status: Open)
Alternatively in source's Dockerfile can be used too:
# sudo=sudo # if docker not configured for user
project="gateway"
url="https://github.com/tizenteam/${project}"
branch="sandbox/rzr/docker/master"
git clone --recursive --depth 1 -b "$branch" "$url" ; cd "$project"
image="node:10-stretch"
sed -e "s|^FROM .*|FROM $image|g" -i Dockerfile
$sudo docker-compose up

$sudo time docker build -t gateway_web . # 1h to rebuild , 2GB used
$sudo docker run --net host -t gateway_web
If you use upstream, the gateway will start but some addons wont be loaded because of API change:
2018-10-19 09:56:26.633 thing-url: NODE_MODULE_VERSION 57. This version of Node.js requires
2018-10-19 09:56:26.634 thing-url: NODE_MODULE_VERSION 64. Please try re-compiling or re-installing
So there we rebuilt them on device
Related:
- https://github.com/mozilla-iot/gateway/pull/1402# (Status: Merged)
- https://github.com/docker/compose/issues/4874# (Status: Closed)
I think that latest ARTIK images switched to Ubuntu, so I will be even easier to migrate from Raspbian as both are debian based.
Note, that Ubuntu is supporting armhf so we can use it.
project="gateway"
url="https://github.com/mozilla-iot/${project}"
branch="master"
# sudo apt-get install docker-compose git time sudo # if on debian based OS
git clone --recursive --depth 1 -b "$branch" "$url" ; cd "$project"
image="ubuntu:18.04" # or debian:latest ...
sed -e "s|^FROM .*|FROM $image|g" -i Dockerfile
time $sudo docker-compose up || time docker build .
Expected:
Using meta-virtualization on STM32MP1:
U-Boot SPL 2018.11-stm32mp-r3 (Jan 28 2020 - 10:25:44 +0000)
Model: STMicroelectronics STM32MP157C-DK2 Discovery Board
RAM: DDR3-1066/888 bin G 1x4Gb 533MHz v1.45
Trying to boot from MMC1

cat /proc/version
Linux version 4.19.49 (oe-user@oe-host) (gcc version 8.3.0 (GCC)) #1 SMP PREEMPT Tue Jan 28 09:01:53 UTC 2020


sudo=$(which sudo) || echo "" # Or configure your sudoers

dev="/dev/disk/by-id/usb-Generic_Mass-Storage-0:0"
label="swap"
$sudo mkswap -L "$label" "$dev"

dev=/dev/disk/by-label/swap
swapon $dev

/etc/init.d/cgroups-init start

dev=/dev/disk/by-label/docker
mnt=/var/lib/docker
/etc/init.d/docker.init stop
mount $dev $mnt
/etc/init.d/docker.init start

/usr/bin/dockerd --pidfile /var/run/dockerd.pid '--registry-mirror=http://localhost:5000' '--insecure-registry=http://localhost:5000' --raw-logs
Error starting daemon: Devices cgroup isn't mounted

zcat /proc/config.gz | grep CONFIG_CGROUP_DEVICE
# CONFIG_CGROUP_DEVICE is not set


ifconfig  eth0 192.168.1.144 up
- https://github.com/CrossStream/meta-virtualization/tree/sandbox/rzr/review/master
- https://git.yoctoproject.org/cgit/cgit.cgi/meta-virtualization/
Optionally, If you have the interposer board you can also try out the generic sensor adapter ARM binaries should work too:
More info about this device:
More hints can be shared later, just tell me more about your setup.
If not supported you can try to rebuild this:
project="gateway"
url="https://github.com/mozilla-iot/${project}"
branch="master"
# sudo apt-get install docker-compose git time sudo # if on debian based OS
git clone --recursive --depth 1 -b "$branch" "$url" ; cd "$project"
image="ubuntu:18.04" # or debian:latest ...
sed -e "s|^FROM .*|FROM $image|g" -i Dockerfile
time $sudo docker-compose up || time docker build .
Success reports:
- 2017-12-07 version worked on debian-10/aarch64 on Dragonboard 410c
It would be nice to have it packaged in debian to support various arch
Unfortunalely node/npm was not shipped it Debian 9 aka scretch. So we advise you to install nvm instead.
Alternatively node can be installed too, but nvm is more flexible, anyway here are some hints if you don't want to setup NVM:
Once installed you can check using:
npm install yarnThere was a UI bug fixed in 0.6.0, or rebuild the gateway from upstream master branch (as explained earlier).
For the record, on (all) previous release, click events are not triggering the desired widget if a thing contain several properties of same type, this issue is not visible for all supported examples.
-
https://github.com/mozilla-iot/gateway/issues/1148# (Status: Released in 0.6.0)
- https://github.com/mozilla-iot/gateway/pull/1249# (Status: Released in 0.9.0-)
- https://github.com/mozilla-iot/gateway/pull/1370# (Status: Released in 0.9.0-)
Earlier version of patches can be applied on release 0.5.0 without rebuilding (just reboot once).
git config --global user.email "you@example.com"
git config --global user.name "Your Name"
cd ~/mozilla-iot/gateway
wget -c https://github.com/TizenTeam/gateway/commit/104738a9066b9a8887889967b2f3770e8566bc12.patch
git am 104738a9066b9a8887889967b2f3770e8566bc12.patch

wget -c https://github.com/TizenTeam/gateway/commit/c3c63aa3a313c975a51fae716f87c083328c6c46.patch
git am c3c63aa3a313c975a51fae716f87c083328c6c46.patchFrom menu a resource token can be issued and used this way:
token='eyJhbGciOiJFUzI1NiIsInR5cCI6IkpXVCIsImtpZCI6ImNiMzk1YTVlLTVmMmUtNGIyOC1iYjliLTI1NDI0ZTllMWQ4OSJ9.eyJjbGllbnRfaWQiOiJsb2NhbC10b2tlbiIsInJvbGUiOiJhY2Nlc3NfdG9rZW4iLCJzY29wZSI6Ii90aGluZ3M6cmVhZHdyaXRlIiwiaWF0IjoxNTU5MjQ0NTc1LCJpc3MiOiJodHRwczovL3Nvc2cubW96aWxsYS1pb3Qub3JnIn0.vYY2VtBw4psb56T6dXVYzuproOoAbGfV0N78DMDQ2O5TdsA0eCU0veupX9Rmp4dnk_3-qwrRSFSfhxrsJZuz7g'

url='https://localhost:4443/things'

curl -k -H 'Accept: application/json' -H "Authorization: Bearer $token" "$url"
ping gateway.local
nmap -p8080 gateway.local
#8080/tcp closed http-proxy
sudo arp -a | grep -i 'B8:27:EB:' # (Raspberry Pi Foundation)
curl -4i http://gateway.local
# pi # raspberry # sudo touch /boot/ssh # rebootRemote access:
nmap -p 8443 api.mozilla-iot.org
#| 8443/tcp open  https-alt
-
https://github.com/mozilla-iot/thing-url-adapter
- Issues with Node10 (TODO: check)
npm install @abandonware/bluetooth-hci-socket- https://github.com/mozilla-iot/thing-url-adapter/pull/64# (Status: Closed)
- https://github.com/mozilla-iot/gateway/pull/1441# (Satus: Closed)
- https://www.npmjs.com/package/@abandonware/bluetooth-hci-socket#
- https://github.com/noble/node-bluetooth-hci-socket/issues/84# (Status: In progress)
- https://github.com/noble/node-bluetooth-hci-socket/issues/85# (Status: In progress)
- https://github.com/noble/noble/pull/851# (Status: under Review)
- https://github.com/noble/noble/issues/805# (Status: Open)
- https://github.com/abandonware/noble/pull/1# (Status: Merged)
- https://github.com/sandeepmistry/node-eddystone-beacon-scanner/pull/26#