Prisma
Prisma is an open source ORM.
Object–Relational Mapping is a technique that allows you to query data from a database through an object oriented paradigm. That creates a virtual object database that can be used within the programming language.
Basically, Prisma allows you to work with a database using less lines of code, and with more convenient methods.
To set up a virtual database, you will need a schema file. A schema is the main config file for Prisma. It usually is called schema.prisma. Here is an example of one:
//This part connects you to your database
datasource db {
  provider = "mysql"
  url      = env("DATABASE_URL")
}

generator client {
  provider = "prisma-client-js"
}

model User {
  id        Int      @id @default(autoincrement())
  createdAt DateTime @default(now())
  email     String   @unique
  name      String?
  role      Role     @default(USER)
  posts     Post[]
}

model Post {
  id        Int      @id @default(autoincrement())
  createdAt DateTime @default(now())
  updatedAt DateTime @updatedAt
  published Boolean  @default(false)
  title     String   @db.VarChar(255)
  author    User?    @relation(fields: [authorId], references: [id])
  authorId  Int?
}

enum Role {
  USER
  ADMIN
}
Prisma takes the models written in the schema. Then, it generates the SQL migrations and types stored in node_modules/.prisma/client. These types are aware of the relations that are created in the models as well as provide generated code that can be used to query the models. When you query using the client, it takes the queries and passes them to a Query Engine binary that optimizes it and converts it to a database query.
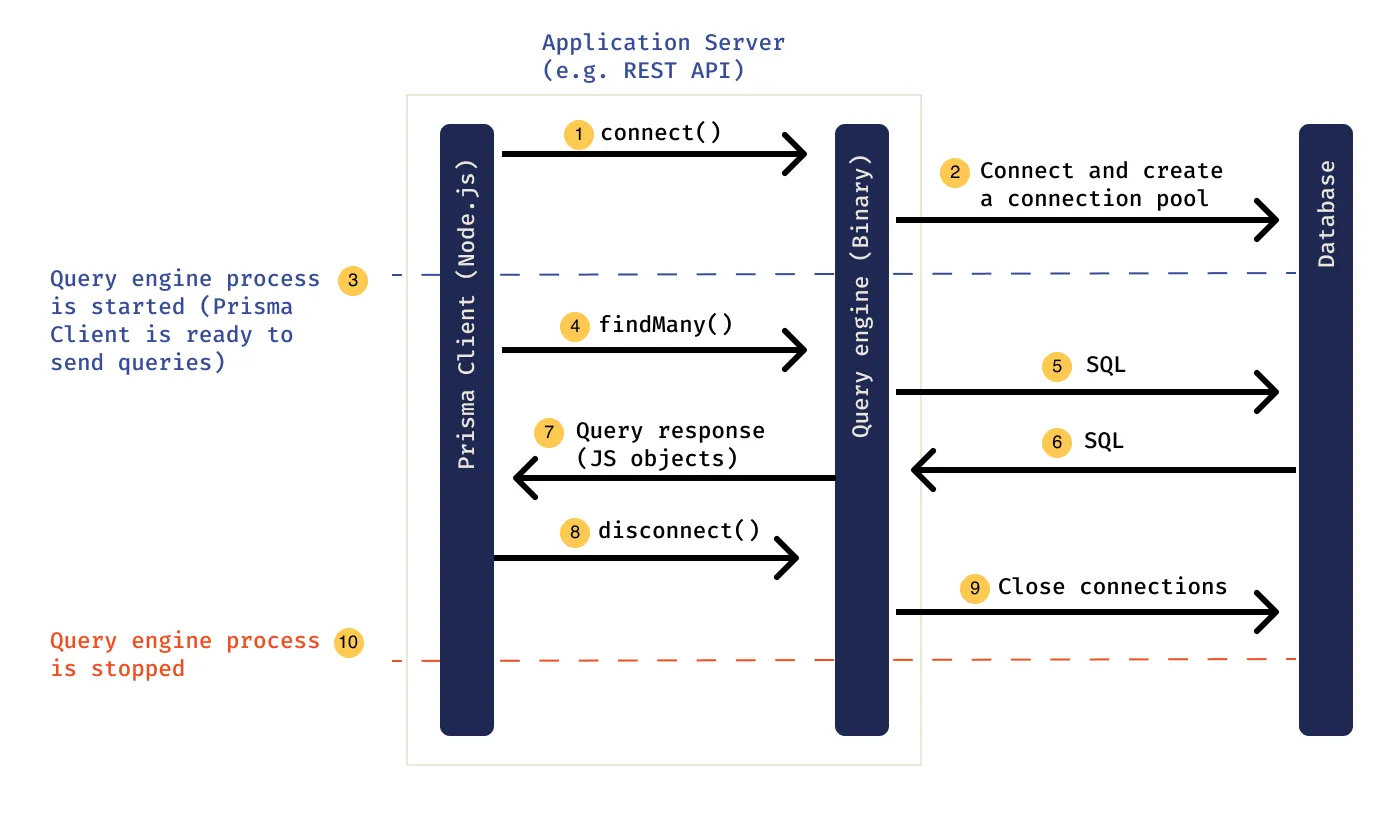
Prisma's engine is something you would not have to interact with ever when working with Prisma, but it helps us understand how Prisma works. All communication to the database layer happens via the engine.
Prisma's main goal is to make application developers more productive when working with databases. Here are a few examples of how Prisma achieves this:
- Thinking in objects instead of mapping relational data
- Queries not classes to avoid complex model objects
- Single source of truth for database and application models
- Healthy constraints that prevent common pitfalls and anti-patterns
- An abstraction that makes the right thing easy ("pit of success")
- Type-safe database queries that can be validated at compile time
- Less boilerplate so developers can focus on the important parts of their app
- Auto-completion in code editors instead of needing to look up documentation

For an existing SQL database
- an existing Node.js project with a
package.json - Node.js installed on your machine
- a MySQL database server running and a database with at least one table
Make sure you have your database connection URL (that includes your authentication credentials) at hand! If you don't have a database server running and just want to explore Prisma, check out the Quickstart.
As a first step, navigate into your project directory that contains the package.json file.
Next, add the Prisma CLI as a development dependency to your project:
npm install prisma --save-dev
You can now invoke the Prisma CLI by prefixing it with npx:
npx prisma
Next, set up your Prisma project by creating your Prisma schema file template with the following command:
npx prisma init
This command does two things:
- creates a new directory called
prismathat contains a file calledschema.prisma, which contains the Prisma schema with your database connection variable and schema models - creates the
.envfile in the root directory of the project, which is used for defining environment variables (such as your database connection)
To connect your database, you need to set the url field of the datasource block in your Prisma schema to your database connection URL:
datasource db {
  provider = "postgresql"
  url      = env("DATABASE_URL")
}
Note that the default schema created by prisma init uses PostgreSQL, so you first need to switch the provider to mysql:
datasource db {
  provider = "mysql"
  url      = env("DATABASE_URL")
}
In this case, the url is set via an environment variable which is defined in .env:
DATABASE_URL="mysql://johndoe:randompassword@localhost:3306/mydb"The fields passed to the datasource block are:
-
provider: Specifies themysqldata source connector. -
url: Specifies the connection URL for the MySQL database server. In this case, an environment variable is used to provide the connection URL.
Here's an overview of the components needed for a MySQL connection URL:

You now need to adjust the connection URL to point to your own database.
As an example, for a MySQL database hosted on AWS RDS, the connection URL might look similar to this:
DATABASE_URL="mysql://johndoe:XXX@mysql–instance1.123456789012.us-east-1.rds.amazonaws.com:3306/mydb"When running MySQL locally, your connection URL typically looks similar to this:
DATABASE_URL="mysql://root:randompassword@localhost:3306/mydb"You can now start writing queries to read and write data in your database. For the purpose of this guide, you'll use a plain Node.js script to explore some basic features of Prisma Client.
Run the following commands:
npx prisma db pull
- to pull to pull the schema to
schema.prisma;
npm install @prisma/client
- to install Prisma client;
npx prisma generate
- to generate the client base on the pulled schema in
schema.prisma;
npm install typescript ts-node @types/node --save-dev
- to install
typescript,ts-node, and@types/node.
Create a new file named index.ts and add the following code to it:
import { PrismaClient } from '@prisma/client'

const prisma = new PrismaClient()

async function main() {
  // ... you will write your Prisma Client queries here
}

main()
  .then(async () => {
    await prisma.$disconnect()
  })
  .catch(async (e) => {
    console.error(e)
    await prisma.$disconnect()
    process.exit(1)
  })
Here's a quick overview of the different parts of the code snippet:
- Import the
PrismaClientconstructor from the @prisma/client node module - Instantiate
PrismaClient - Define an
asyncfunction namedmainto send queries to the database - Call the
mainfunction - Close the database connections when the script terminates
Inside the main function, add the following query to read all
Userrecords from the database and print the result:
async function main() {
  // ... you will write your Prisma Client queries here
  const allUsers = await prisma.user.findMany()
  console.log(allUsers)
}
Now run the code with this command:
npx ts-node index.ts
This should print an empty array because there are no User records in the database yet:
[]
The findMany query you used in the previous section only reads data from the database (although it was still empty). In this section, you'll learn how to write a query to write new records into the Post and User tables.
Adjust the main function to send a create query to the database:
async function main() {
  await prisma.user.create({
    data: {
      name: 'Alice',
      email: 'alice@prisma.io',
      posts: {
        create: { title: 'Hello World' },
      },
      profile: {
        create: { bio: 'I like turtles' },
      },
    },
  })

  const allUsers = await prisma.user.findMany({
    include: {
      posts: true,
      profile: true,
    },
  })
  console.dir(allUsers, { depth: null })
}
This code creates a new User record together with new Post and Profile records using a nested write query. The User record is connected to the two other ones via the Post.author ↔ User.posts and Profile.user ↔ User.profile relation fields respectively.
Notice that you're passing the include option to findMany which tells Prisma Client to include the posts and profile relations on the returned User objects.
Run the code with this command:
npx ts-node index.ts
The output should look similar to this:
[
  {
    email: 'alice@prisma.io',
    id: 1,
    name: 'Alice',
    posts: [
      {
        content: null,
        createdAt: 2020-03-21T16:45:01.246Z,
        id: 1,
        published: false,
        title: 'Hello World',
        authorId: 1,
      }
    ],
    profile: {
      bio: 'I like turtles',
      id: 1,
      userId: 1,
    }
  }
]
The query added new records to the User and the Post tables:
| id | name | |
|---|---|---|
| 1 | "alice@prisma.io" | "Alice" |
| id | createdAt | title | content | published | authorId |
|---|---|---|---|---|---|
| 1 | 2020-03-21T16:45:01.246Z | "Hello World" | null | false | 1 |
| id | bio | userId |
|---|---|---|
| 1 | "I like turtles" | 1 |
Note: The numbers in the
authorIdcolumn onPostanduserIdcolumn onProfileboth reference theidcolumn of theUsertable, meaning theidvalue1column therefore refers to the first (and only)Userrecord in the database.
Before moving on to the next section, you'll "publish" the Post record you just created using an update query. Adjust the main function as follows:
async function main() {
  const post = await prisma.post.update({
    where: { id: 1 },
    data: { published: true },
  })
  console.log(post)
}
Now run the code using the same command as before:
npx ts-node index.ts
You will see the following output:
{
  id: 1,
  title: 'Hello World',
  content: null,
  published: true,
  authorId: 1
}
The Post record with an id of 1 now got updated in the database:
| id | title | content | published | authorId |
|---|---|---|---|---|
| 1 | "Hello World" | null | true | 1 |
Fantastic, you just wrote new data into your database for the first time using Prisma Client 🚀
This tutorial was a combination of official Prisma guides. If you would like to go in deeper, please try them out:
- Steps 1 and 2 were the same, however, for step 3 you should continue onto the introspecting your database with Prisma step. This guide is used when you are adding Prisma to an existing project.
- Step 3 was taken from the Quickstart guide which is intended for you to just play around.
- To start from scratch using MySQL database, use this guide.
- Import and instantiate prisma client
import { PrismaClient } from '@prisma/client'

const prisma = new PrismaClient()- Retrieve all
Userrecords from the database
// Run inside `async` function
const allUsers = await prisma.user.findMany()- Include the posts relation on each returned
Userobject
// Run inside `async` function
const allUsers = await prisma.user.findMany({
  include: { posts: true },
})- Filter all
Postrecords that contain"prisma"
// Run inside `async` function
const filteredPosts = await prisma.post.findMany({
  where: {
    OR: [
      { title: { contains: 'prisma' } },
      { content: { contains: 'prisma' } },
    ],
  },
})- Create a new
Userand a newPostrecord in the same query
// Run inside `async` function
const user = await prisma.user.create({
  data: {
    name: 'Alice',
    email: 'alice@prisma.io',
    posts: {
      create: { title: 'Join us for Prisma Day 2020' },
    },
  },
})- Update an existing
Postrecord
// Run inside `async` function
const post = await prisma.post.update({
  where: { id: 42 },
  data: { published: true },
})With Prisma Migrate, Prisma's integrated database migration tool, the workflow looks as follows:
- Manually adjust your Prisma data model
- Migrate your development database using the
prisma migrate devCLI command - Use Prisma Client in your application code to access your database

Database migration is the process of migrating data from one or more source databases to one or more target databases by using a database migration service. When a migration is finished, the dataset in the source databases resides fully, though possibly restructured, in the target databases. Clients that accessed the source databases are then switched over to the target databases, and the source databases are turned down.

Database migrations basically track granular changes to your database schema.
ORM:
- What is an ORM, how does it work, and how should I use one?
- What is an ORM - The meaning of Object Relational Mapping Database Tools
Prisma docs:
- What is Prisma?
- Why Prisma?
- Prisma schema
- Set up Prisma guide, when adding to an existing project that has MySQL
- MySQL
Other: