I recently came across this excellent article by Nathan LeClaire which goes about spinning up a RethinkDB cluster on the cloud, powered by Docker 1.9 and Swarm 1.0. It illustrates how using tools like Docker Compose and Docker Machine one can launch a cluster in just a few minutes. This is all possible thanks to one of Docker's coolest feat ever: Multi-Host Networking.
Multi-Host networking was labeled production grade on November 2015 and you can read more about it here. This blog post assumes you're somewhat familiar with this particular feature, but if you're not take look at this link and maybe this video and you should be good to go.
There are two main parts on this article:
- Launching a Swarm cluster.
- Launching an Elasticsearch cluster.
On the first part we will power up and Swarm cluster comprising one master and three nodes, which we will later use on part two to launch our Elasticsearch cluster. Before we move onto the fun stuff, make sure that:
- You're running Docker >= 1.9 (verify with docker version )
- Docker Compose >= 1.5.0 (verify with docker-compose --version)
- Docker Machine >= 0.5.0 (verify with docker-machine --version)
- Have a valid/active Digital Ocean account. If you don't you can get one here.
The "source code" of this article is available on GitHub. PRs are welcomed ;)
Before we can do anything else we need a few machines for our cluster, which we can be done in no time with Docker Machine. One thing I really love about Machine it's the number of Cloud providers it supports and how easy it is to launch a fully working Docker environment from the command line and have it running in a matter of minutes.
So, go ahead and grab your Digital Ocean access token. If you're new to Digital Ocean, take a look at the How To Generate a Personal Access Token first section first part this tutorial .
We will need to setup 5 environment variables:
export DIGITALOCEAN_ACCESS_TOKEN=YOUR_DIGITAL_OCEAN_GOES_HERE
export DIGITALOCEAN_IMAGE=debian-8-x64
export DIGITALOCEAN_PRIVATE_NETWORKING=true
export DIGITALOCEAN_REGION=sfo1
export DIGITALOCEAN_SIZE=1gb
Each one of these environment variable will be used later by Docker Machine when creating the servers for running Docker on the cloud. Let's take a look at the meaning of each of these variables:
- DIGITALOCEAN_ACCESS_TOKEN: This is the token which identifies your account so Digital Ocean knows on behalf of whom API calls are made (and so he can identify the account/user that will be billed ;)).
- DIGITALOCEAN_IMAGE: This is indicates which Linux Distro/OS we want to run on the server. We went here for Debian 8 since Multi-Host networking requires a kernel >= 3.16.
- DIGITALOCEAN_PRIVATE_NETWORKING: This enables communication between servers on the same data-center using a private network (i.e this network is not visible/accessible to the "outside" world). Take a look here if you want to learn more about Digital Ocean's private networking feature.
- DIGITALOCEAN_REGION: This is the region where servers will be created. I went for the Frisco region because is located in North America, but feel free to choose a different one especially if it happens to be closer to your geographical location. For a list of available regions take a look at the Digital Ocean's regions API
- DIGITALOCEAN_SIZE: This is the amount of RAM to be allocated for the server. Even though you can go for 512mb which is less expensive I strongly suggest that you use 1gb since the price difference is not that significant and you will certainly appreciate the performance gain.
For a comprehensive list of available options related the Digital Ocean driver for Docker machine take a look at the online documentation
Swarm requires access to a Key-Value store so that nodes can be discovered and added tot he cluster (or removed when the node goes down). So let's launch a server for the sole purpose of running the Key Value store, which in our case will be Consul:
docker-machine create -d digitalocean kvstore
eval $(docker-machine env kvstore)
export KV_IP=$(docker-machine ssh kvstore 'ifconfig eth1 | grep "inet addr:" | cut -d: -f2 | cut -d" " -f1')
docker run -d -p ${KV_IP}:8500:8500 -h consul--restart=always progrium/consul -server -bootstrap
wait a few minutes for the machine to come online and make sure the Consul sever is up and running by running:
docker-machine ssh kvstore curl -I http://$KV_IP:8500 2>/dev/null
which should produce an output like this:
    HTTP/1.1 301 Moved Permanently
    Location: /ui/
    Date: Tue, 19 Jan 2016 04:48:34 GMT
    Content-Type: text/plain; charset=utf-8
With the Key Value store in place lets launch the Swarm master:
docker-machine create -d digitalocean --swarm --swarm-master --swarm-discovery="consul://${KV_IP}:8500" --engine-opt="cluster-store=consul://${KV_IP}:8500" --engine-opt="cluster-advertise=eth1:2376" swarm-master
and now lets summon those minions:
export NUM_WORKERS=3;
for i in $(seq 1 $NUM_WORKERS); do
docker-machine create -d digitalocean --digitalocean-size=1gb --swarm --swarm-discovery="consul://${KV_IP}:8500" --engine-opt="cluster-store=consul://${KV_IP}:8500" --engine-opt="cluster-advertise=eth1:2376" swarm-node-${i} &
done;
This operation should take about 15 - 20 mins, so go get a cup of coffee ;). I wanted this to be run in sequence so that you can easily keep track of what's happening.
I know there is quite a bit to digest here, but if you find it overwhelming please do take the time to read Nathan's post and I'm sure by the time you're done everything in this article will make perfect sense.
With our infrastructure cluster in place we can now focus on the fun stuff: creating an Elasticsearch cluster. But before that, let's take a very quick look at Elasticsearch (ES from now on). ES is a high-availability/multi-tenant full-text search sever based on Lucene. Yes, I know that was a mouthful to say but take a couple of minutes at the ES home page and you'll get a better idea of what this remarkable piece of software can do for you.
It might seem a bit late, but there is one question I'd like to address before moving on. Why an ES Cluster? Aren't there a few cloud solutions already available at affordable prices? Yes there are some, like Amazon Elastic Search and QBox. but you still need at least $50 if you want a decent setup. Yes, it is true that Amazon Elastic Search is cloud based and that you pay only for what you use but it takes some time to get use to Amazon's terms and concepts (and the interface, and the lots of clicks ;))
There is also another reason why I think being able to run an ES cluster of your own can save you some time and money. A few months ago I was tasked to evaluate a suitable API Gateway to be put in front of our HTTP API(s). After a few weeks testing solutions from major providers it was clear to me that Kong would suit our needs to a large degree. I won't go into the details as to why Kong is such a good solution but if you're in the business of API(s) and Micro Services do take a look at it. So, once it was clear that Kong was the way to go, I needed to be sure that we wouldn't incur into any performance penalties once we started routing API calls through the Kong API Gateway. To make the story short, I ended up creating a small Python script to be able to replay API calls from logs files and this.
That little projet of mine integrates Locust, Statsd, Grafana and InfluxDB in order to visualize in real time the number of requests a given site/URL can handle over a short period of time. It is mostly about gluing all those pieces of software into a reusable stack and of course with a lot of help from Docker and Docker Compose. If I had only know ES around that time it would have saved me a lot of time. Why? You will see in no time.
So, time to launch the ES cluster. Grab this docker-compose file and save it somewhere in your filesystem.:
$ mkdir -p ~/tmp/es-cluster
$ cd ~/tmp/es-cluster
$ curl https://gist.githubusercontent.com/yoanisgil/047256dbe21622c1a10a/raw/90bffe5dd2ee2940594ee1019458741f2594acd3/docker-compose.yml > docker-compose.yml
with the file saved, lets make sure newly launched containers will run on our recently created Swarm cluster:
$ eval $(docker-machine env --swarm swarm-master)
and we can confirm that nodes are ready for taking work, by running:
$ docker info
Containers: 5
Images: 4
Role: primary
Strategy: spread
Filters: health, port, dependency, affinity, constraint
Nodes: 4
 swarm-master: 107.170.200.211:2376
  └ Status: Healthy
  └ Containers: 2
  └ Reserved CPUs: 0 / 1
  └ Reserved Memory: 0 B / 1.026 GiB
  └ Labels: executiondriver=native-0.2, kernelversion=3.16.0-4-amd64, operatingsystem=Debian GNU/Linux 8 (jessie), provider=digitalocean, storagedriver=aufs
 swarm-node-1: 107.170.203.99:2376
  └ Status: Healthy
  └ Containers: 1
  └ Reserved CPUs: 0 / 1
  └ Reserved Memory: 0 B / 1.026 GiB
  └ Labels: executiondriver=native-0.2, kernelversion=3.16.0-4-amd64, operatingsystem=Debian GNU/Linux 8 (jessie), provider=digitalocean, storagedriver=aufs
 swarm-node-2: 107.170.194.118:2376
  └ Status: Healthy
  └ Containers: 1
  └ Reserved CPUs: 0 / 1
  └ Reserved Memory: 0 B / 1.026 GiB
  └ Labels: executiondriver=native-0.2, kernelversion=3.16.0-4-amd64, operatingsystem=Debian GNU/Linux 8 (jessie), provider=digitalocean, storagedriver=aufs
 swarm-node-3: 107.170.247.233:2376
  └ Status: Healthy
  └ Containers: 1
  └ Reserved CPUs: 0 / 1
  └ Reserved Memory: 0 B / 1.026 GiB
  └ Labels: executiondriver=native-0.2, kernelversion=3.16.0-4-amd64, operatingsystem=Debian GNU/Linux 8 (jessie), provider=digitalocean, storagedriver=aufs
CPUs: 4
Total Memory: 4.103 GiB
Name: 6546401664f0
and here comes the fun. First we will launch a ES master node:
docker-compose --x-networking --x-network-driver overlay up -d master
The Docker Compose service relavant to this command looks like this:
master:
    image: elasticsearch:2
    ports:
       -"9200:9200"
    restart: always
    container_name: es_master
Most of these options will look familiar to you and I know providing a container_name reduces to 1 the number of containers with the same name that can run on a Swarm node but this will make things a bit easier for running certain actions on the ES master node later on.
The es_master container will act as an contact/entry point for the other nodes to know about the cluster topology. Before we launch more nodes let's install the Elasticsearch-HQ plugin, a plugin that will provide us with some very useful monitoring/configuration details about the cluster:
docker exec es_master plugin install royrusso/elasticsearch-HQ
Once the plugin has been installed lets take a look at what sort of information you can get from it. Run this command:
$ echo "http://$(docker inspect --format='{{(index (index .NetworkSettings.Ports "9200/tcp") 0).HostIp}}' es_master):9200/_plugin/hq/"
grab the resulting URL and enter it on your browser. You should see something like this:
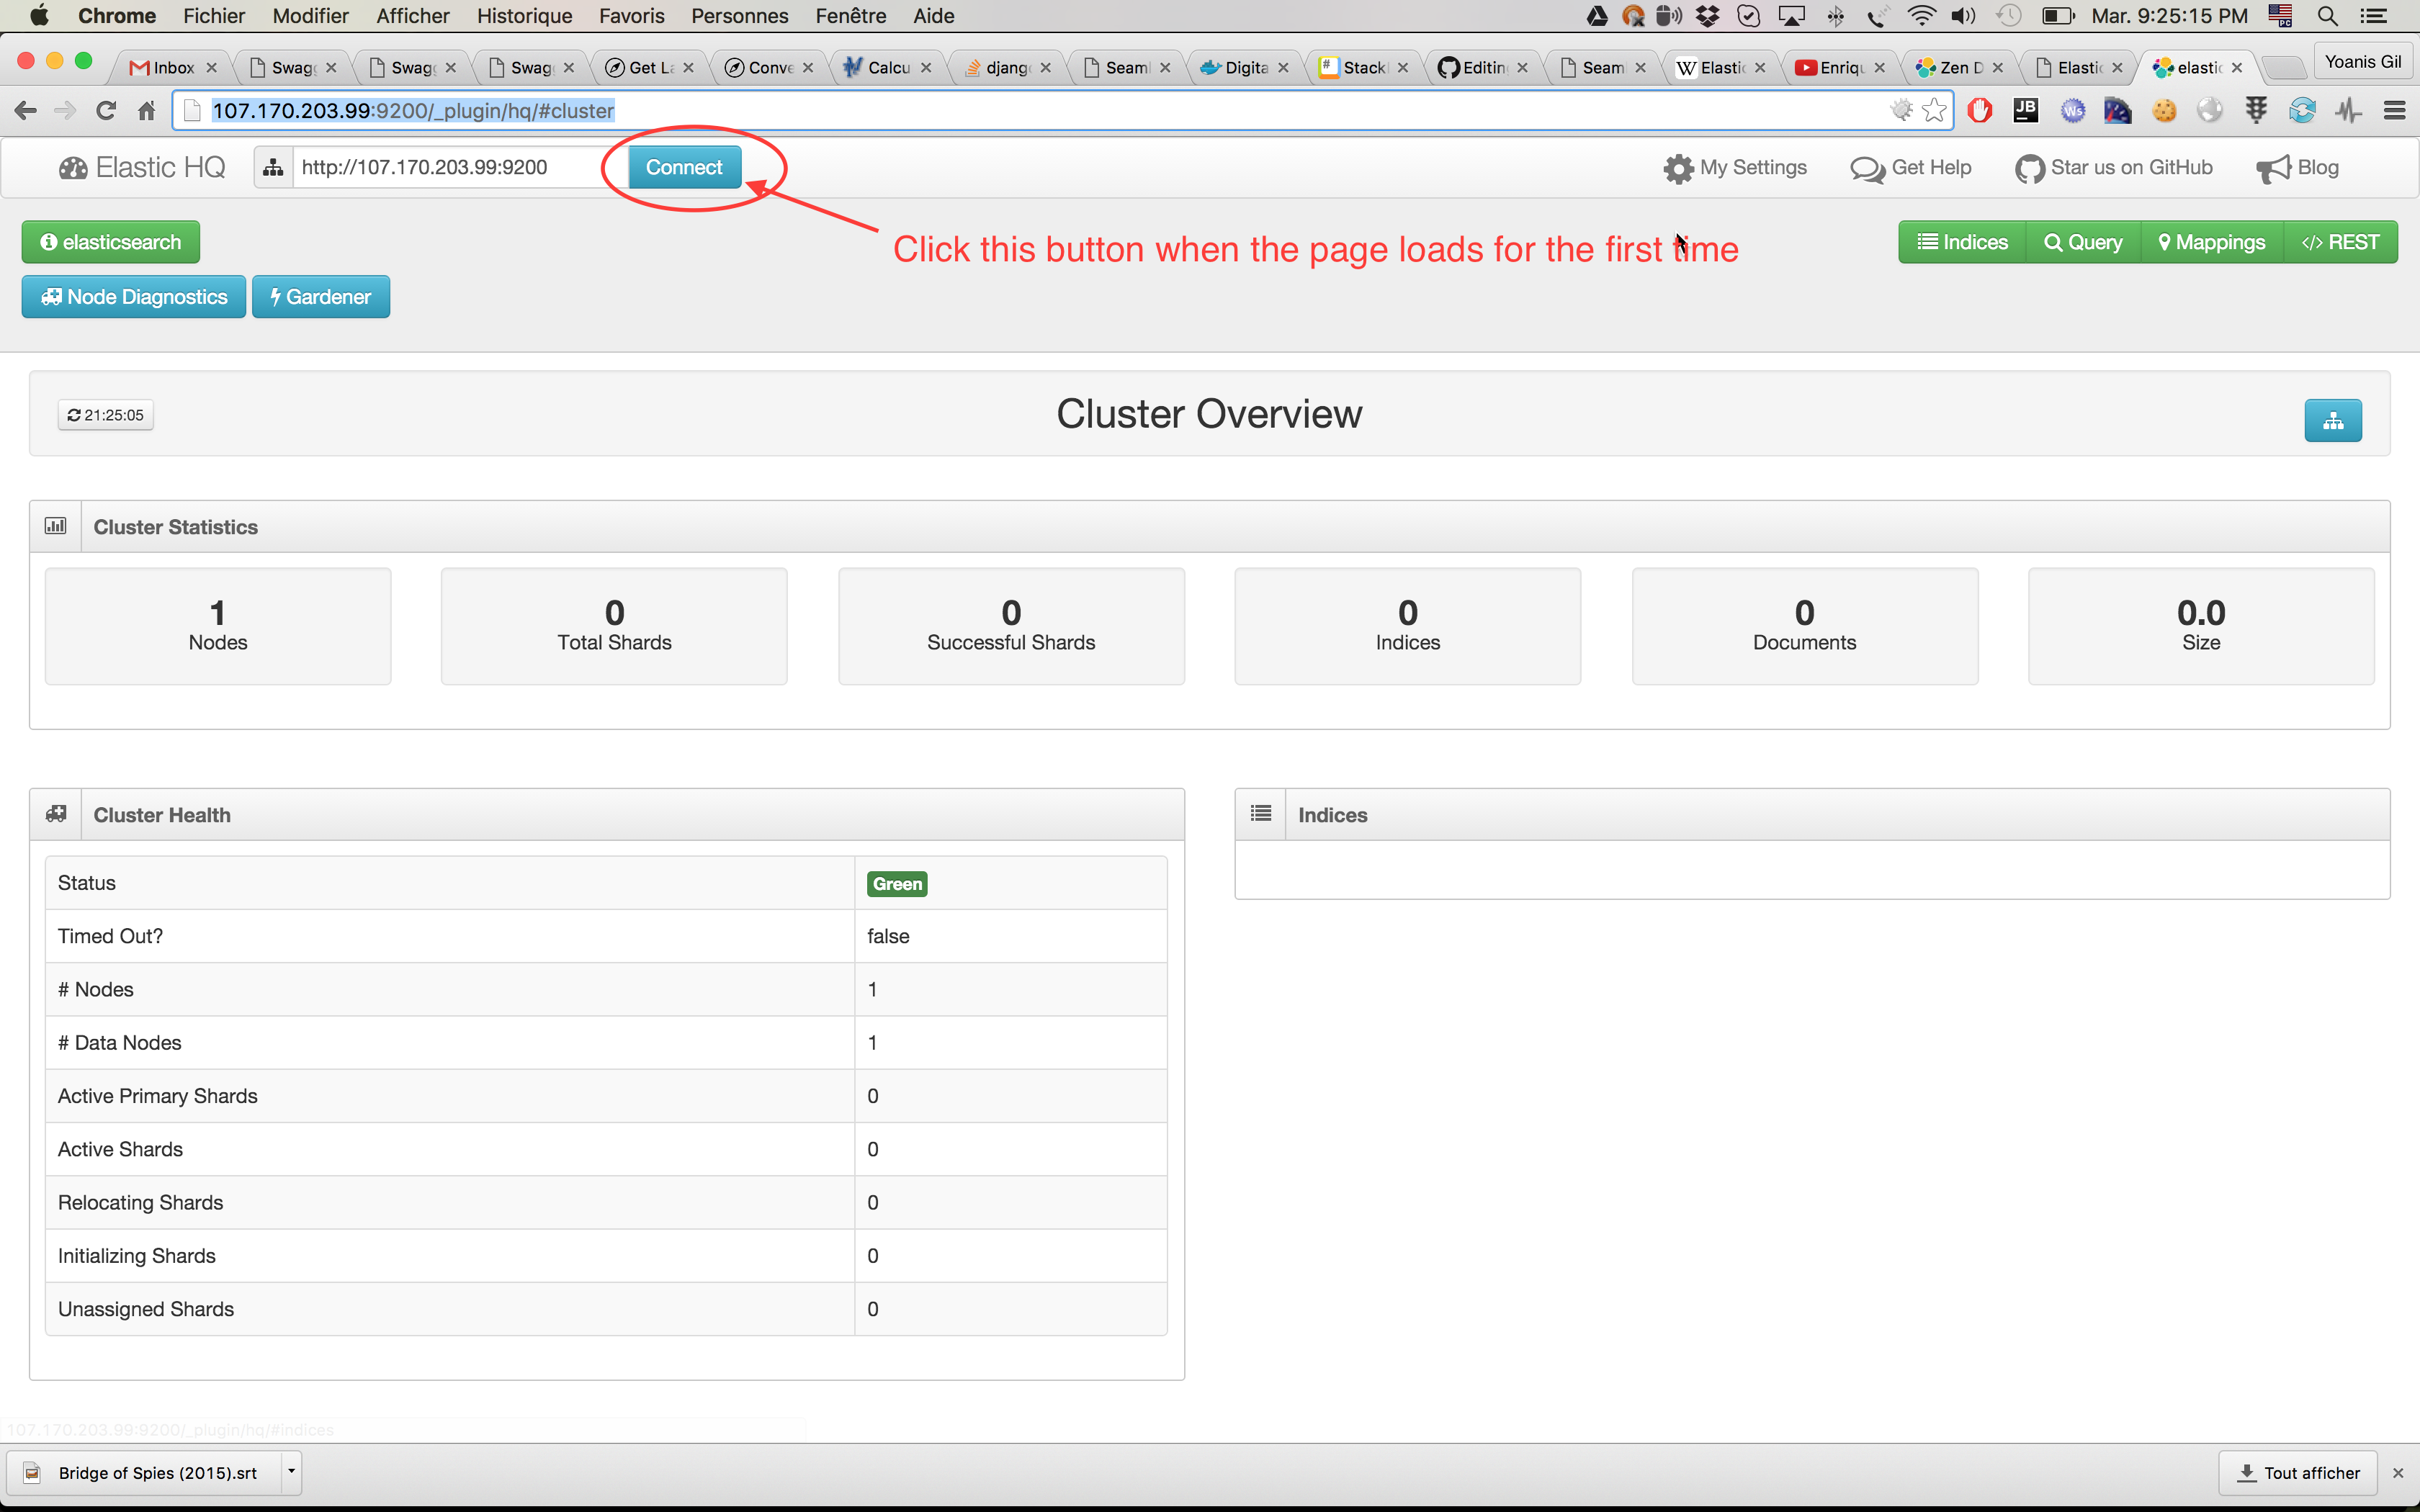
and, as the screenshot indicates, do not forget to click the Connect button when the page loads for the first time.
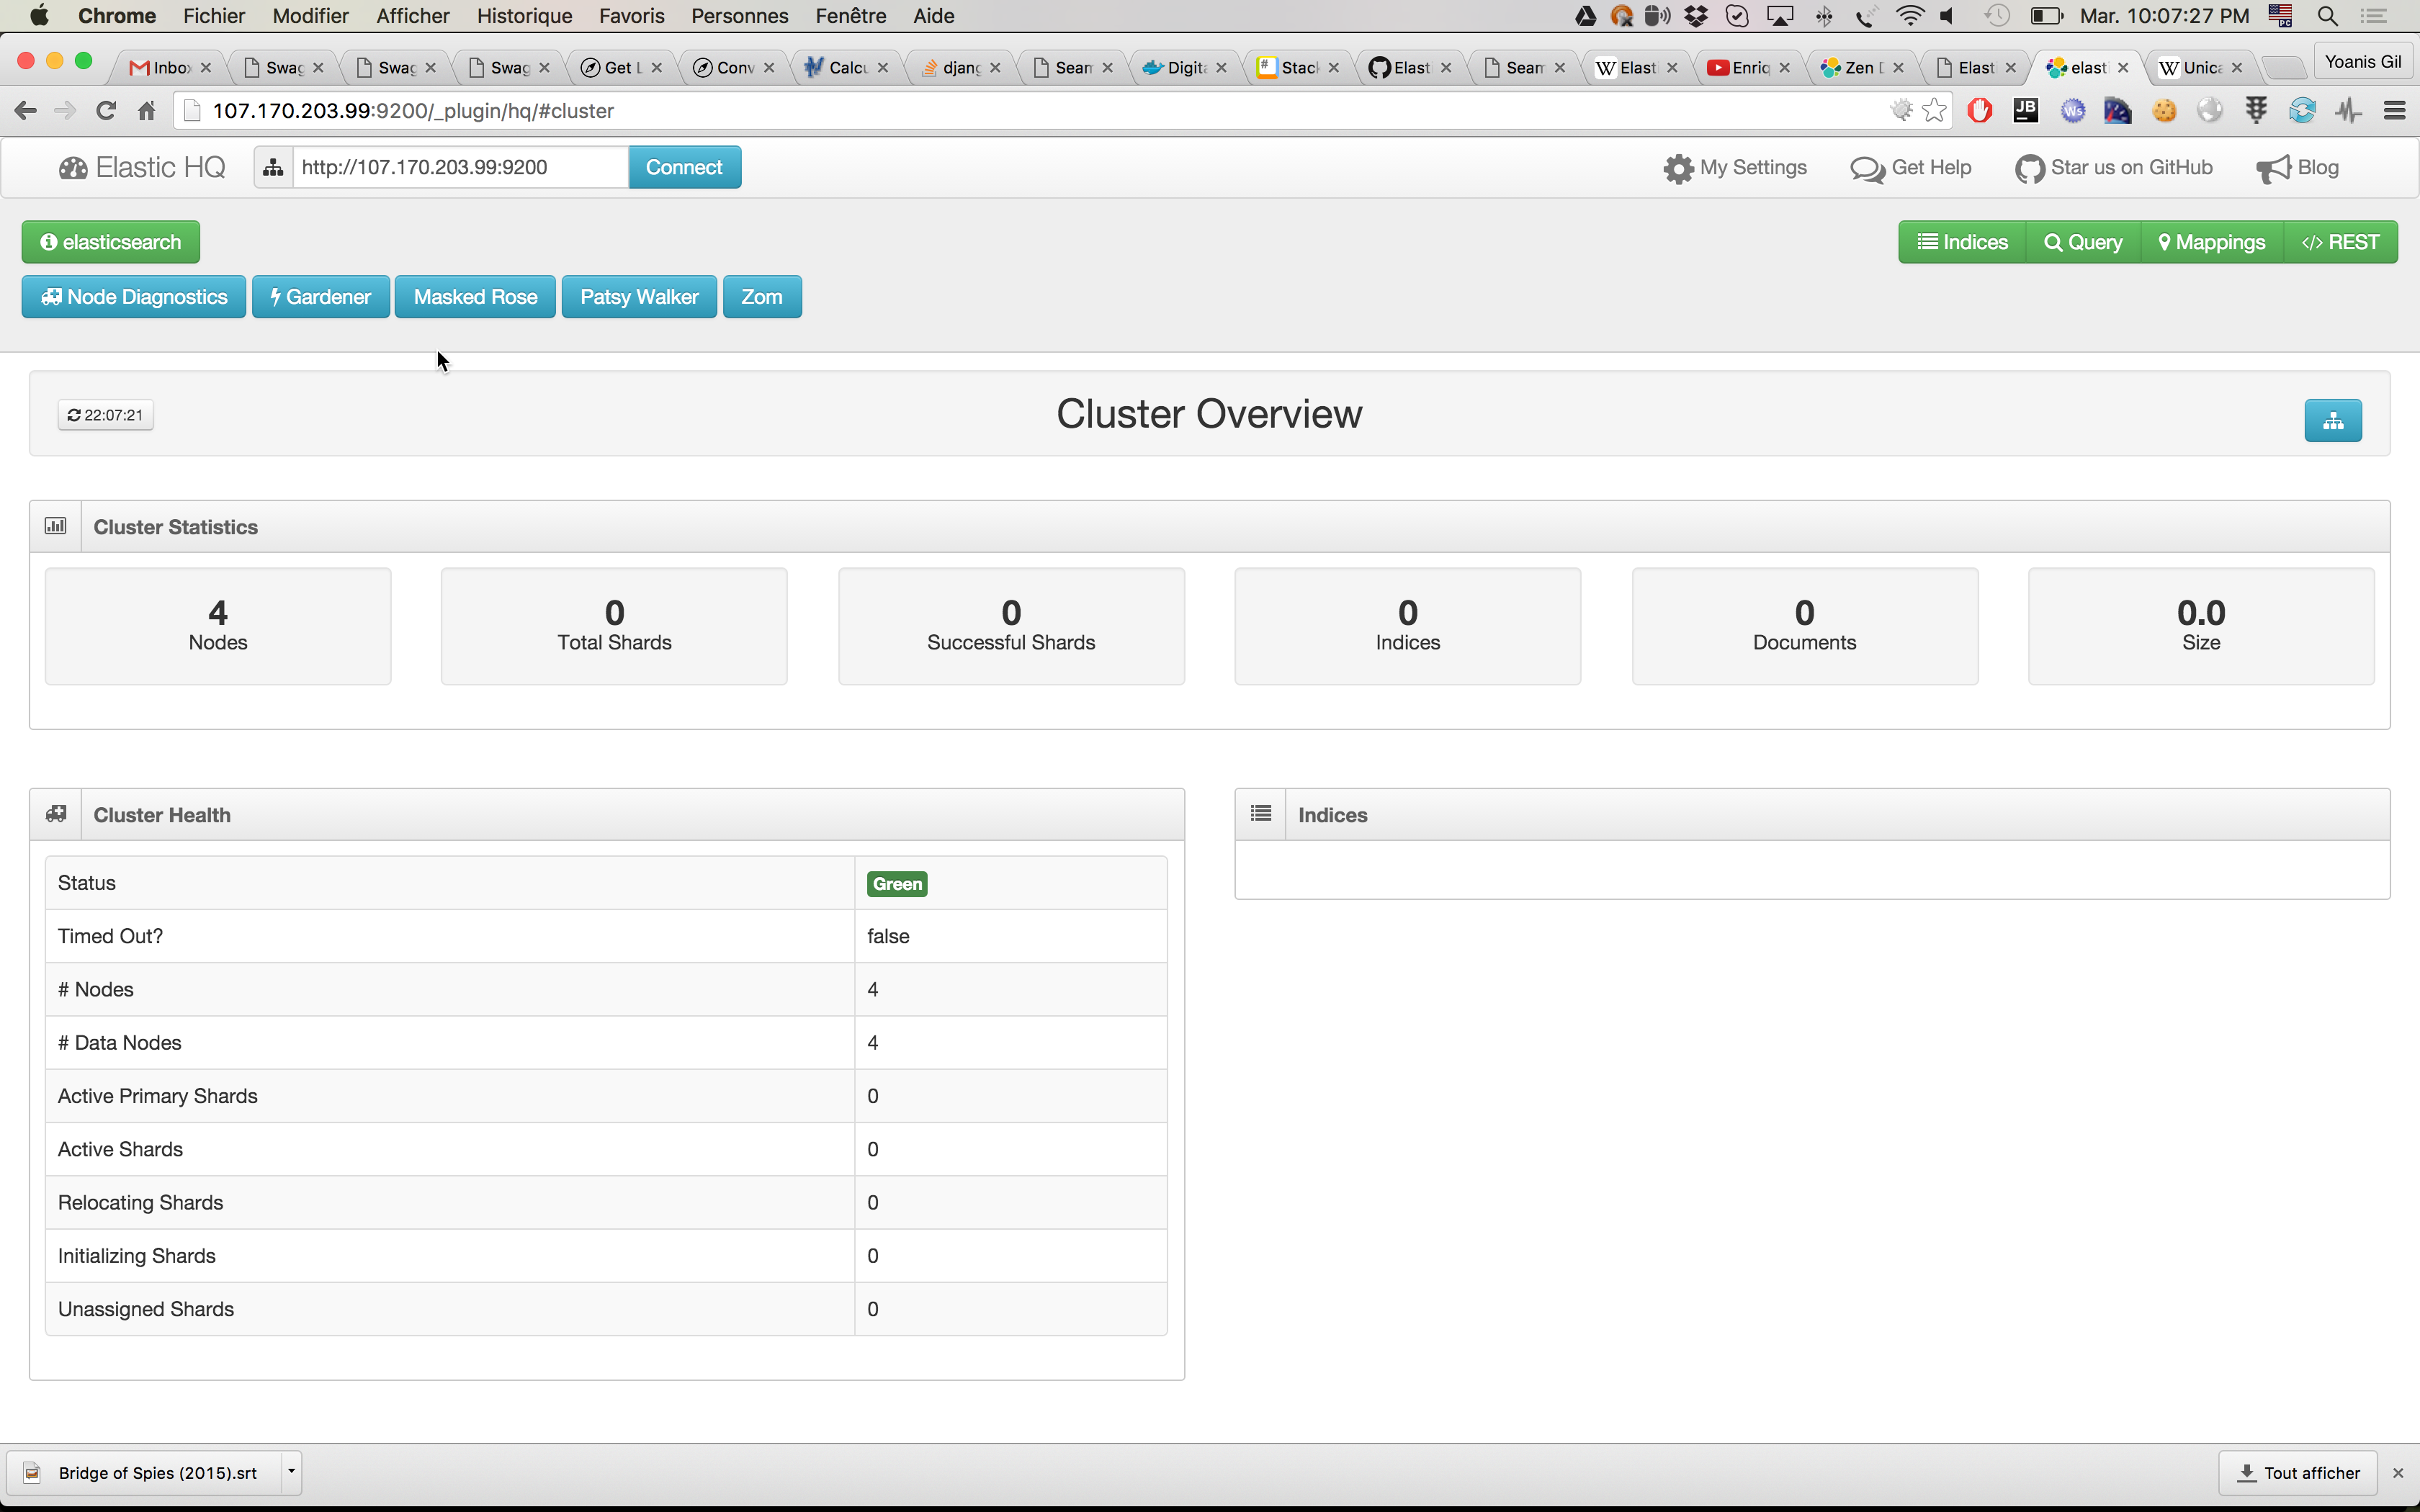
We can clearly see that we have 1 node running, so let's launch 3 more:
docker-compose --x-networking --x-network-driver overlay scale es-node=3
and this is it! It does not get any easier like these. We have requested Docker Compose to summon 3 containers, each one of them running ES and by specifying --x-networking --x-network-driver overlay they will all be connected and reachable within a private network of their own. This all works of course because we're running Docker 1.9 on top of Swarm. Let's take a look at the section of the Docker Compose file which takes care of defining the ES nodes:
es-node:
  image: elasticsearch:2
  command: elasticsearch --discovery.zen.ping.unicast.hosts=es_master
  restart: always
  environment:
    -"affinity:container!=*master*"
    -"affinity:container!=*es-node*"
There are two important pieces here:
- discovery.zen.ping.unicast.hosts=es_master: We're instructing ES to use Zen Discovery in order to find out the cluster topology. We're telling nodes to contact the es_master host as the entry point for the gossiping protocol. Notice that es_master is the name we gave to our container running the ES master node.
-
-**"affinity:container!=*master*"** / "**affinity:container!=*es-node*"**: We're instructing Swarm to make sure that ES containers cannot run where the ES master container is running and that we only want to run one ES node per Swarm node.
So let's go back and take a look at HQ plugin page. It should look like this:
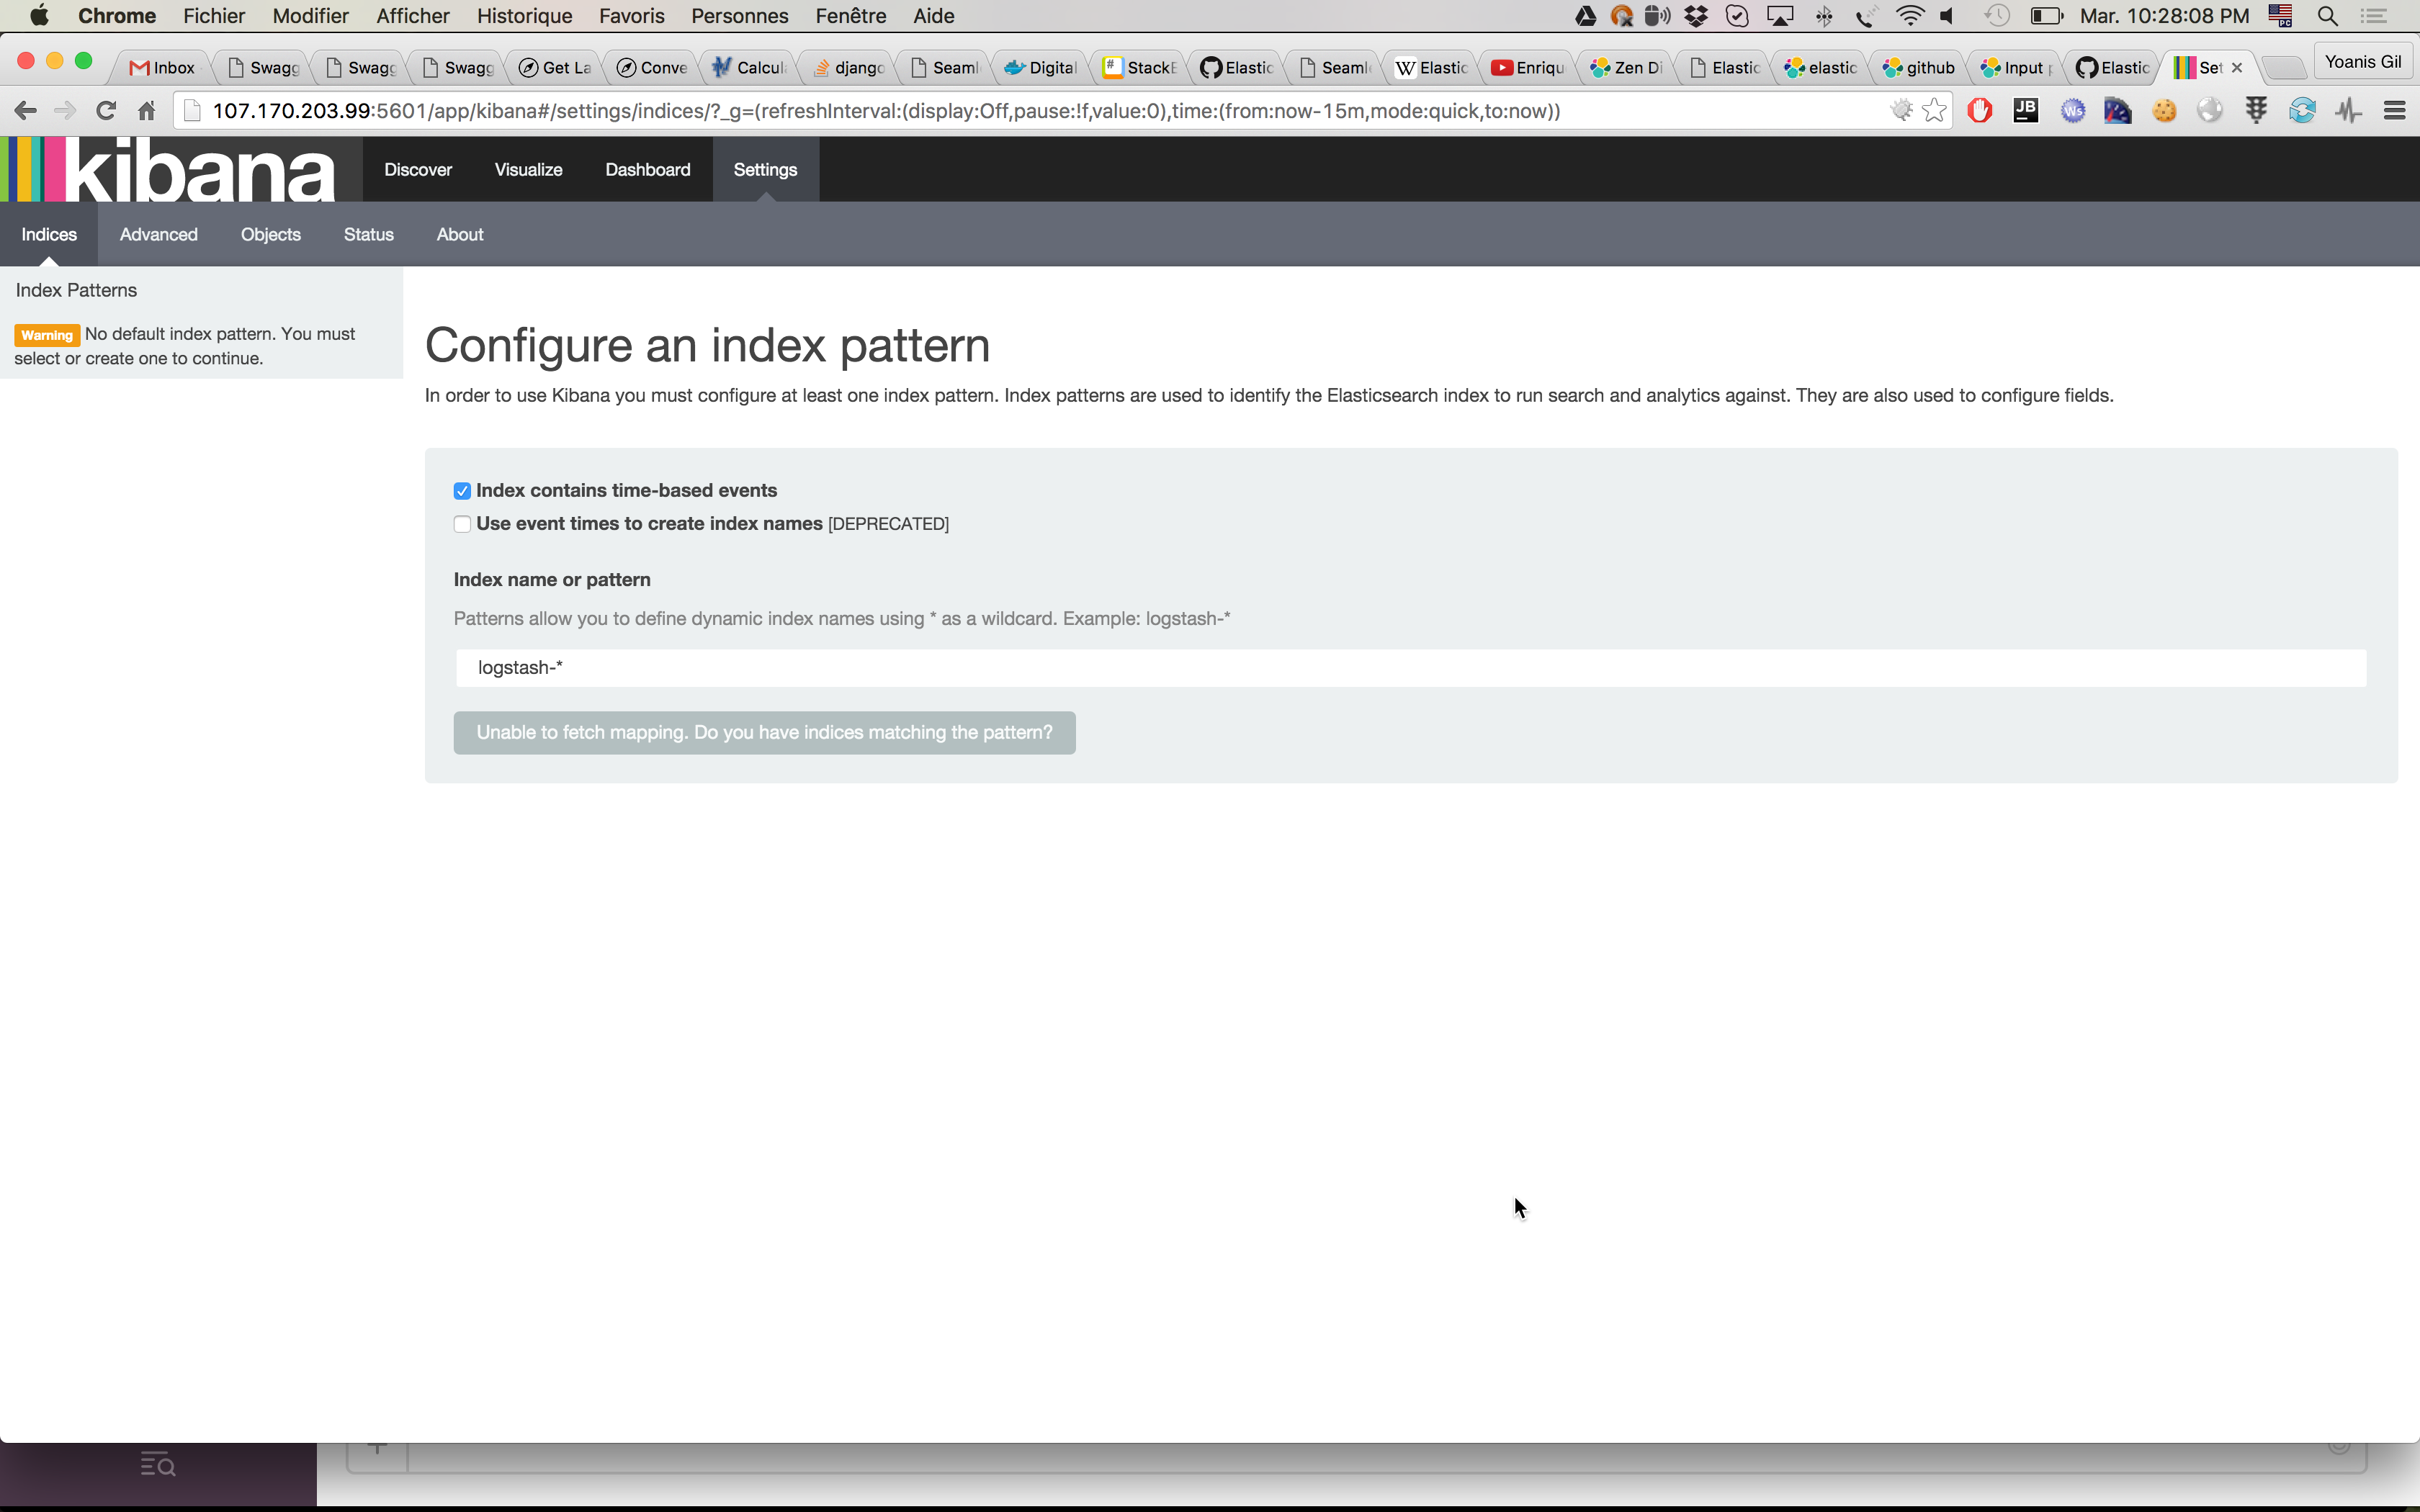
Finally, lets launch a Kibana container which is able to connect to our ES cluster. First open the docker-compose.yml file, look for the string ES_MASTER_IP and replace it with the IP address of the ES master node. You can get the IP address by running:
docker inspect --format='{{(index (index .NetworkSettings.Ports "9200/tcp") 0).HostIp}}' es_master
With that done, we can launch a Kibana container:
docker-compose --x-networking --x-network-driver overlay up -d kibana
and then go grab the URL where Kibana is running and enter it in our browser:
echo "http://$(docker inspect --format='{{(index (index .NetworkSettings.Ports "5601/tcp") 0).HostIp}}' kibana):5601"
you should see something like this:
And that's it! You can start using your ES cluster with Logstash/Filebeat. Just make sure you properly configure the elastic search output plugin and make it point to the ES master node (any other node from the cluster will do as well).
Go ahead and have fun! Try adding new nodes, removing existing ones and see it all in action.
And, hey!, do not forget to turn those servers off because you know, you're billed as long as they're running ;). You can do that with docker-machine:
$ docker-machine rm kvstore swarm-master swarm-node-1 swarm-node-2 swarm-node-3
By now it should be clear to you how easy it is to run a Elasticsearch cluster on a cloud provider of your own. Moreover you have full control of how and when this is done. I'm not saying that by following the instructions provided here you will end up with a production grade cluster. This is far from it. However, for short lived task, like real time data analysis for making short term decisions I believe this presents some very interesting and unique options (and challenges as well).
One thing I did not cover in this article was data persistence. That's certainly something to keep in mind if you need data to stick around after the life cycle of your cluster. I must be honest and say that I tried to achieve that by using Openstorage but unfortunately I ran into this issue. I will try to follow up on that and see if I can finally get data persistence working within a Swarm cluster but that will go for sure into another blogpost ;).
For those asking themselves why ES would have saved me a lot of time, the answer it's easy: I only needed to log any performance information to a location (file, syslog, etc) which Logstash/Filebeast knows how to read. The rest was about getting ES to index the information and spent some time toying around with Kibana for producing the reports/graphs I needed.
Yes, that's absolutely something I need to do. Here it goes in no particular order of priority:
- To Nathan Leclaire for his excellent post. Can thank you enough mate, your post the starting point.
- To Elasticsearch for crafting such a magic piece of software.
- To Roy Russo for his excellent ElasticSearch HQ plugin.
- To Docker and I think we'all know why :).