Our research project for the 2020 NASA University Student Research Challenge (USRC) is an autonomous drone swarm that is capabable of collaboratively carrying a payload and swapping in and out mid-flight, effectively giving the swarm an infinite flight time. Possible applications include long-distance transportation, emergency relief, and any other instances that require heavy payloads and/or long flight times.
This repository focuses on the software aspects of AVIATA, which include inter-drone communication through a mesh network, ground-swarm communication, and a GPS and vision-based docking system for attaching to the payload.
Structure:
docking/- autonomous docking implementation, currently includes code developed for research during the proposal stagecontrols/- all the non-docking controls code for the Raspberry Pimesh/- mesh networking between dronesground/- everything related to the ground station, including communication with drones and coordination/monitoring for swapping
These results are based upon work supported by the NASA Aeronautics Research Mission Directorate under award number 80NSSC20K1452. This material is based upon a proposal tentatively selected by NASA for a grant award of $10,811, subject to successful crowdfunding. Any opinions, findings, and conclusions or recommendations expressed in this material are those of the authors and do not necessarily reflect the views of NASA.
The code in the simulation folder is used for bare-bones, ideal physics simulations of varius multi-vehicle configurations, utilizing PyOpenGL graphics. To demonstrate flight, position control is implemented using a simplified version of the controllers used in PX4. Simulations are run using python3 simulate.py. The position target can be moved around in the horizontal plane with the WASD keys, as well as up and down with R and F. The yaw setpoint can be rotated with Z and X. For airframes that are flyable with undocked drones, the number keys (0-9) will toggle the presence of a drone in the corresponding docking slot.
The physics code can be found in the tick() function in drones.py. The controller code can be found in the control_loop() function of the Drone class also in drones.py, with comments referencing the relevant parts of the PX4 codebase. As part of the controller, px4_mixer_multirotor.py is utilizied, which mainly takes care of motor desaturation, and is taken from the PX4 codebase.
Python files that start with constants_ define physical properties and controller parameters for various airframes. Files that start with generate_matrices_ generate the specific rotor configuration(s) and corresponding mixer(s) for the airframe. The file config.py determines which of these files get used when running python3 simulate.py.
The generate_all_mixers.py script generates mixers for a prescribed set airframes and writes them to a C header file that can be used in PX4. To update the mixers in PX4, copy the generated file (aviata_mixers.h) to PX4-Autopilot/src/lib/mixer_module/aviata_mixers.h (see PX4 Firmware Version for more info about our modified version of PX4).
- Note that "docking slot" numbers are determined by the order of drones in the mixer matrix, and are zero-indexed. For generate_matrices_aviata.py, the convention is that you start with the body forward axis, and count up from 0 as you move clockwise (looking from above the vehicle). The math is done in the NED coordinate frame with the vehicle facing north.
Additionally, the generate_matrices_ files can be executed individually to show useful stats / performance measures for the frame.
To generate the mixers and header files, px4_generate_mixer.py is utilized, which is taken from the PX4 codebase. It calculates the dynamics of an airframe with some configuration of rotors, and then determines an inverse of these dynamics to generate the mixer. Originally, the Moore-Penrose Pseudoinverse was used, but there is an additional option to use optimize_saturation.py instead, which determines the inverse that can achieve the highest thrust and torque before saturating the motors (in typical circumstances). The desired method is chosen in geometry_to_mix() in px4_generate_mixer.py.
Installation Requirements:
- cmake
- ROS2
- OpenCV
- apriltag
- pigpio
Build:
# source your ROS2 setup script
git submodule update --init --recursive # download MAVSDK submodule
cd controls
mkdir build
cd build
cmake ..
makeThe controls code relies on the release/1.11-aviata branch of this fork of PX4-Autopilot: https://github.com/uas-at-ucla-dependencies/PX4-Autopilot/tree/release/1.11-aviata.
git clone https://github.com/uas-at-ucla-dependencies/PX4-Autopilot.git
cd PX4-Autopilot && git checkout release/1.11-aviata
To see what has been changed from PX4 v1.11, check out this webpage, which is a modified version of a pull request which shows the relevant changed files: https://uas-at-ucla-dependencies.github.io/aviata-px4-diff. The version of mavlink used can be found in the aviata branch of this fork of mavlink: https://github.com/uas-at-ucla-dependencies/mavlink/tree/aviata.
Run in the PX4-Autopilot folder:
make px4_sitl gazebo_typhoon_h480Run in the PX4-Autopilot folder:
Tools/gazebo_sitl_multiple_run.sh -m typhoon_h480 -n 2- If you have made changes to PX4 and need to rebuild, run
make px4_sitlfirst.
After the simulator exits, the PX4 log from each drone will be located at:
- build/px4_sitl_default/instance_0/out.log
- build/px4_sitl_default/instance_1/out.log
- ...
Tip: There's a lot going on in the simulator, and sometimes something goes wrong during startup or shutdown. If you have problems (e.g. the drone cannot be found by MAVSDK), try restarting the simulator. If you still have problems, restart your computer.
Source your ROS2 setup script, then run this:
- On Linux:
export LD_LIBRARY_PATH=$LD_LIBRARY_PATH:"." - On MacOS:
export DYLD_LIBRARY_PATH=$DYLD_LIBRARY_PATH:"."
A shortcut for these things on RPi is ./rpi_tools/env_setup.sh.
Next, run the aviata_drone executable from within the controls/build folder. For example, you can run these two commands in separate terminals if you are using multi-vehicle simulation:
./aviata_drone -i drone1 -s leader -d 0 -c udp://:14540 -f 2_sim./aviata_drone -i drone2 -s follower -d 1 -c udp://:14541 -f 2_simThe drone that was initiated as the leader can be controlled from QGroundControl, and the follower should roughly copy it, although expect some deviations since the program expects the drones to be docked.
Drones can also be started in standby mode, meaning they are idle (presumably at the ground station). While we do not have real-life docking, drones can be transitioned from STANDBY to a new state by sending an INIT_STATE command to the drone's DroneCommand ROS service.
./aviata_drone -i drone2 -s standby -d 1 -c udp://:14541 -f 2_simFor more details, run ./aviata_drone --help.
The aviata_ground executable currently allows you to specify the leader drone name, and will tell the drone to hand off the leader role to another drone. The new leader can then be controlled from QGroundControl. The ground station is in progress, so more features to come.
First run ./init_mesh.sh to initiate and clone the submodule code. Then go to ./mesh/OONF to buiuld the framework. use command:
cd build
cmake ..
makeIf other network services are running on the machine and using the network interface for the mesh network, they may interfere with it. For example, if you have wpa_supplicant.conf configured to connect to a WiFi network, add the following to to /etc/dhcpcd.conf:
interface <INTERFACE_NAME>
    nohook wpa_supplicant
where <INTERFACE_NAME> is the network interface you want to use for the mesh network.
First go to build folder (mesh/OONF/build) and create a file with unique id (0 - 255), note that NO node in your network should have the same ID. Then, go to OONF root folder (mesh/OONF) and run
run.sh <INTERFACE_NAME> <INTERFACE_NAME> should be the network interface you want to use for the mesh network, check it with command ifconfig.
For more instructions and troubleshooting, see: https://docs.google.com/document/d/18OtGG7QGEEyhy4e1Phuv2IOWkYh8ndprgu_6wa8lDLM/edit?usp=sharing
- Flash the SD card for the Pi with Raspberry Pi OS Lite. Alternatively, flash the SD card with the image found here which has many things already set up, and skip to step 6.
- SSH into the Pi and give it internet access either directly or via sharing on your computer. You may need to run
sudo rfkill unblock allto allow wireless communication. - Install git:
sudo apt-get update && sudo apt-get install -y git - Clone this repository:
git clone https://github.com/uas-at-ucla/aviata.git - Run
./aviata/rpi_tools/install.sh. Make sure you can let it do its thing for a while, since ROS2 takes a long time to install. - Enable the serial port on the Pi. See 23:40-25:51 of this video.
- Enable the camera on the Pi (Interfacing Options in
sudo raspi-config). - Choose a unique name for this drone. Using
sudo raspi-config-> System Options -> Hostname, set the hostname to rpi-<NAME>. Note that only alphanumeric characters and hyphens are allowed. - Decide on a unique mesh network ID. See Comms Code for details.
- To run the comms code and/or controls code on startup, use
crontab -eand add the line:@reboot <command_goes_here> &.
- e.g. to enable the mesh network:
@reboot cd ~/OONF && ./run.sh wlan1 & - e.g. to wait for the mesh network then start the controls code:
@reboot bash -c "export PATH="$PATH:/usr/sbin" && cd ~/aviata/controls/build && source ../../rpi_tools/env_setup.sh && ../../rpi_tools/wait_for_mesh_network.sh && ./aviata_drone &>aviata_drone.out &"
Four drones' RPi's have been setup with these mesh network IP addresses and hostnames:
- 10.10.0.1: rpi-Bryan-Sun
- 10.10.0.2: rpi-DN
- 10.10.0.3: rpi-Hopper
- 10.10.0.4: rpi-Krispy
The ground station just needs to have it's own unique mesh network ID, and it will be able to connect to all the drones. Not sure if an ID of 0 is allowed.
- Connect a drone via USB to QGroundControl.
- Change, add, or remove parameters in set_px4_params.sh as necessary (in the root folder of this project).
- Either in set_px4_params.sh or QGroundControl itself, set MAV_SYS_ID to an appropriate unique ID (only needed if testing multiple drones simultaneously).
- Copy all or part of the contents of set_px4_params.sh and paste in QGroundControl -> Analyze Tools -> MAVLink Console.
- The parameters have been set! Now remove power from the Pixhawk. Once you power it back on, you're all set!
- Next time you want to update some parameters, you can skip step 3, as well as step 5 depending on which parameters are changed.
Tip: Use param reset in the MAVLink Console if you want to start fresh and reset all parameters to their defaults, or param reset CAL_* SENS_BOARD_* EKF2_MAG_DECL to keep sensor calibration. Unfortunately, you cannot reset individual parameters this way, but you can look up the defaults in the parameter reference. Documentation for the param command can be found at https://dev.px4.io/v1.11_noredirect/en/middleware/modules_command.html#param. Note that this is specific to PX4 v1.11.
- Retrieve the code from https://github.com/uas-at-ucla-dependencies/PX4-Autopilot/tree/release/1.11-aviata (use the release/1.11-aviata branch).
- If needed, set the contents of src/lib/mixer_module/aviata_mixers.h (in PX4-Autopilot) with the appropriate set of mixers generated by simulation/generate_matrices_.py (in this repository), e.g.
python3 generate_matrices_aviata.py > aviata_mixers.h. - Run
make px4_fmu-v3_defaultin the PX4-Autopilot folder. You may need to install some things to build the code. See https://docs.px4.io/master/en/dev_setup/dev_env.html for more details, but note that you do not need any simulation tools for this step. - Using QGroundControl, flash the custom firmware file PX4-Autopilot/build/px4_fmu-v3_default/px4_fmu-v3_default.px4 to the Pixhawk. If this fails, follow the instructions to update the FMUv2 bootloader here and try again.
To connect multiple drones to one laptop, we configure the telemetry radios with firmware that supports multipoint communication. There is a ground station radio with ID 0, and a radio for each drone with its own unique ID.
- Download radio~hm_trp.ihx from https://drive.google.com/drive/folders/1yd3WoalLU3xQads8v3oJmjZb5dtD86ct?usp=sharing
- Retrieve the code from https://github.com/RFDesign/SiK. In particular, you only need the file Firmware/tools/uploader.py.
- Follow the instructions here (starting with "Upload Firmware to the radio") to configure each radio. Note that uploader.py is written in Python 2.
- If you plan to fly around other RC pilots, choose a single network ID number and set it on each radio (the NETID parameter). By choosing a NETID other than the default (25), you will mitigate possible interference with other radios. The NETID can be any unsigned 32-bit integer.
A ground station radio and four drones' radios have been setup with the above steps, with drone IDs 1-4. The NETID has been left at 25 for now. Unfortunately, the radios are in general very slow, and have a hard time maintaining a connection when all 4 are in use. Solutions may include reducing the amount of data sent in PX4 or buying more capable radios. There is als talk about other causes online, for example: https://discuss.px4.io/t/sik-radio-telemetry-very-slow-removing-ecc-made-big-difference/5528.
As the AVIATA ground station gains more features, the radios will become more obsolete.
Here is some general info on Pixhawk wiring: https://docs.px4.io/master/en/assembly/quick_start_pixhawk.html
See the motor numbering for a hexacopter: https://docs.px4.io/master/en/airframes/airframe_reference.html#hexarotor-x
If conducting cooperative controls tests, you must use an airframe that uses the AUX outputs instead of the main outputs (details in set_px4_params.sh). Therefore, when wiring the ESCs, use the corresponding AUX outputs instead of the main ouputs.
Raspberry Pi wiring can be found here. You may need to do some soldering to make the proper wire for this (technically, what you need is a 6-pin DF13 to female dupont cable).
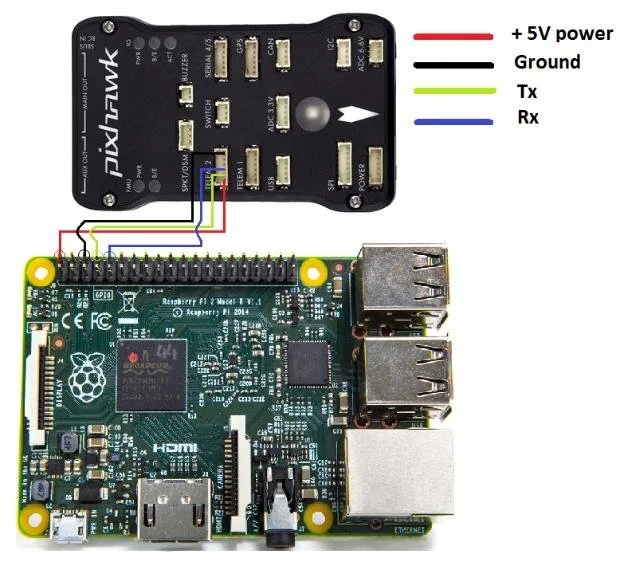
The TFmini plugs into Serial 4 on the Pixhawk. You may need replace the provided connecter with the proper 6-pin connector. Here's what the connection looks like: https://ardupilot.org/copter/_images/benewake-tfmini-pixhawk.png
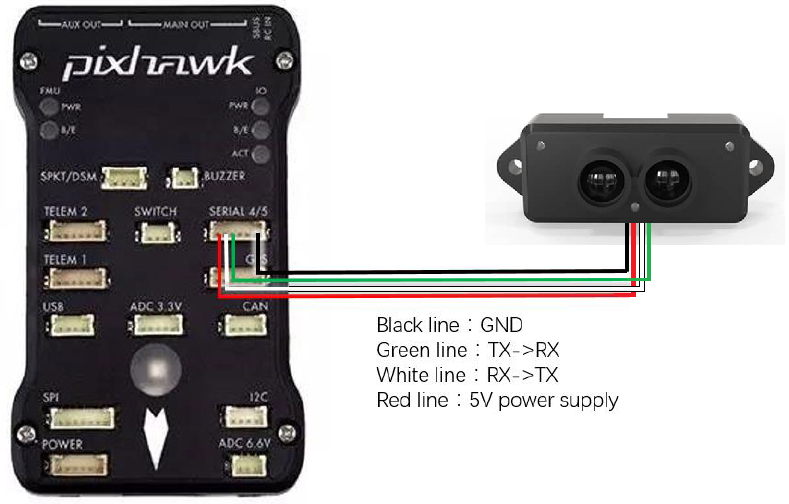
Most GPSs made for Pixhawk will have one connector for the I2C port and another for the GPS port. For the latter, you may need to replace with the proper 6-pin connector.
We use a version of the Pixhawk that uses DF13 connectors (which, unfortunately, are inferior to the JST-GH connectors used on new versions). Additionally, some devices come with connectors that have an incompatible number of pins. For example, many GPSs come with a 5-pin connector attached, and provide a replacement 6-pin connector which Pixhawk users must install. Here is a demonstration on how to do that: https://www.youtube.com/watch?v=6nLe9_2Fyok
For making new connectors, a kit like this can be very useful: https://www.amazon.com/1-25mm-Connectors-Pre-Crimped-Pixhawk-Silicone/dp/B07S18D3RN/
All ground station UI code is developed with QT Open Source license covered under the GPL3 license.