Calibration: Resin time finder
Video: https://youtu.be/lRbZw6GbGCI (Don't skip this reading!)
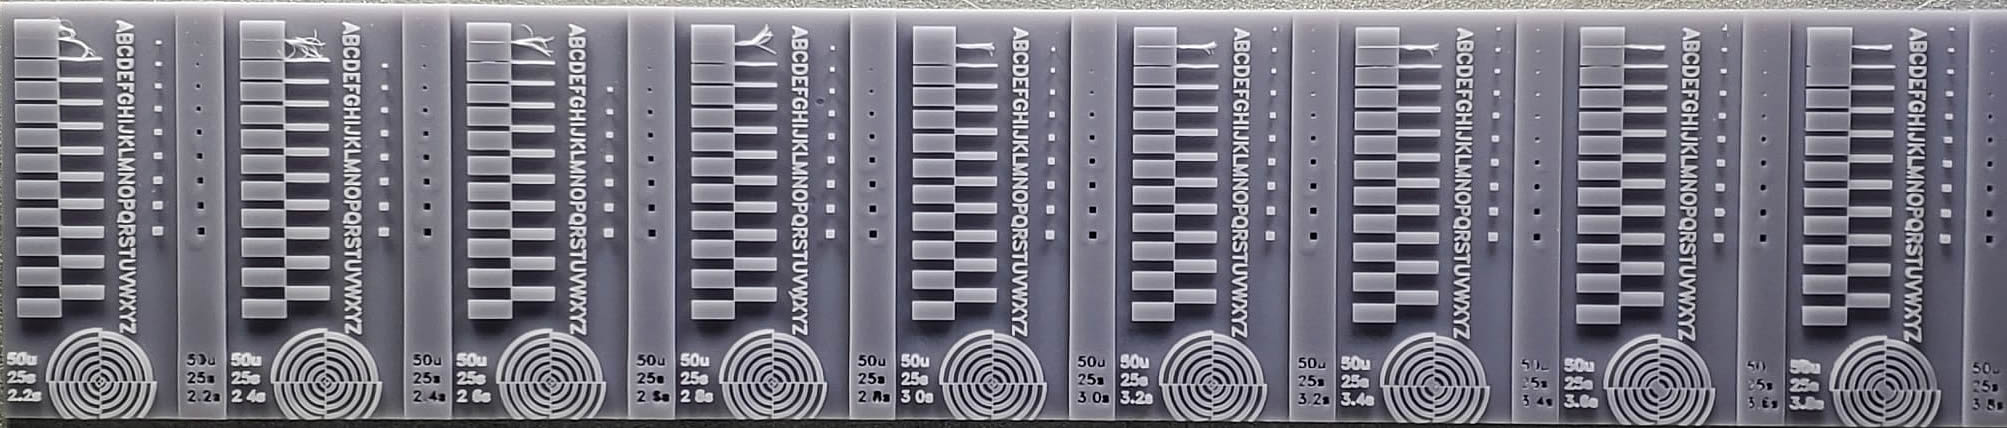
- This test have small features that will fail to print on purpose in order to validate under and over exposure, keep in mind that you will have floating cured bits of resin on tank after run, always clean and recover those bits after and every test. Can be with a plastic spatula, no filtering required. Also use the spatula to scrape FEP, make sure no cured resin got stick at it.
- The dialog have many options, most don't require changes, if you are unsure just use the defaults and only tweak the commun properties.
- Only use the advanced features of the dialog if you know they are compatible with your printer: https://github.com/sn4k3/UVtools/wiki/Printer-compability-with-per-layer-settings-and-advanced-tools
- If you use multiple tests on same plate, make sure to distribute the parts even on the plate, use the left/right margin to adjust that and make them center most.
- Don't be afraid to boost your bottom exposure time to make sure it will adhere, if you normally do 30s, go with 40s-50s to make sure it will adhere, this become more important if you run multiple tests with long rows across the plate
- Be carefull at clean/wash the parts, small details can easy break, take a picture of it before or just renember the present features, don't attempt to brush clean at tiny pillars.
- Read all this guide before do anything else.
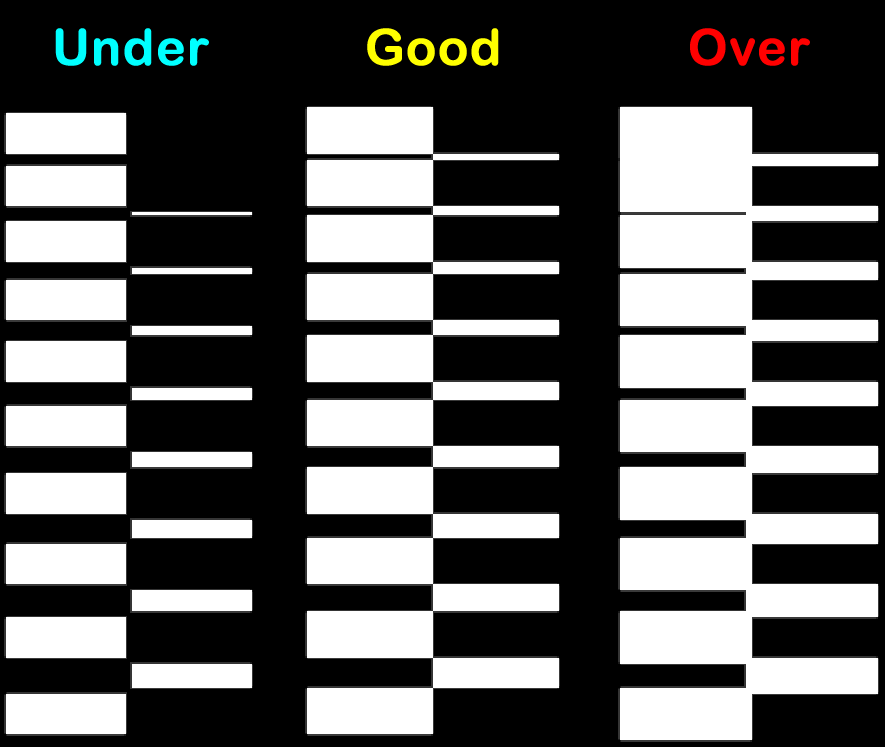
To compare and find the best timming results there are some commun aspects to look for and keep in mind:
- Features will shrink creating some spacing between elements
- Some features will not print and will fail to show up
- Overall it will look skinny
- Features will expand and overlap to the other nearby neighbour feature
- The smallest features can print (Due expansion and more cured pixels)
- Overall it will look fat and bold
- Features looks like the same compared to the preview
- Spacings are just right (No shrink or expanded into neighbour)
- The smallest features are missing (For example, is very hard to cure a single pixel without over exposuse)
- Overall it look sharp and precise
Take a look at some examples:


Depending on the configuration you used some features must print while others don't, you can start from the features you think give you the best hints, but i will suggest the following:
- Close look at spirals:
- Center is missing or incomplete, is the arcs thinner and not flush with other arcs, any arc missing: Under exposure - Go to the next test
- Center is all glued and a full white dot, is arcs merged into another arcs: Over exposure - Go to the next test
- Close look at text:
- Text is incomplete, missing elements, looks to thin: Under exposure - Go to the next test
- Text is bold and fat, some elements are glued or a white blob: Over exposure - Go to the next test
- Close look at zebra bars:
- Many lines missing, lines are shrink and have spacings: Under exposure - Go to the next test
- Lines expanded and overlap into neighbour bars: Over exposure - Go to the next test
- The number of positive bars are smaller than the negatives: Under exposure - Go to the next test
- The number of positive bars are greater than the negatives: Over exposure - Go to the next test
- Note: On this test the smallest line can be missing on good exposure due to thin to print
- Close look at pillars:
- On this test you must aim for the same number of pillars from both negative and positive sides, but on most of the cases this will not happen and the smallest positive pillar will not print due very thin pillar, so this is why i would validate this test at last, a over exposure can print the smallest pillar but that doesn't mean you should go with that time. This also gives you the information at that time and conditions what are the minimal area your printer can print. (Same can happen with zebra bars)
The zebra bars have a known spacing and bar size, after cure the piece you can measure them with an digital caliper and validate the printed size. Allow some error from caliper.
- This guide aims for the best part size accuracy with the optimal exposure time. If you don't require extreme part accuracy, tight fits, snaps, etc, you can overexpouse just by a little bit to ensure stronger supports/model and print success, it will also help to smooth the model and better cure of few isolated pixels.
- Often the more resolution your printer has the smaller the pixel size, so a 4px on a 4K display (eg. 35um per pixel) can fail to print while on FullHD screens it may survive (eg. 50um per pixel). Larger areas will survive better.
- You can use the Text to input your own marking, for example, you can use it to engrave the used resin name, eg: "EPAX HARD BLUE" and still add some validation symbols like "%&#"
- I always recommend you use the "Unit of meassure" to "Pixel", to ensure a better test with pixel perfect features.
Open on a new window and zoom in