The lightweight app to run your AI models. Use this app, so you don't have to build your own.
Website • Key Features • Quick Start • Fast.ai Examples
- Familiar tools (Colab, Github).
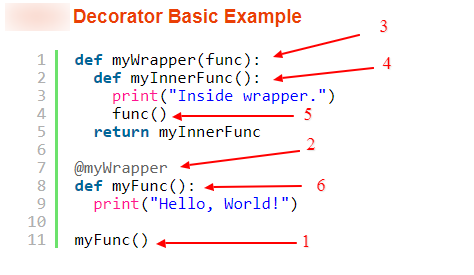
- Minimal code. (Write a predict function with python decorators)
- Turn that predict function into a webapp, hosted at YHat.pub.
- Make the webapp so easy, a panda could use it.


Hop in Discord and ask whatever you like
Open a Google colab and install dependencies
!pip install -q --no-cache-dir git+https://github.com/yhatpub/yhat_params.git@main
from yhat_params.yhat_tools import inference_test, FieldType, inference_predict
from PIL import ImageFilter

input = {"text": FieldType.Text, "image": FieldType.PIL}
output = {"text": FieldType.Text, "image": FieldType.PIL}

@inference_predict(input=input, output=output)
def predict(params):
    text = f"hello world {params['text']}"
    image = params['image'].convert("RGB")
    image = image.filter(ImageFilter.EMBOSS)
    return {"text": text, "image": image}
from yhat_params.yhat_tools import in_colab
from PIL import Image
import torch

if in_colab():
    torch.hub.download_url_to_file('https://upload.wikimedia.org/wikipedia/en/4/48/Blank.JPG', '1x1.jpg')
    img = Image.open('1x1.jpg')
    inference_test(predict_func=predict, params={'text': 'my text', 'image': img})
Go to YHat.pub and upload your model and run!
This example is the teddy bear detector (lesson 2) from fast.ai. The entire notebook is here Colab notebook. Feel free to start a new colab notebook and follow along.
Train your model and upload it for public accessibility. This example uses Google Drive, but anywhere is fine.

The following cell installs pytorch, fastai and yhat_params, which is used to decorate your predict function.
!pip install -q --upgrade --no-cache-dir fastai
!pip install -Uqq --no-cache-dir git+https://github.com/yhatpub/yhat_params.git@mainGoogle drive does not allow direct downloads for files over 100MB, so you'll need to follow the snippet below to get the download url. .
#file copied from google drive
google_drive_url = "Add url to google drive model here or use this" # https://drive.google.com/file/d/1s-fQPvk8l7CTUiiRvKzecijSluDnoZ27/view?usp=sharing
import os
os.environ['GOOGLE_FILE_ID'] = google_drive_url.split('/')[5]
os.environ['GDRIVE_URL'] = f'https://docs.google.com/uc?export=download&id={os.environ["GOOGLE_FILE_ID"]}'
!echo "This is the Google drive download url $GDRIVE_URL"
wget it from google drive. This script places the model in a model folder
!wget -q --no-check-certificate $GDRIVE_URL -r -A 'uc*' -e robots=off -nd
!mkdir -p model
!mv $(ls -S uc* | head -1) ./model/export.pkl
verify the model exists. Warning YHat is pretty finicky about where you place your models. Make sure you create a model directory and download your model(s) there
!ls -l ./model/export.pklThe following is the equivalent of torch torch.load or ts model.load_weights
from fastai.vision.all import *
learn_inf = load_learner('./model/export.pkl')
And write your predict function. Note, you will need to decorate your function with inference_predict which takes 2 parameters, a input and output.
These parameters are how YHat.pub maps your predict functions input/output of the web interface. The key, in this case, image or text is how you access the variable and the value is it's type, in this case, FieldType.PIL or FieldType.Text.
input = {"image": FieldType.PIL} # PIL image
output = {"text": FieldType.Text} # str

@inference_predict(input=input, output=output)
def predict(params):
    img = PILImage.create(np.array(params["image"].convert("RGB")))
    result = learn_inf.predict(img)
return {"text": str(result[0])}For testing, first, import in_colab since you only want to run this test in colab. YHat will turn this colab in an imported script, so you want to tell YHat not to run this test outside of colab. Next, import inference_test which is a function to make sure your predict will run ok with YHat.
Now, inside in_colab() , first get whatever test data you'll need, in this case, an image. Then you'll call your predict function, wrapped inside inference_test, passing in the same params you defined above. If something is missing, you should see an informative error. Otherwise, you'll see something like
Please take a look and verify the results
from yhat_params.yhat_tools import in_colab, inference_test

if in_colab():
    import urllib.request
    from PIL import Image
    urllib.request.urlretrieve("https://upload.wikimedia.org/wikipedia/commons/thumb/a/a9/GrizzlyBearJeanBeaufort.jpg/220px-GrizzlyBearJeanBeaufort.jpg", "input_image.jpg")
    img = Image.open("input_image.jpg")
    inference_test(predict_func=predict, params={'image': img})
If you run into errors, feel free to hop into Discord.
Otherwise, you'll now want to clear your outputs and save a public repo on Github.

If it doesn't work, make sure to look out for errros. Click the EXPORT button to download the logs.
