Examples
Here are presented code snippets for different canvas API features. To use this code in your project just include canvas header kcanvas/canvas.h and instantiate canvas object. E.g. you can use kContextCanvas class to paint on your device context (such as HDC on Windows or CGContextRef on MacOS X).
// DeviceContext is platform dependent context descriptor,
// such as HDC or CGContextRef
kContextCanvas canvas(DeviceContext);
// canvas object is ready to be used here- Basic shapes
- Basic filled shapes
- Text and fonts
- Paths
- Bitmaps
- Gradients and gradient brushes
- Stroke styles and pens
- Clipping and masking
Canvas supports several commands to stroke simple shapes (line, bezier line, arc, poly line, bezier poly line). To paint a shape you need a kPen object which defines stroke properties. Following code snippet demonstrates how to paint basic shapes:
kPen pen(kColor(0, 162, 232), 5);

canvas.Line(kPoint(10, 10), kPoint(50, 50), pen);
canvas.Bezier(
    kPoint(60, 10), kPoint(90, 10),
    kPoint(100, 20), kPoint(100, 50),
    pen
);
canvas.Arc(kRect(110, 10, 150, 50), 0, 270, pen);

const kPoint linepoints[] = {
    kPoint(180, 10),
    kPoint(200, 30),
    kPoint(180, 50),
    kPoint(160, 30)
};
canvas.PolyLine(linepoints, 4, pen);

const kPoint linepointsbezier[] = {
    kPoint(230, 10),

    kPoint(232, 20),
    kPoint(240, 28),
    kPoint(250, 30),

    kPoint(240, 32),
    kPoint(232, 40),
    kPoint(230, 50),

    kPoint(228, 40),
    kPoint(220, 30),
    kPoint(210, 30)
};
canvas.PolyBezier(linepointsbezier, 10, pen);
Result:

Full example source
Basic shapes example source
Reference
Canvas supports several commands to fill and/or stroke simple solid shapes (rectangle, rounded rectangle, ellipse, polygon, bezier polygon). The major difference from previous set of commands is that filled shapes are always closed contours. To stroke shape you need to pass kPen object. To fill shape you need to pass kBrush object. Both parameters are optional, if both are nullptr nothing will be painted. Following code snippet demonstrates how to paint basic filled shapes:
kPen pen(kColor(255, 127, 39), 4);
kBrush brush(kColor(255, 201, 14));

canvas.Rectangle(kRect(10, 10, 50, 50), &pen, &brush);
canvas.RoundedRectangle(kRect(60, 10, 100, 50), kSize(5, 5), &pen, &brush);
canvas.Ellipse(kRect(110, 10, 150, 50), &pen, &brush);

const kPoint points[] = {
    kPoint(180, 10),
    kPoint(200, 30),
    kPoint(180, 50),
    kPoint(160, 30)
};
canvas.Polygon(points, 4, &pen, &brush);

const kPoint pointsbezier[] = {
    kPoint(230, 10),

    kPoint(232, 20),
    kPoint(240, 28),
    kPoint(250, 30),

    kPoint(240, 32),
    kPoint(232, 40),
    kPoint(230, 50),

    kPoint(228, 40),
    kPoint(220, 32),
    kPoint(210, 30),

    kPoint(220, 28),
    kPoint(228, 20)
};
canvas.PolygonBezier(pointsbezier, 12, &pen, &brush);
Result:

Full example source
Basic filled shapes example source
Reference
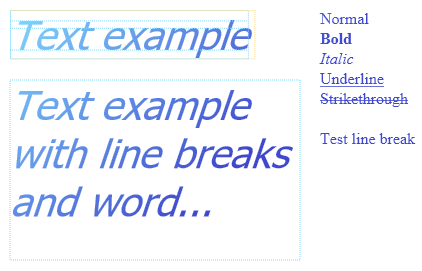
Canvas able to render and measure text. kFont object defines font properties for rendering text: face name, size and style (bold, italic, underline and strikethrough). Text can be painted as single line or with simple layout inside defined rectangle. Different metrics can be queried for whole font or individual glyphs. Text outline can be added to path object (this is demonstrated in next sample).
const char *text1 = "Text example";
const char *text2 = "Test\nline\nbreak";
const char *text3 = "Text example with  line breaks\n\nand word wrapping";

kFont bigfont("Tahoma", 30, kFontStyle::Italic);
kFont normal("Times New Roman", 12);
kFont bold("Times New Roman", 12, kFontStyle::Bold);
kFont italic("Times New Roman", 12, kFontStyle::Italic);
kFont underline("Times New Roman", 12, kFontStyle::Underline);
kFont strike("Times New Roman", 12, kFontStyle::Strikethrough);

kGradient gradient(kColor(130, 218, 255), kColor(63, 72, 204));
kBrush brush(kPoint(10, 10), kPoint(210, 190), gradient);
canvas.Text(kPoint(10, 10), text1, -1, bigfont, brush);

kRect bounds;
kSize sz = canvas.TextSize(text1, -1, bigfont, nullptr, &bounds);

kPen pen1(kColor(130, 218, 255), 1, kStrokeStyle::Dot);
kPen pen2(kColor(255, 218, 130), 1, kStrokeStyle::Dot);
canvas.Rectangle(kRect(kPoint(10, 10) + 0.5f, sz), &pen1, nullptr);
canvas.Rectangle(bounds + (kPoint(10, 10) + 0.5f), &pen2, nullptr);

canvas.Text(kPoint(320, 130), text2, -1, normal, brush);

kFontMetrics m;
canvas.GetFontMetrics(bigfont, m);
canvas.Line(
    kPoint(10, 10 + m.ascent),
    kPoint(10 + sz.width, 10 + m.ascent), pen1
);
canvas.Line(
    kPoint(10, 10 + m.ascent - m.xheight),
    kPoint(10 + sz.width, 10 + m.ascent - m.xheight), pen1
);
canvas.Line(
    kPoint(10, 10 + m.ascent - m.capheight),
    kPoint(10 + sz.width, 10 + m.ascent - m.capheight), pen1
);

canvas.Text(kPoint(320, 10), "Normal", -1, normal, brush);
canvas.Text(kPoint(320, 30), "Bold", -1, bold, brush);
canvas.Text(kPoint(320, 50), "Italic", -1, italic, brush);
canvas.Text(kPoint(320, 70), "Underline", -1, underline, brush);
canvas.Text(kPoint(320, 90), "Strikethrough", -1, strike, brush);


kRect textrect(10, 80, 300, 260);
canvas.Rectangle(textrect, &pen1, nullptr);

kTextOutProperties op = kTextOutProperties::construct(
    kTextFlags::IgnoreLineBreaks |
    kTextFlags::Multiline        |
    kTextFlags::MergeSpaces      |
    kTextFlags::Ellipses
);
canvas.Text(textrect, text3, -1, bigfont, brush, &op);
Result:
Full example source
Text and fonts example source
Reference
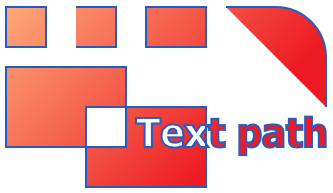
When simple shapes aren't enough path object can be used to construct any shape. Paths represented by kPath objects. This example shows how to use path object to construct complex shape and then paint it on canvas. Path object only defines shape and doesn't define any other properties (such as stroke or fill properties).
kFont font("Tahoma", 30, kFontStyle::Bold);

kPath path = kPath::Create()

    // explicitly closed figure
    .MoveTo(kPoint(10, 10))
    .LineTo(kPoint(50, 10))
    .LineTo(kPoint(50, 50))
    .LineTo(kPoint(10, 50))
    .Close()

    // opened figure (when stroking, line from
    // last point to first is not painted)
    .MoveTo(kPoint(80, 10))
    .LineTo(kPoint(120, 10))
    .LineTo(kPoint(120, 50))
    .LineTo(kPoint(80, 50))

    // explicitly closed figures
    .MoveTo(kPoint(150, 10))
    .LineTo(kPoint(210, 10))
    .LineTo(kPoint(210, 50))
    .LineTo(kPoint(150, 50))
    .Close()

    .MoveTo(kPoint(10, 70))
    .LineTo(kPoint(130, 70))
    .LineTo(kPoint(130, 150))
    .LineTo(kPoint(10, 150))
    .Close()

    .MoveTo(kPoint(90, 110))
    .LineTo(kPoint(210, 110))
    .LineTo(kPoint(210, 190))
    .LineTo(kPoint(90, 190))
    .Close()

    .MoveTo(kPoint(230, 10))
    .ArcTo(kRect(230, 10, 330, 110), 0, 90)
    .LineTo(kPoint(330, 110))


    // text
    .MoveTo(kPoint(140, 110))
    .Text("Text path", -1, font)

    .Build();

kPen pen(kColor(36, 92, 196), 2);

kGradient gradient(kColor(255, 177, 125), kColor(237, 28, 36));
kBrush brush(kPoint(0, 0), kPoint(330, 190), gradient);

canvas.DrawPath(path, &pen, &brush);
Result:
Full example source
Paths example source
Reference
Bitmaps store arbitrary two-dimensional image data. To create empty bitmap pass width, height and pixel format to kBitmap object constructor. Bitmap is initialized with all components set to 0 (fully transparent). Whole or part of bitmap data can be initialized with Update function.
Canvas API doesn't handle loading image data from files. Any suitable library or API could be used to load image data from files.
kBitmap bitmap(width, height, kBitmapFormat::Color32BitAlphaPremultiplied);
// load image data here with your preffered way into memory pointed to by
// "data" pointer and pass amount of bytes per row in "pitch" variable
bitmap.Update(nullptr, format, pitch, data);
Whole or any part of bitmap can be painted to canvas. Bitmap can be scaled or modulated by additional opacity value. Following example assumes that bitmap is a valid pointer to kBitmap instance with valid color image.
// paint whole bitmap at (10, 10) with 0.75 opacity
canvas.DrawBitmap(*bitmap, kPoint(10, 10), 0.75f);
// paint part of the bitmap
canvas.DrawBitmap(*bitmap, kPoint(50, 40), kPoint(40, 30), kSize(80));
// paint scaled part of the bitmap
canvas.DrawBitmap(
    *bitmap,
    kPoint(270, 10), kSize(256),
    kPoint(40, 30), kSize(80)
);
Result:
Bitmap can be used to store only opacity data (alpha value) without color information. This type of bitmap can be used as a mask to mask out unwanted areas of painting. To create mask bitmap just use kBitmapFormat::Mask8Bit bitmap format.
kBitmap mask(width, height, kBitmapFormat::Mask8Bit);
// load image data here with your preffered way into memory pointed to by
// "data" pointer and pass amount of bytes per row in "pitch" variable
mask.Update(nullptr, format, pitch, data);
Mask bitmap can be used to fill canvas with kBrush object. Parts outside the mask bitmap won't be painted. Following example assumes that mask is a valid pointer to kBitmap instance with valid monochrome image.
kGradient gradient0(kColor(255, 177, 125), kColor(237, 28, 36));
kGradient gradient1(kColor(130, 218, 255), kColor(63, 72, 204));
kBrush fill0(kPoint(10, 10), kPoint(230, 410), gradient0);
kBrush fill1(kPoint(10, 10), kPoint(230, 245), gradient1);

for (int n = 0; n < 5; ++n) {
    canvas.DrawMask(
        *mask, n & 1 ? fill0 : fill1,
        kPoint(kScalar(n * 30) + 10, 10), kSize(kScalar(n * 10) + 50),
        kPoint(), mask->size()
    );
}
Result:

Bitmap can be used as source for bitmap brush object. Bitmap brush can be used to fill any arbitrary shape with texture. Following example assumes that bitmap is a valid pointer to kBitmap instance with valid color image.
kBrush brush(kExtendType::Wrap, kExtendType::Wrap, *bitmap);
canvas.RoundedRectangle(kRect(10, 25, 100, 115), kSize(10), nullptr, &brush);
canvas.Ellipse(kRect(120, 25, 210, 115), nullptr, &brush);
Result:
Full example source
Bitmaps example source
Reference
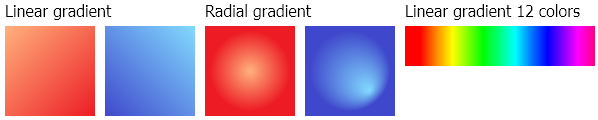
Previous examples use solid color brush to fill shapes. This example shows how to use different gradient brushes. Special kGradient object defines properties of gradient – set of colors at certain positions within 0 to 1 range. Two types of brushes can be created using kGradient object. First one is linear gradient brush. Second one is radial gradient brush.
kFont font("Tahoma", 12);
kBrush black(kColor::Black);


canvas.Text(kPoint(), "Linear gradient", -1, font, black);

kGradient gradient0(kColor(255, 177, 125), kColor(237, 28, 36));
kGradient gradient1(kColor(130, 218, 255), kColor(63, 72, 204));

kBrush linear0(kPoint(0, 25), kPoint(90, 115), gradient0);
canvas.Rectangle(kRect(0, 25, 90, 115), nullptr, &linear0);

kBrush linear1(kPoint(190, 25), kPoint(100, 115), gradient1);
canvas.Rectangle(kRect(100, 25, 190, 115), nullptr, &linear1);


canvas.Text(kPoint(200, 0), "Radial gradient", -1, font, black);

kBrush radial0(kPoint(245, 70), kPoint(0, 0), kSize(40, 40), gradient0);
canvas.Rectangle(kRect(200, 25, 290, 115), nullptr, &radial0);

kBrush radial1(kPoint(345, 70), kPoint(20, 20), kSize(40, 40), gradient1);
canvas.Rectangle(kRect(300, 25, 390, 115), nullptr, &radial1);


canvas.Text(kPoint(400, 0), "Linear gradient 12 colors", -1, font, black);

const kGradientStop stops[] = {
    kGradientStop(kColor(255, 0, 0), 0.08f),
    kGradientStop(kColor(255, 128, 0), 0.16f),
    kGradientStop(kColor(255, 255, 0), 0.25f),
    kGradientStop(kColor(128, 255, 0), 0.33f),
    kGradientStop(kColor(0, 255, 0), 0.41f),
    kGradientStop(kColor(0, 255, 128), 0.5f),
    kGradientStop(kColor(0, 255, 255), 0.58f),
    kGradientStop(kColor(0, 128, 255), 0.66f),
    kGradientStop(kColor(0, 0, 255), 0.75f),
    kGradientStop(kColor(128, 0, 255), 0.83f),
    kGradientStop(kColor(255, 0, 255), 0.91f),
    kGradientStop(kColor(255, 0, 128), 1)
};
kGradient gradient2(stops, 12);
kBrush linear2(kPoint(400, 25), kPoint(590, 25), gradient2);
canvas.Rectangle(kRect(400, 25, 590, 65), nullptr, &linear2);
Result:
Full example source
Gradients example source
Reference
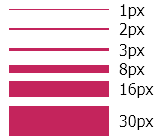
kPen can be used to stroke shapes with different line width.
kFont font("Tahoma", 12);
kBrush black(kColor::Black);

const kScalar widths[6] = { 1, 2, 3, 8, 16, 30 };
const kScalar offsets[6] = { 0.5f, 0, 0.5f, 0, 0, 0 };
kScalar y = 25;
for (int n = 0; n < 6; ++n) {
    kPen pen(kColor(196, 36, 92), widths[n]);
    canvas.Line(
        kPoint(10, y + offsets[n]),
        kPoint(110, y + offsets[n]), pen
    );

    char buf[32];
    sprintf(buf, "%.fpx", widths[n]);
    canvas.Text(
        kPoint(120, y + offsets[n] - 10),
        buf, -1, font, black
    );

    y += umax(widths[n], kScalar(10)) * 2;
}
Result:
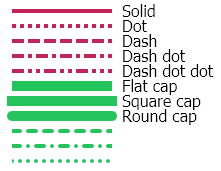
Line style and caps can be configured with kStroke object. kStroke object can be implicitly created for pen object with special constructor.
kFont font("Tahoma", 12);
kBrush black(kColor::Black);

canvas.Text(kPoint(120, 15), "Solid", -1, font, black);
canvas.Text(kPoint(120, 30), "Dot", -1, font, black);
canvas.Text(kPoint(120, 45), "Dash", -1, font, black);
canvas.Text(kPoint(120, 60), "Dash dot", -1, font, black);
canvas.Text(kPoint(120, 75), "Dash dot dot", -1, font, black);
canvas.Text(kPoint(120, 90), "Flat cap", -1, font, black);
canvas.Text(kPoint(120, 105), "Square cap", -1, font, black);
canvas.Text(kPoint(120, 120), "Round cap", -1, font, black);

const kStrokeStyle styles[5] = {
    kStrokeStyle::Solid, kStrokeStyle::Dot, kStrokeStyle::Dash,
    kStrokeStyle::DashDot, kStrokeStyle::DashDotDot
};

const kScalar linewidth = 4;

kScalar y = 25;
for (int n = 0; n < 5; ++n) {
    kPen pen(kColor(196, 36, 92), linewidth, styles[n]);
    canvas.Line(kPoint(10, y), kPoint(110, y), pen);
    y += 15;
}

kStroke flat(kStrokeStyle::Solid, kLineJoin::Miter);
kPen pen0(kColor(36, 196, 92), 10, flat);
canvas.Line(kPoint(10, y), kPoint(110, y), pen0);
y += 15;

kStroke square(
    kStrokeStyle::Solid, kLineJoin::Miter,
    kCapStyle::Square, kCapStyle::Square, kCapStyle::Square
);
kPen pen1(kColor(36, 196, 92), 10, square);
canvas.Line(kPoint(10, y), kPoint(110, y), pen1);
y += 15;

kStroke round(
    kStrokeStyle::Solid, kLineJoin::Miter,
    kCapStyle::Round, kCapStyle::Round, kCapStyle::Round
);
kPen pen2(kColor(36, 196, 92), 10, round);
canvas.Line(kPoint(10, y), kPoint(110, y), pen2);
y += 15;

kStroke rounddash(
    kStrokeStyle::Dash, kLineJoin::Miter,
    kCapStyle::Flat, kCapStyle::Flat, kCapStyle::Round
);
kPen pen3(kColor(36, 196, 92), linewidth, rounddash);
canvas.Line(kPoint(10, y), kPoint(110, y), pen3);
y += 15;

kStroke rounddashdot(
    kStrokeStyle::DashDot, kLineJoin::Miter,
    kCapStyle::Flat, kCapStyle::Flat, kCapStyle::Round
);
kPen pen4(kColor(36, 196, 92), linewidth, rounddashdot);
canvas.Line(kPoint(10, y), kPoint(110, y), pen4);
y += 15;

kStroke rounddot(
    kStrokeStyle::Dot, kLineJoin::Miter,
    kCapStyle::Flat, kCapStyle::Flat, kCapStyle::Round
);
kPen pen5(kColor(36, 196, 92), linewidth, rounddot);
canvas.Line(kPoint(10, y), kPoint(110, y), pen5);
Result:
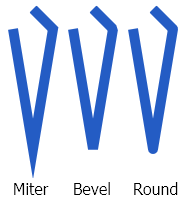
kStroke object can be used to adjust how multiple line segments are connected together.
kFont font("Tahoma", 12);
kBrush black(kColor::Black);

const kPoint linepoints[] = {
    kPoint(30, 30),
    kPoint(50, 50),
    kPoint(30, 170),
    kPoint(10, 50)
};


canvas.Text(kPoint(10, 200), "Miter", -1, font, black);

kStroke miter(kStrokeStyle::Solid, kLineJoin::Miter);
kPen penmiter(kColor(36, 92, 196), 10, miter);
canvas.PolyLine(linepoints, 4, penmiter);


kTransform t = kTransform::construct::translate(60, 0);
canvas.PushTransform(t);

canvas.Text(kPoint(10, 200), "Bevel", -1, font, black);

kStroke bevel(kStrokeStyle::Solid, kLineJoin::Bevel);
kPen penbevel(kColor(36, 92, 196), 10, bevel);
canvas.PolyLine(linepoints, 4, penbevel);


t.translateby(60, 0);
canvas.SetTransform(t);

canvas.Text(kPoint(10, 200), "Round", -1, font, black);

kStroke round(kStrokeStyle::Solid, kLineJoin::Round);
kPen penround(kColor(36, 92, 196), 10, round);
canvas.PolyLine(linepoints, 4, penround);

canvas.PopTransform();
Result:
Full example source
Stroke styles example source
Reference
All painting operations can be clipped or masked. Clipping is a restriction of painting to some arbitrary shape. Path object can be used as shape source for clipping. Following example shows how to clip painting to shape defined by path object.
kPen pen(kColor(63, 72, 204), 4);
kBrush brush(kColor(130, 218, 255));
kFont font("Tahoma", 30, kFontStyle::Bold);

kPath textpath = kPath::Create()
    .MoveTo(kPoint(10, 20))
    .Text("Text clip path", -1, font)
    .Build();

{
    kCanvasClipper clipper(canvas, textpath, kTransform::construct::translate(-15, 0));

    canvas.Rectangle(kRect(10, 25, 50, 65), &pen, &brush);
    canvas.RoundedRectangle(kRect(60, 25, 100, 65), kSize(5, 5), &pen, &brush);
    canvas.Ellipse(kRect(110, 25, 150, 65), &pen, &brush);

    const kPoint points[] = {
        kPoint(180, 25),
        kPoint(200, 45),
        kPoint(180, 65),
        kPoint(160, 45)
    };
    canvas.Polygon(points, 4, &pen, &brush);
}
Result:

Painting can be masked with mask bitmap. Following example shows how to use mask bitmap to mask out unwanted areas of painting. This example assumes that mask is a valid pointer to kBitmap instance with valid monochrome image.
kPen pen(kColor(255, 127, 39), 4);
kBrush brush(kColor(255, 201, 14));

kTransform tfm;
tfm.scale(0.5f, 0.5f);
tfm.translateby(-25, 15);
{
    kCanvasClipper clipper(canvas, *mask, tfm, kExtendType::Wrap, kExtendType::Wrap);

    canvas.Rectangle(kRect(10, 25, 50, 65), &pen, &brush);
    canvas.RoundedRectangle(kRect(60, 25, 100, 65), kSize(5, 5), &pen, &brush);
    canvas.Ellipse(kRect(110, 25, 150, 65), &pen, &brush);

    const kPoint points[] = {
        kPoint(180, 25),
        kPoint(200, 45),
        kPoint(180, 65),
        kPoint(160, 45)
    };
    canvas.Polygon(points, 4, &pen, &brush);
}
Result:

Full example source
Clipping and masking example source
Reference