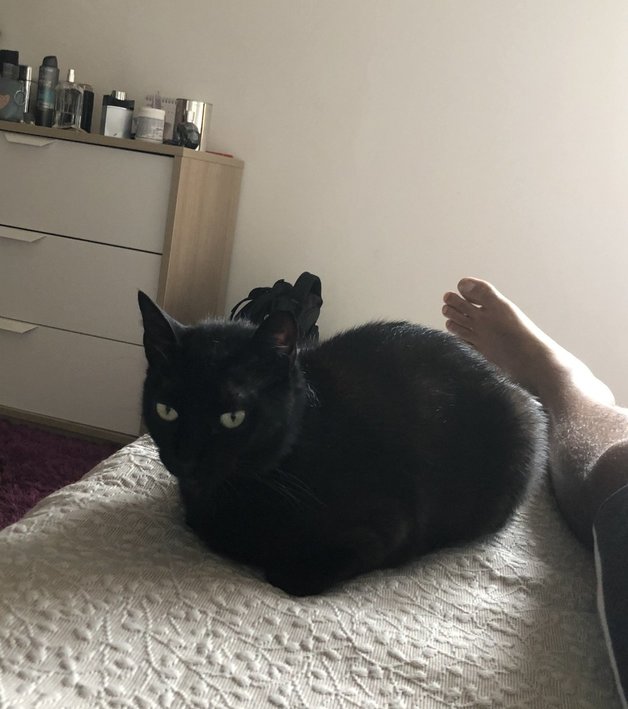
I have a small cat (1 year old - Nêga) and as all small cats in the world, she is playful and full of energy. Occasionally my perfumes are drooping or messy and my wife and I doesn't know if it's wind (we can't close the window for some reasons) or the cat.. Then I designed a solution to connect a Microcontroller (Arduino like) and an IOT Serverless backend to check if Nêga is guilty.
Orr I almost forgot, look her :D
Ok, now you know who is Nêga and the reason of this project, I would like to say that I know that there are lot of cams, equipments and gadgets that I could use to reach this goal, but I'm a tech guy and really love to discovery new things every day.
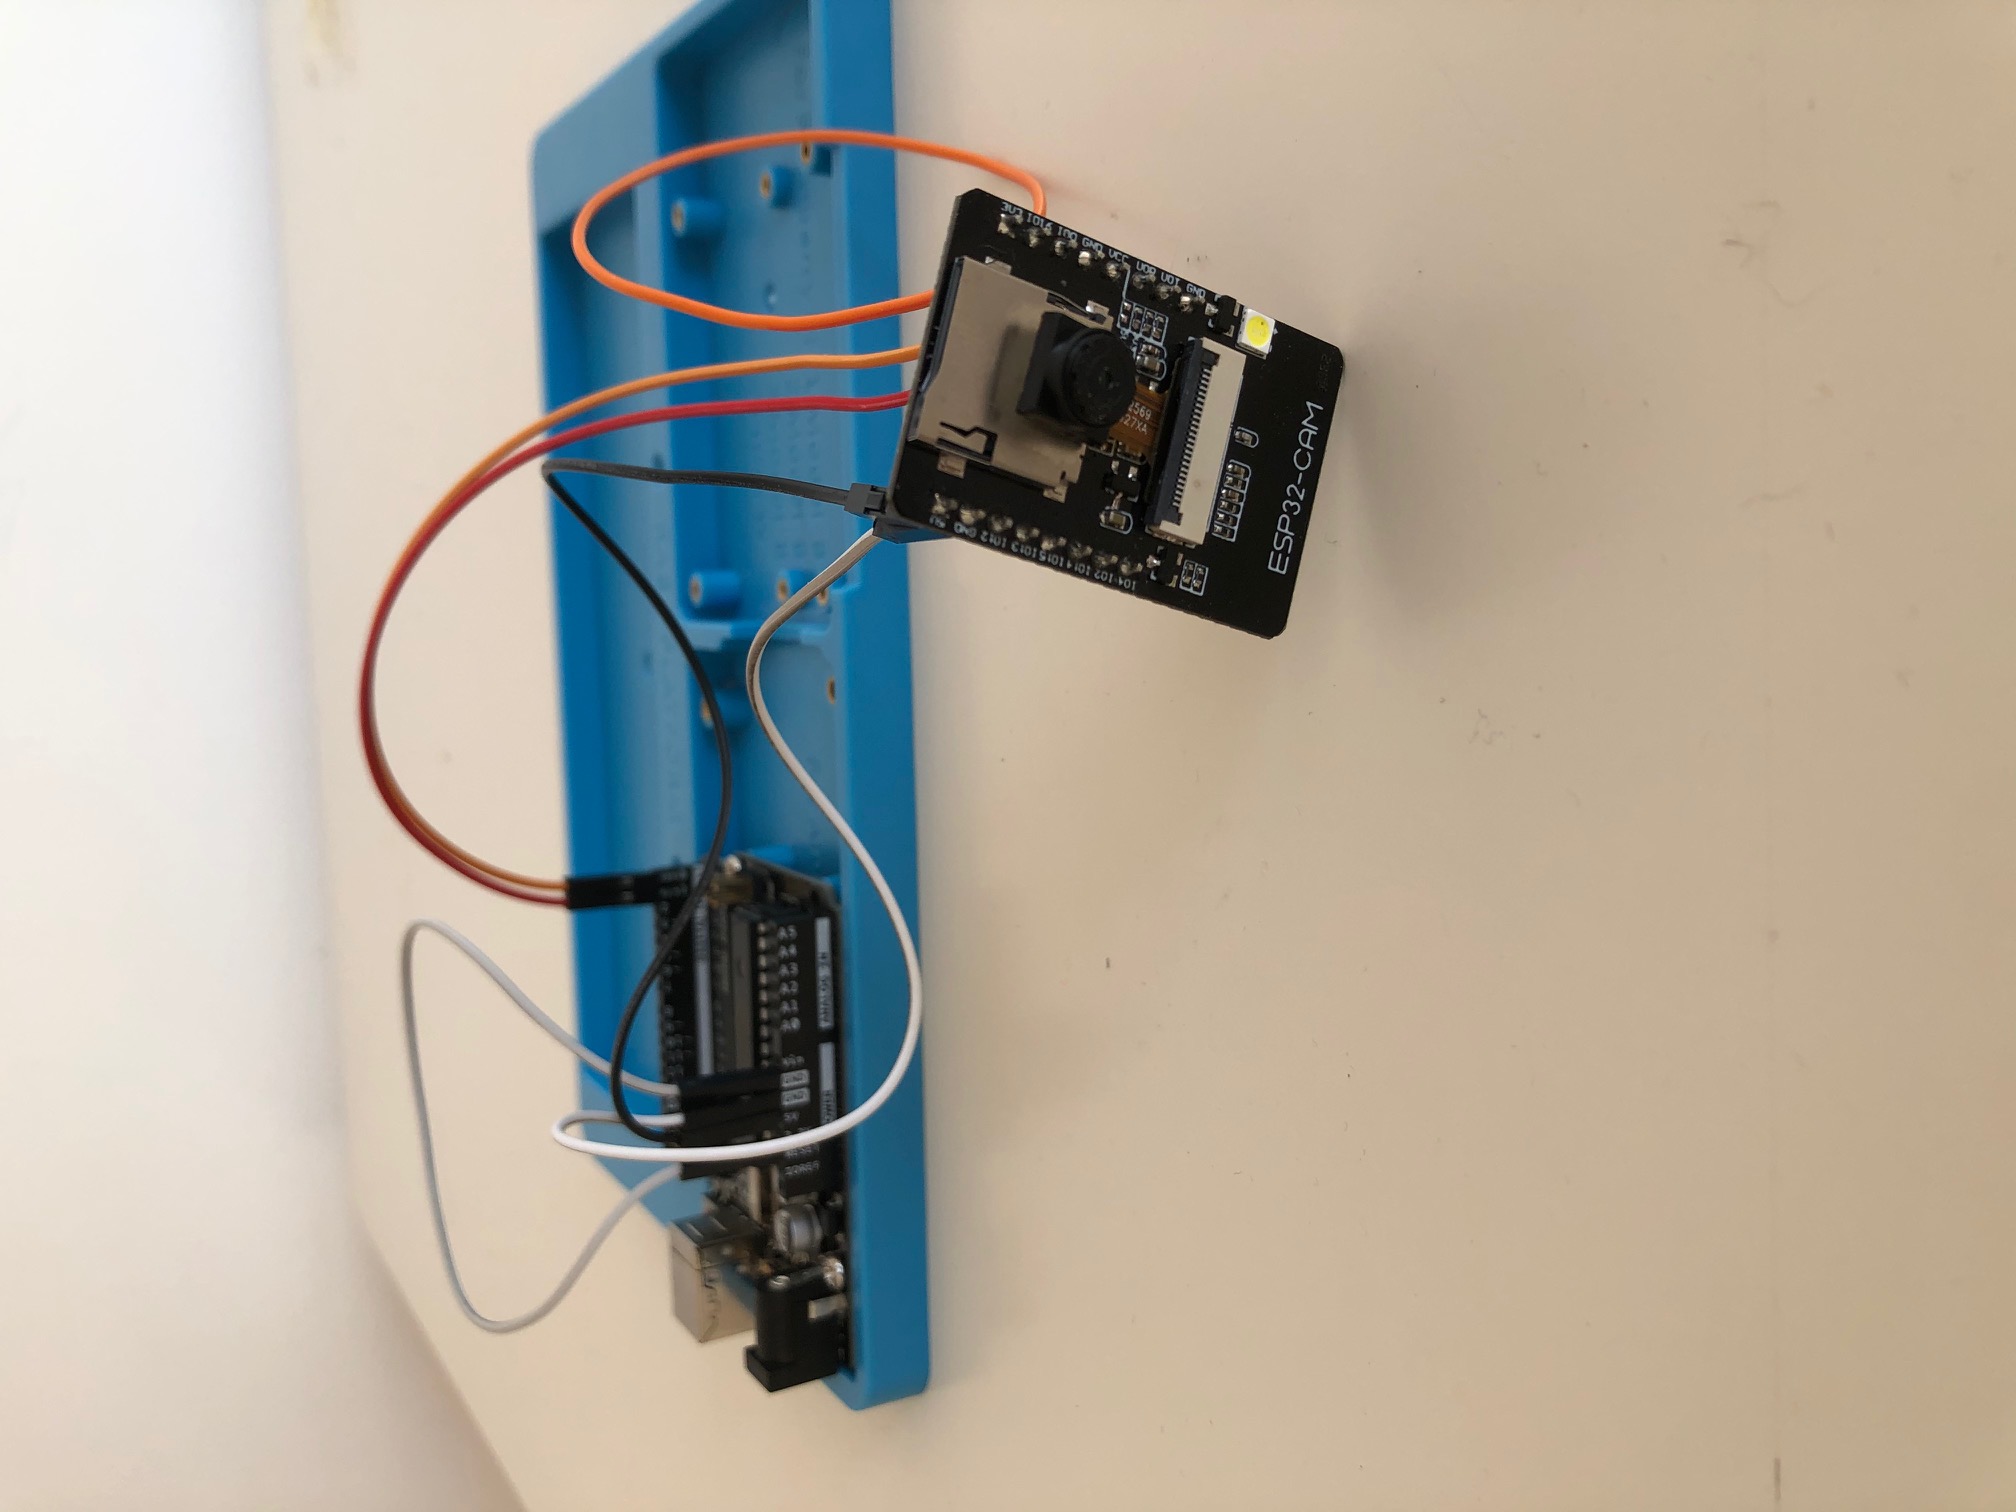
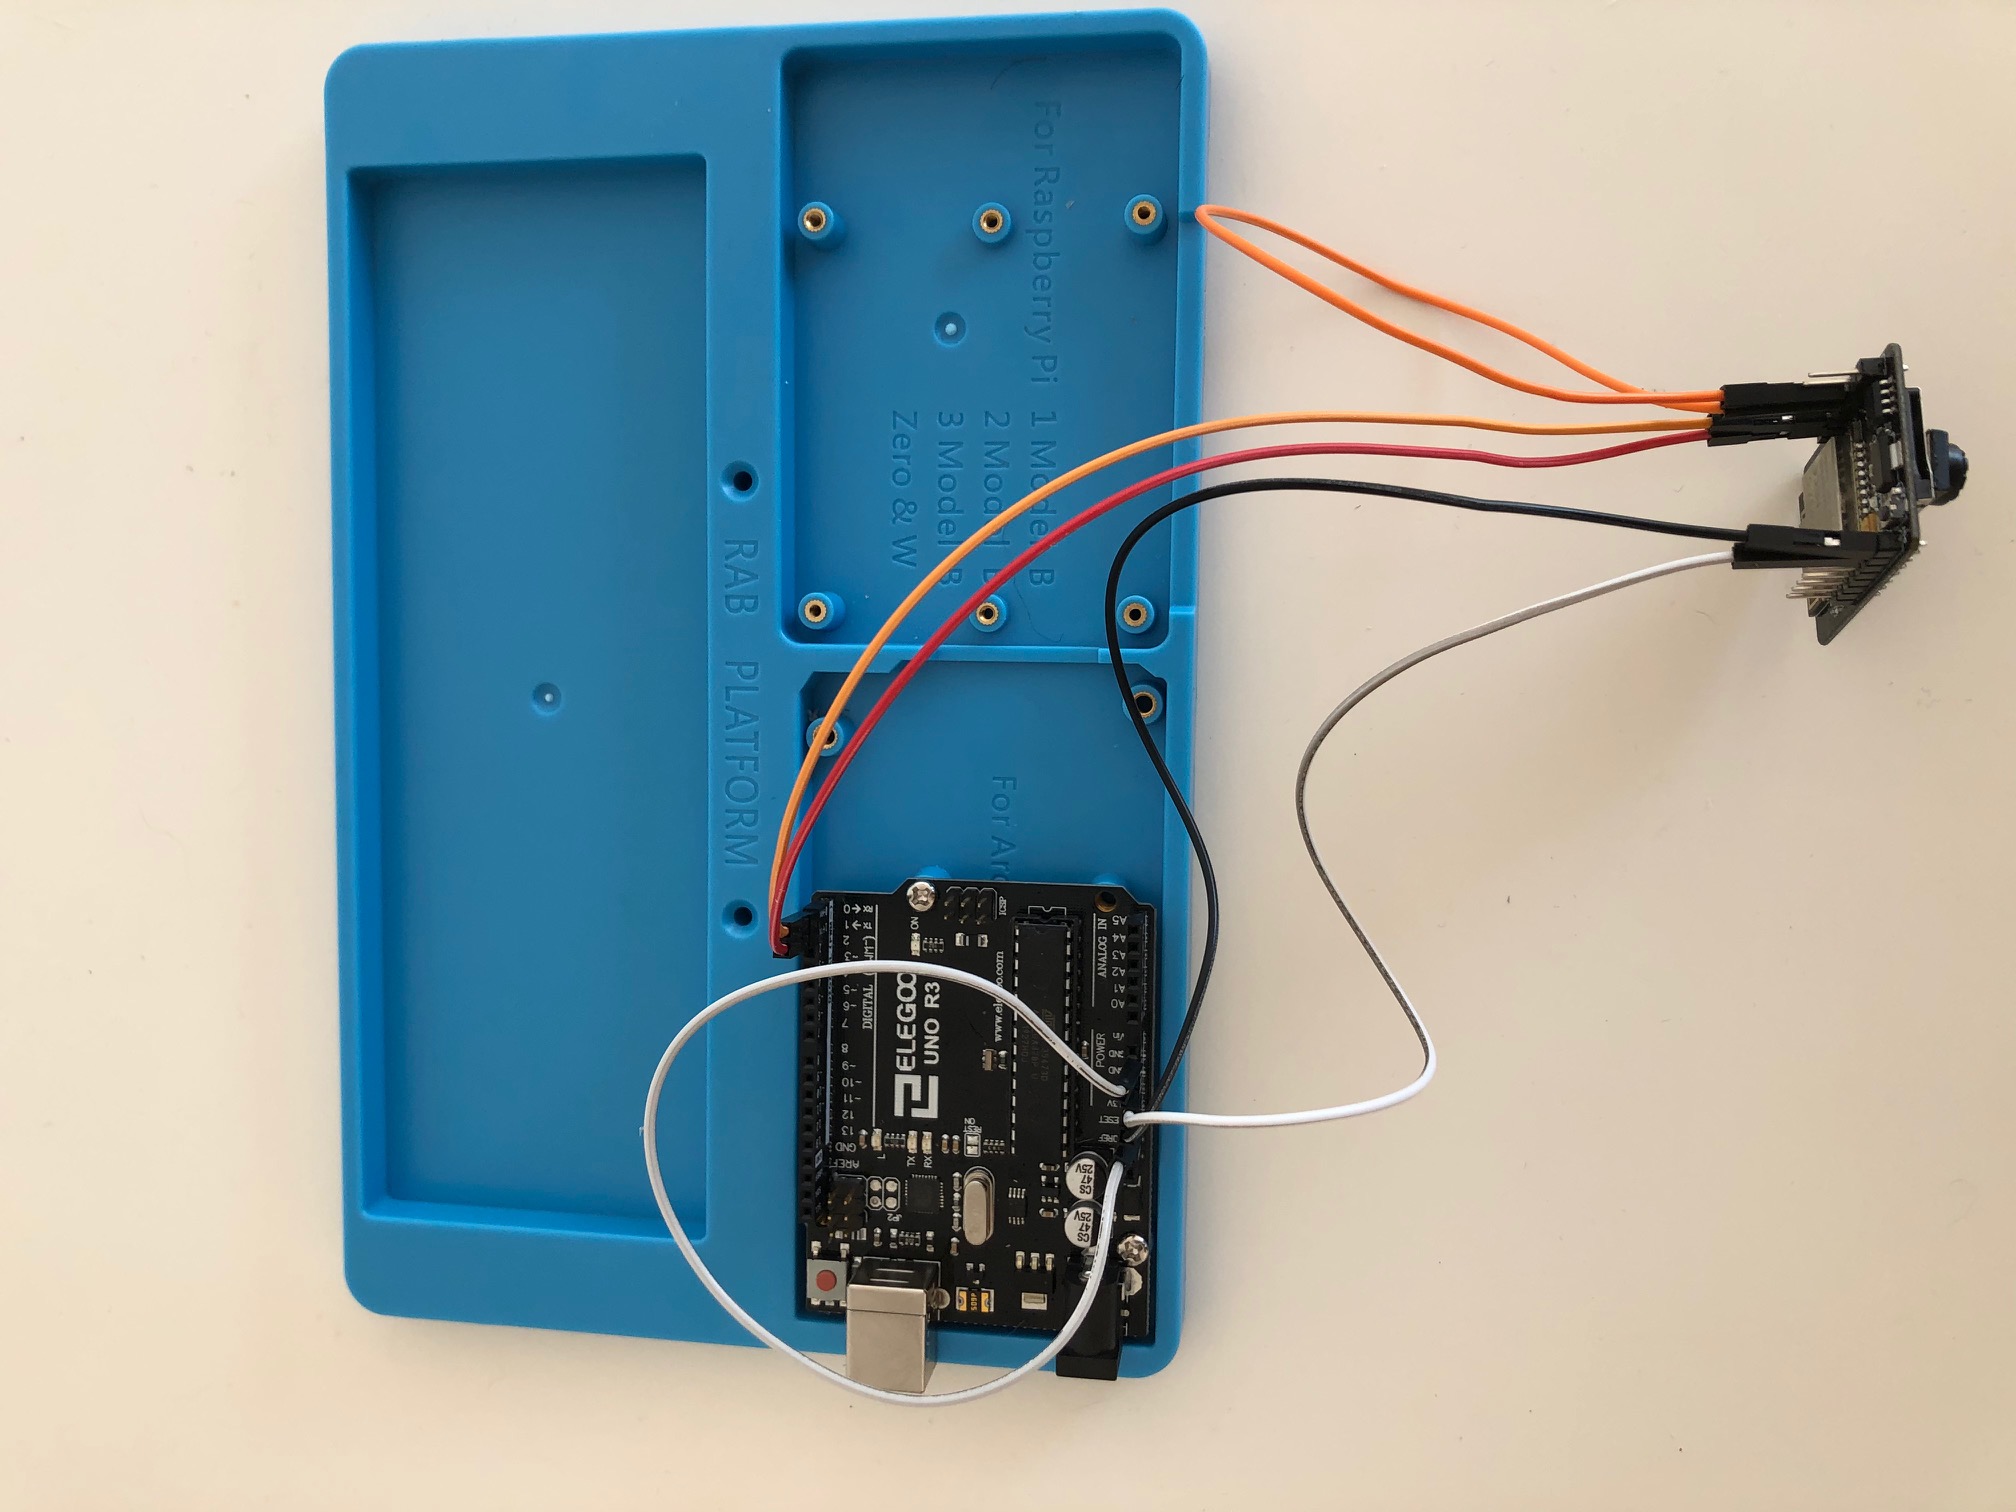
- Ardunio Uno R3 or similar (I used Elegoo UNO R3) - available here
- ESP-32 CAM board - available here
- Some wires and connectors
- AWS Account
- A basic IT knowledge
- C++ to flash ESP-32
- ESP-32 Board Driver - Github Project
- MQTT Library - Github Project
- Python 3.8
- Boto3
- Diagrams to draw architecture diagram - Github Project
- AWS Lambda
- AWS Rekognition
- AWS S3
- AWS SNS
- AWS IoT Core
- AWS DynamoDB
- AWS Cloudwatch
- AWS SQS
- AWS IAM
The image below is a draw of architecture used in this project.
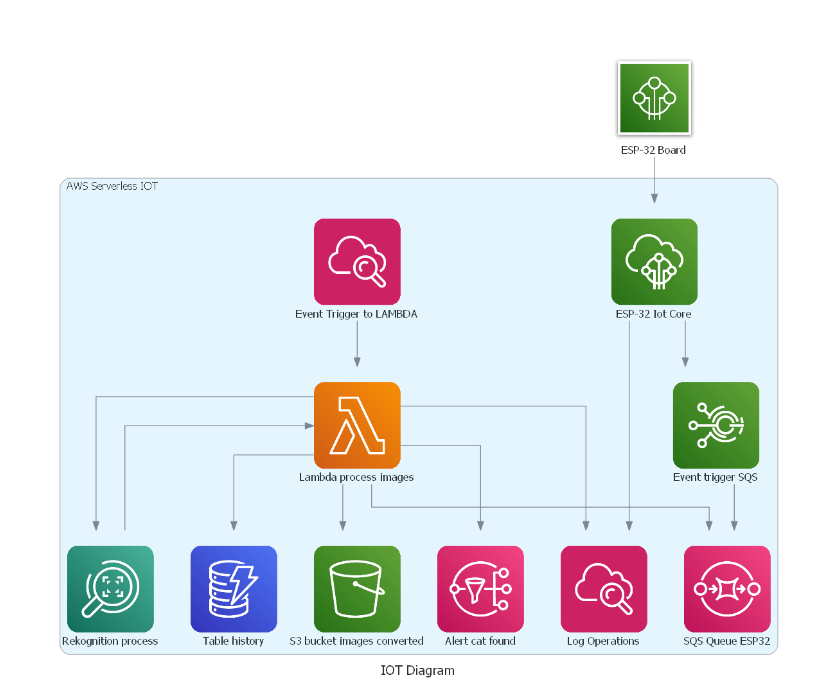
As you see, all entire process starts with ESP-32 Board sending a connection and data (image base64) to AWS IoT Core. The ESP-32 cam sends a file each 30 minutes. After that, AWS IoT Core trigger an event to store the message (publish action) in a SQS Queue.
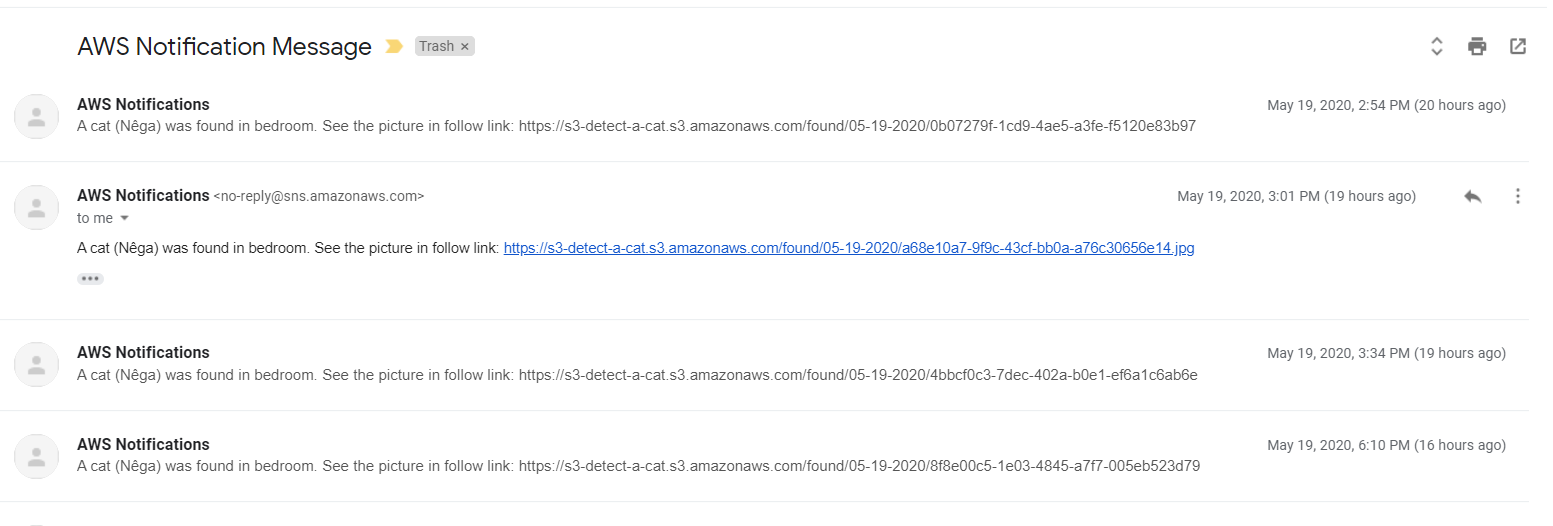
Using CloudWatch Event Rules, an Event runs every 5 minutes and execute a Lambda Function (lambda_function.py). This Lambda Function consumes the SQS Queue, decode base64 to image and send image to Rekognition. If a cat is present in image and Rekognition has an Confidence higher than 50%, Lambda invoke a SNS topic to alert (using email endpoint) that cat is on bedroom. For history and analyze proposes, all images metadata are stored on DynamoDB and physical file are stored in S3.
OBS:
- You can invoke Lambda execution using SQS Trigger for Lambda and remove CloudWatch Event. It's up to you.
- All of this archicture you can execute with NO COST. Yes, you can execute this using your free tier limits.
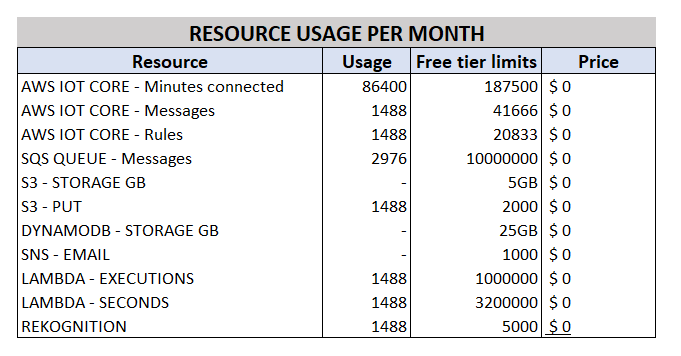
The table below describes all resources usages, free tier limit and costs per month.
- Create a Queue in SQS and give the name you want.
- Create a S3 Bucket and give the name you want.
- Create a SNS Topic and one email subscription in this topic.
- Create a DynamoDB (give the name you want) with "imageId" as Partition Key and "found" as Sort Key, both must be String type. Look inside "lambda_function.py" and check line 46, you'll see table creation schema.
- Open "lambda_function.py" and change the follow lines with respective URL, names and ARN.
SQS_QUEUE_URL = "" #Queue URL
S3_BUCKET_NAME = "" #Bucket name
SNS_TOPIC_ARN = "" #ARN topic to subscribe a message in SNS
DYNAMODB_TABLE = "" #Dynamodb table name
REGION_NAME = "" #Region- Create a IAM role for Lambda and attach a policy with following permissions
{
  "Version": "2012-10-17",
  "Statement": [
    {
      "Sid": "Stmt1589962598341",
      "Action": [
        "sqs:DeleteMessage",
        "sqs:ListQueues",
        "sqs:ReceiveMessage"
      ],
      "Effect": "Allow",
      "Resource": "arn:aws:sqs:<region>:<account_ID>:<queue_name>" // Replace to correct ARN
    },
    {
      "Sid": "Stmt1589962617476",
      "Action": [
        "sns:Subscribe"
      ],
      "Effect": "Allow",
      "Resource": "arn:aws:sns:<region>:<account_ID>:<topic_name>" // Replace to correct ARN
    },
    {
      "Sid": "Stmt1589962661926",
      "Action": [
        "s3:ListBucket",
        "s3:PutObject",
        "s3:PutObjectAcl"
      ],
      "Effect": "Allow",
      "Resource": "arn:aws:s3:::<bucket_name>/<key_name>" // Replace to correct ARN
    },
    {
      "Sid": "Stmt1589962713190",
      "Action": [
        "dynamodb:CreateTable",
        "dynamodb:PutItem"
      ],
      "Effect": "Allow",
      "Resource": "arn:aws:dynamodb:<region>:<accountID>:<resourceType>/<resourcePath>" // Replace to correct ARN
    },
    {
      "Sid": "Stmt1589962815070",
      "Action": [
        "rekognition:DetectLabels"
      ],
      "Effect": "Allow",
      "Resource": "*"
    },
    {
      "Sid": "Stmt1589962871242",
      "Action": [
        "logs:PutLogEvents"
      ],
      "Effect": "Allow",
      "Resource": "*"
    }
  ]
}- Create a Lambda Function from scratch, select runtime "Python 3.8" and attach Role created.
- Paste the file code "lambda_function.py" inside Lambda console and click in Save.
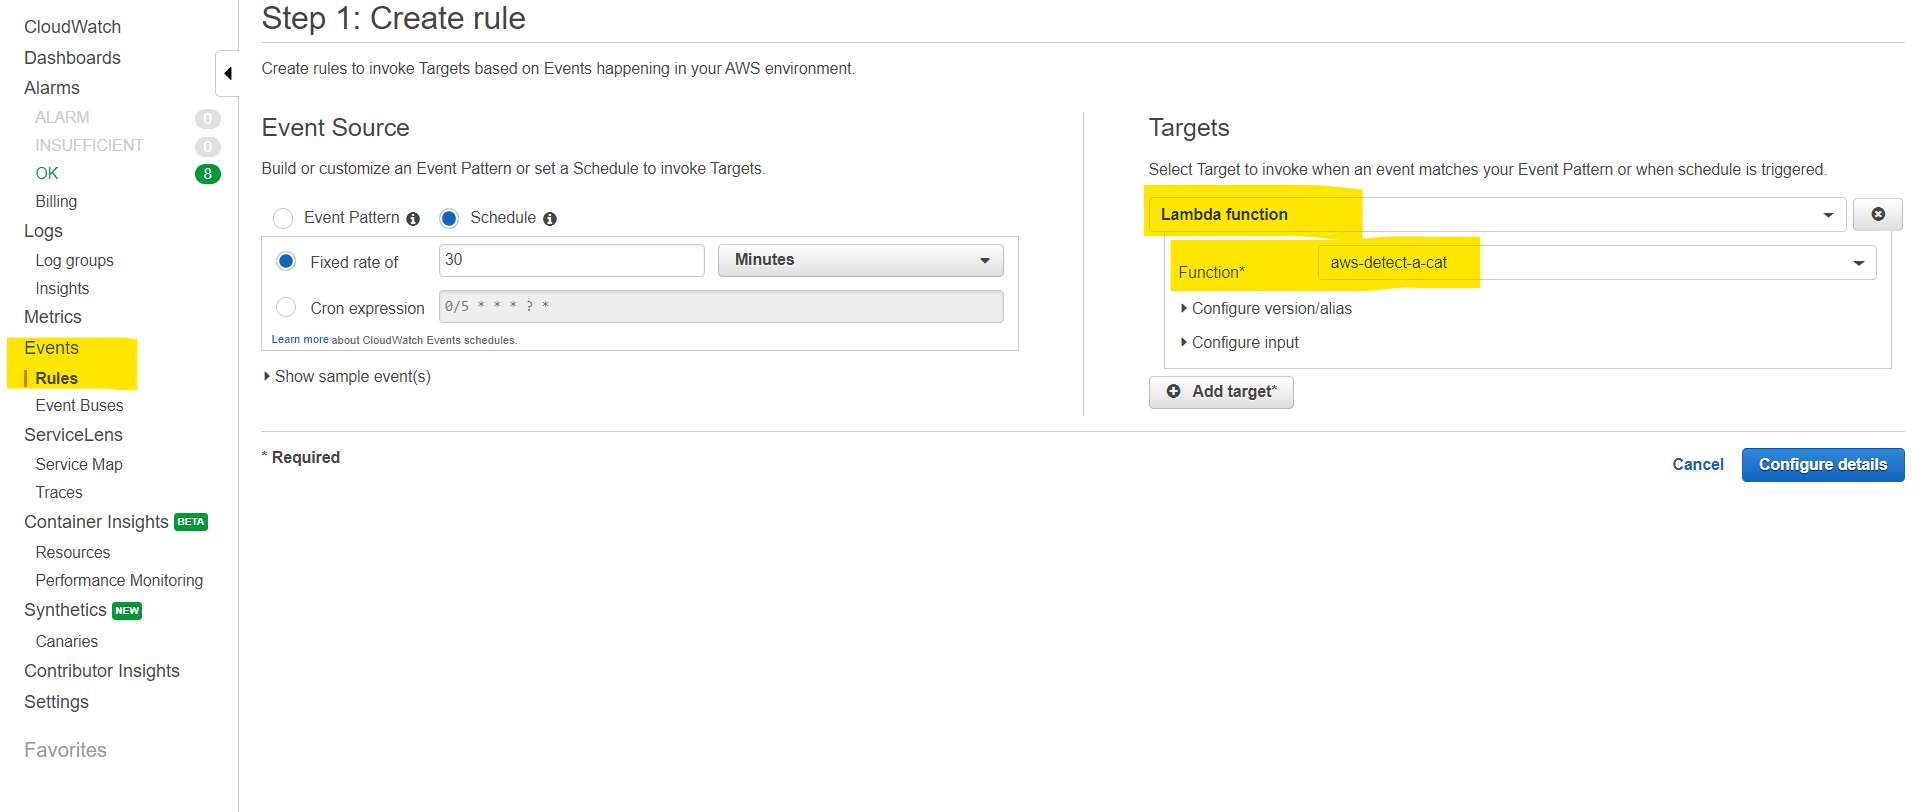
- Create a Cloudwatch Events Rule, Schedule to run every 5 minutes and target a Lambda Function created in previous step.
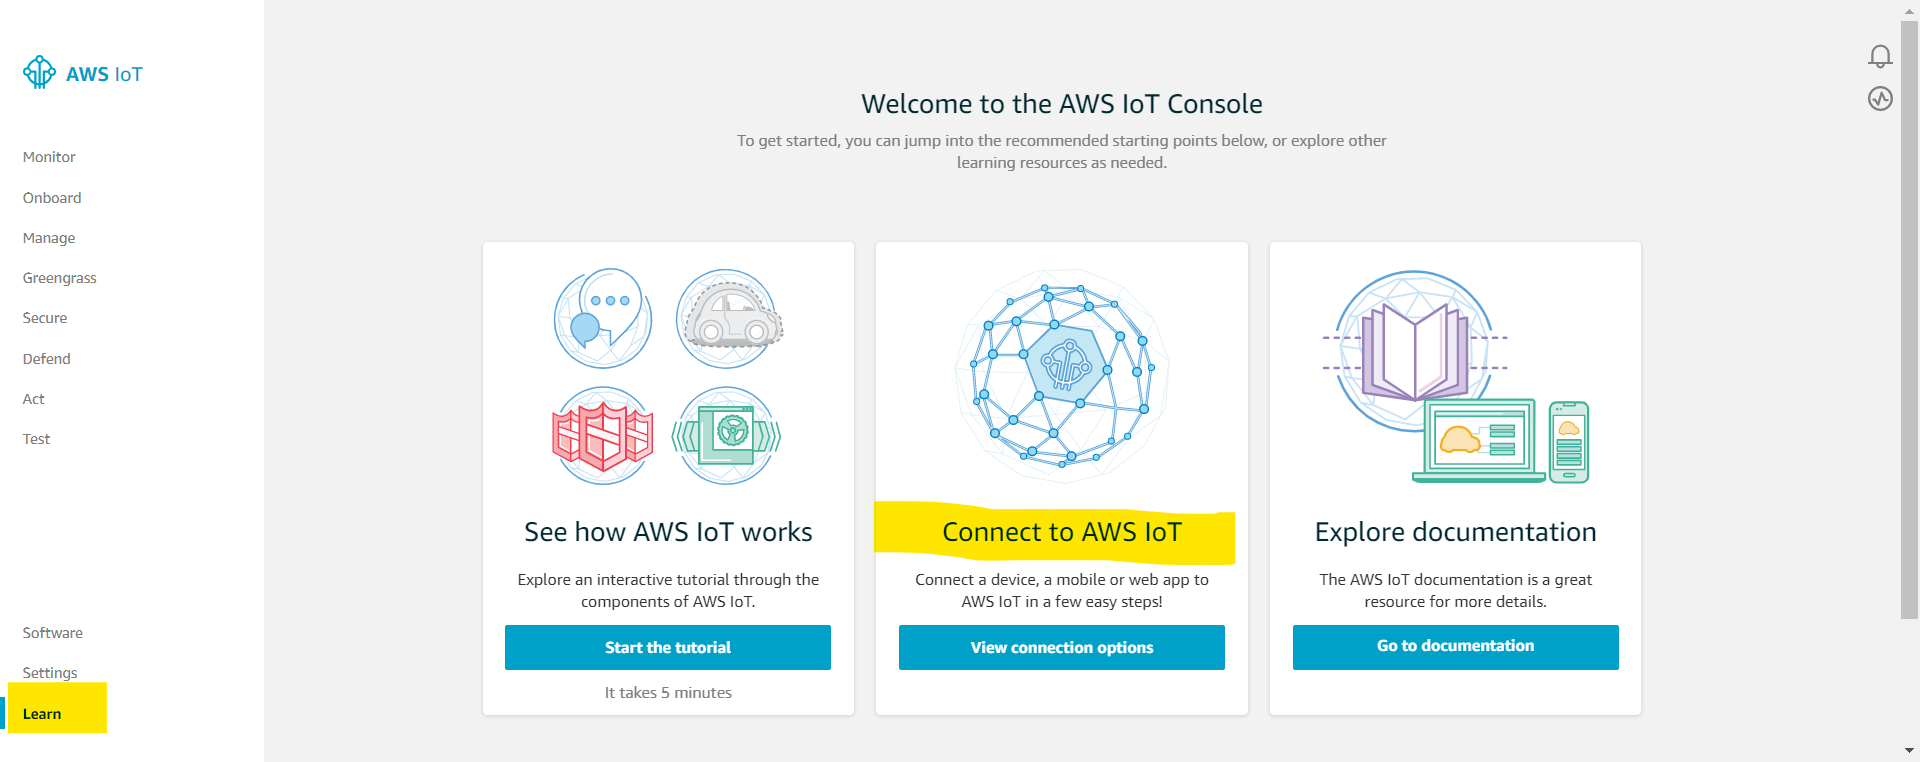
Login on AWS Console and find for "IoT Core". In left menu click on "Learn" and "Connect to AWS IoT".
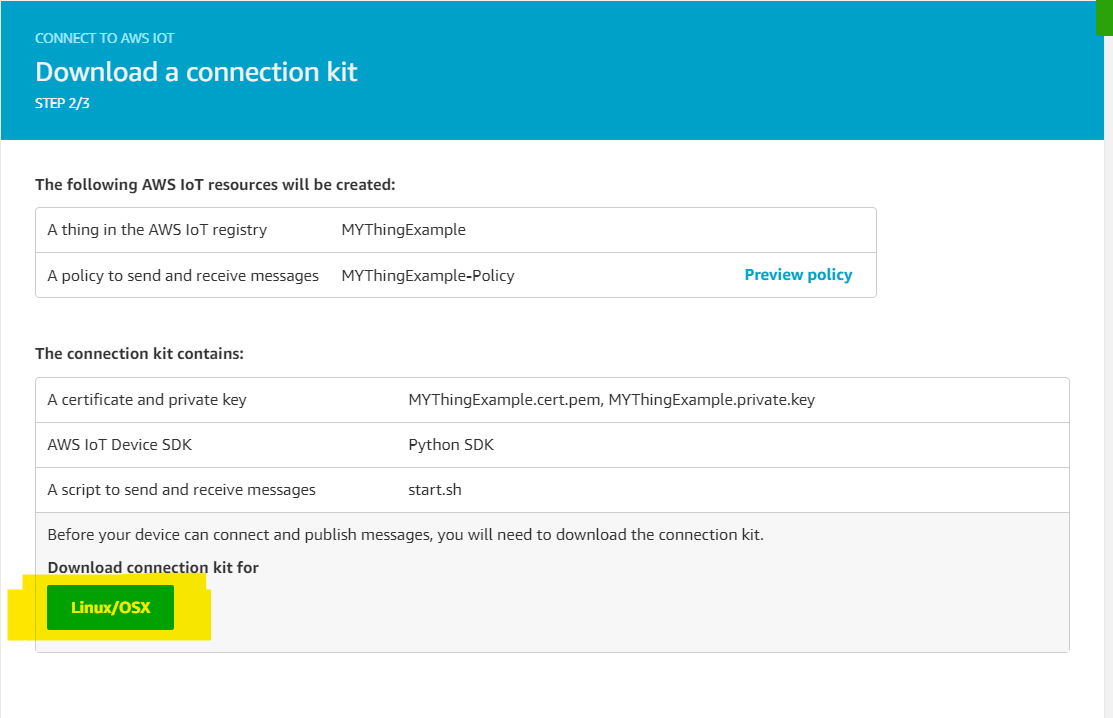
In the next step select "Linux/OS" and "Python". Even you use Windows, select "Linux/OS". Give a name for you Thing (Device), it's should be like "Arduino-ESP", and click next. In next step, download your connection kit and unzip in a folder. You'll use this kit when deploys Arduino code.
Go back to IoT Core main menu and click on Secure -> Policies and select the Thing that you already created. Click on "Edit policy document" and attach this policy:
Change "YOURTHINGAME" to your thing name. In my case "MyThingExample"
{
  "Version": "2012-10-17",
  "Statement": [
    {
      "Effect": "Allow",
      "Action": [
        "iot:Publish",
        "iot:Receive"
      ],
      "Resource": [
        "arn:aws:iot:us-east-1:200984112386:topic/detectcat/pub",
        "arn:aws:iot:us-east-1:200984112386:topic/detectcat/sub"
      ]
    },
    {
      "Effect": "Allow",
      "Action": [
        "iot:Subscribe"
      ],
      "Resource": [
        "arn:aws:iot:us-east-1:200984112386:topicfilter/detectcat/pub",
        "arn:aws:iot:us-east-1:200984112386:topicfilter/detectcat/sub"
      ]
    },
    {
      "Effect": "Allow",
      "Action": [
        "iot:Connect"
      ],
      "Resource": [
        "arn:aws:iot:us-east-1:200984112386:client/YOURTHINGNAME"
      ]
    }
  ]
}
Go back to IoT Core main menu and click on Act -> Create. Give the name what you and and go to "Rule query" section. Paste this SQL inside textbox:
SELECT * FROM 'detectcat/pub' WHERE picture <> NullIn "Set one or more actions" section, click in "Add action" and choose "Send a message to SQS Queue":
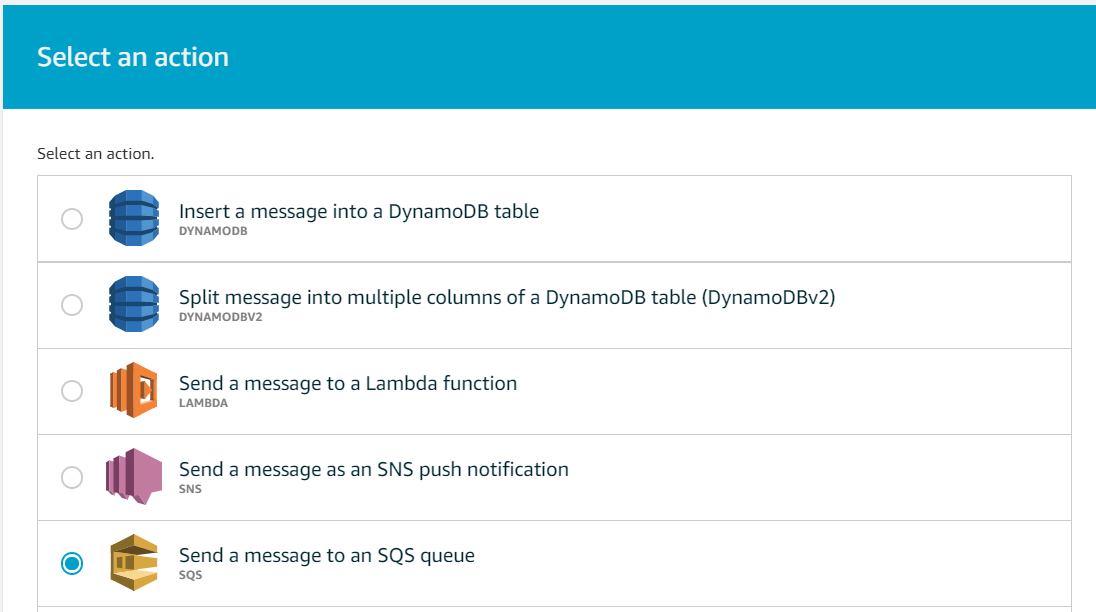
Click in Next and choose your queue previously created:
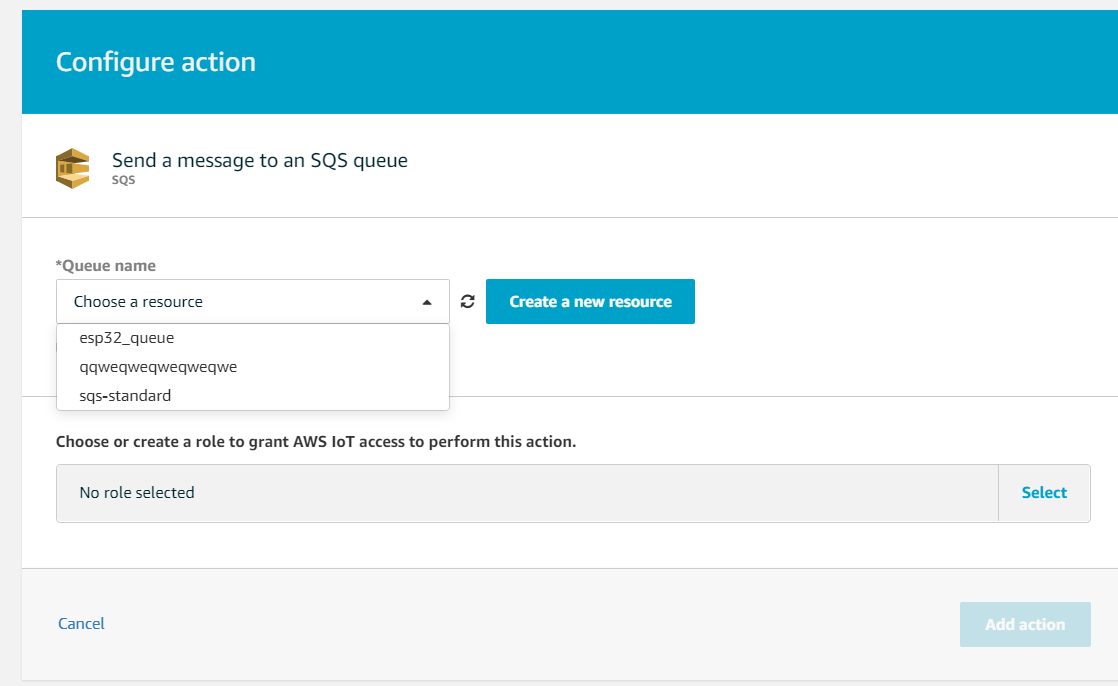
Click in "Add action" and done.
Now your backend serveless is configured to receive ESP-32 Pictures and analyze them.
1 - Download Arduino IDE available here.
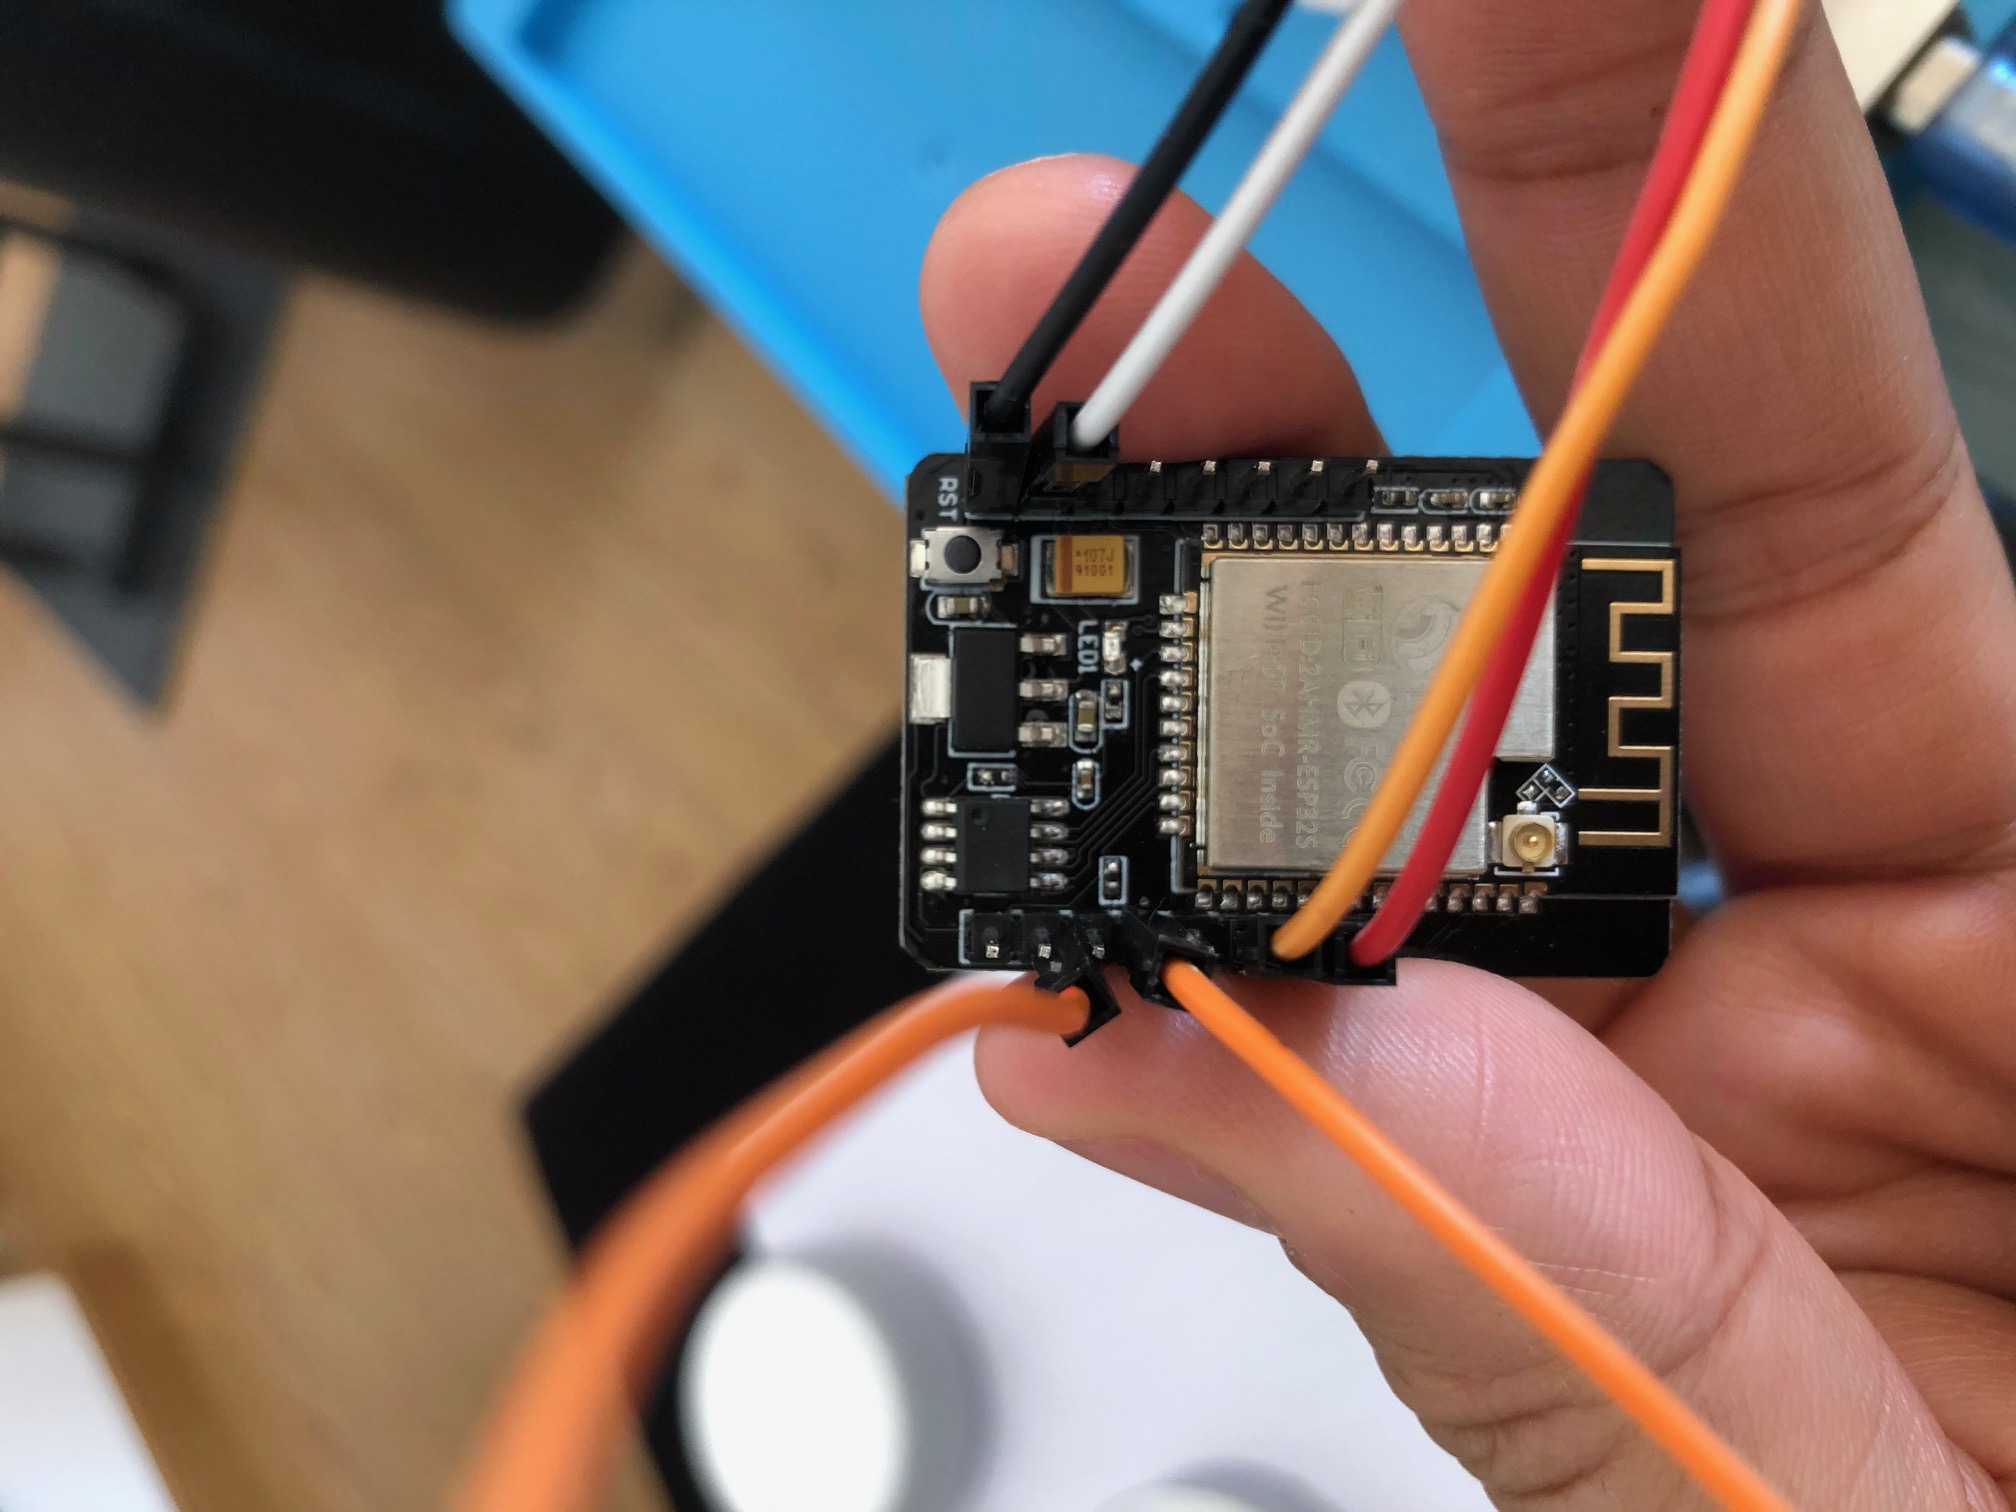
2 - Connect Arduino Board and ESP32-Cam Board. Install ESP module. Watch this video that explain everything.
3 - Open Arduino IDE and click in File -> Open. Choose the folder where you cloned this repo and open Arduino project.
4 - Open "secrets.h" and fill blank fields. Use "connect device_packages.zip" files.
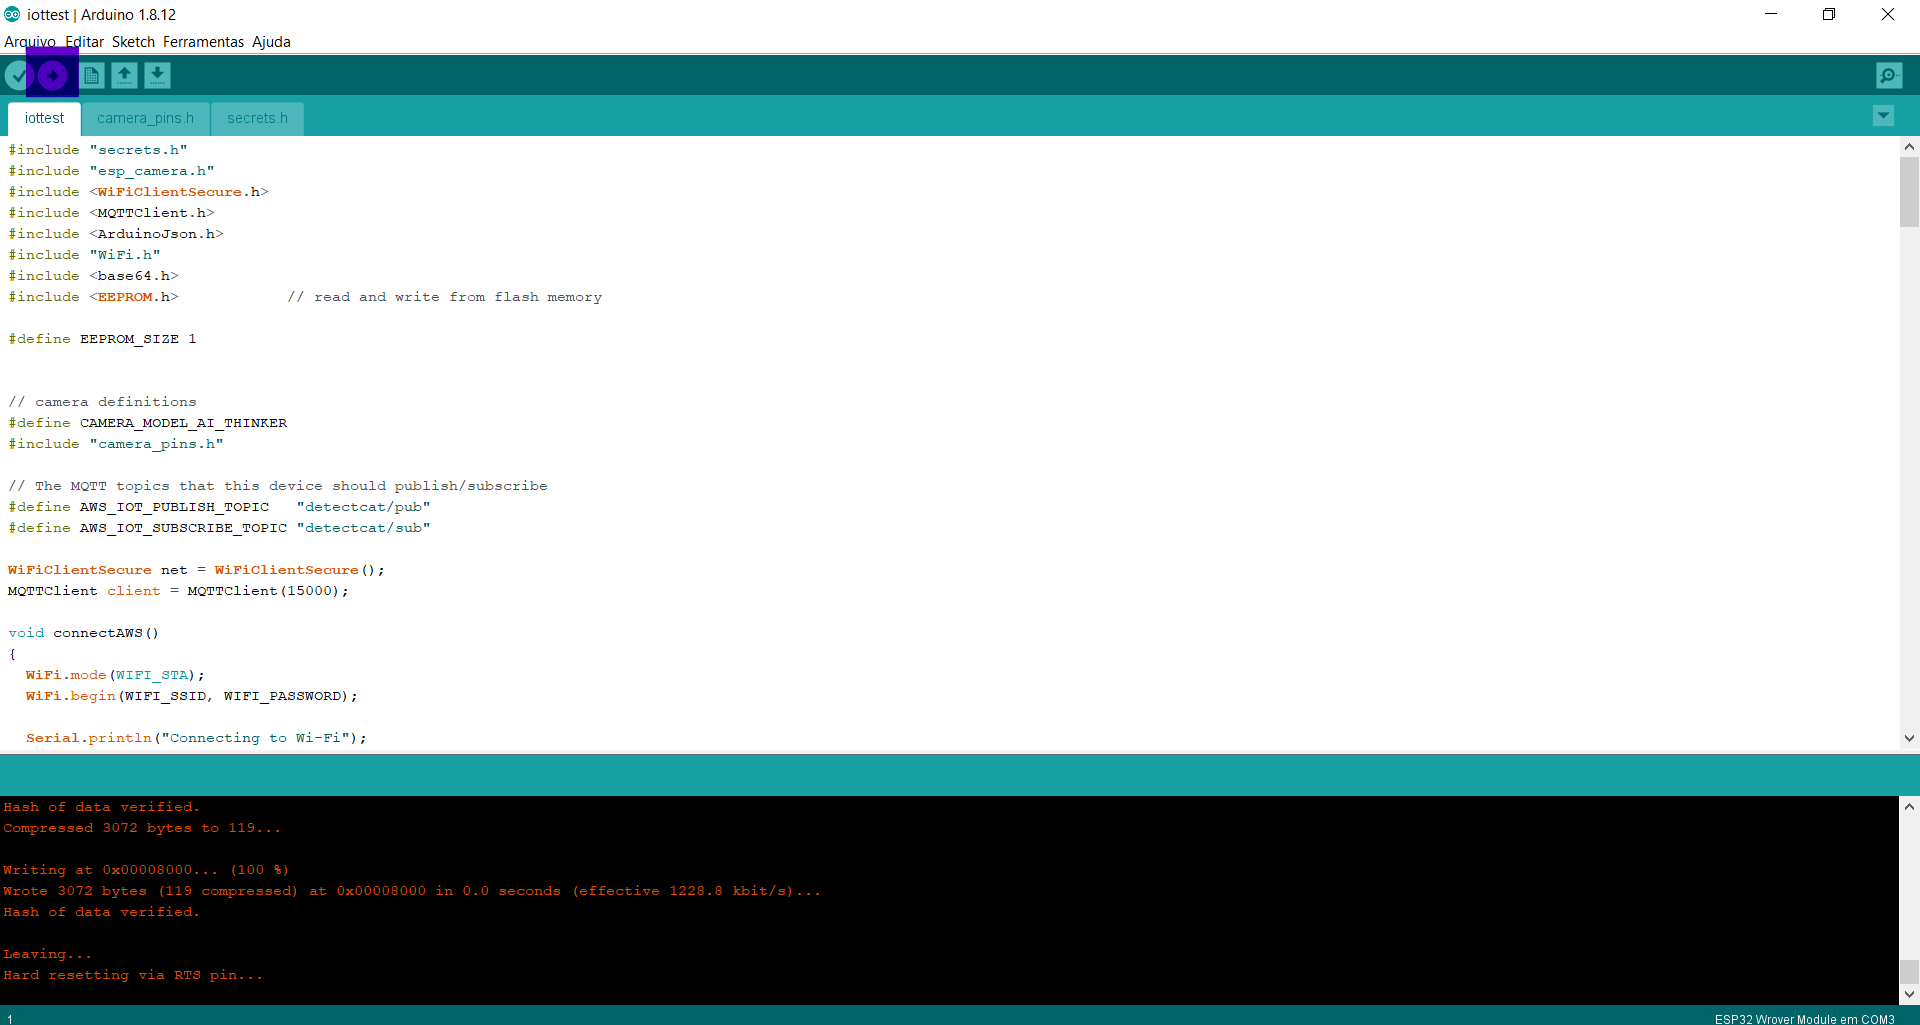
5 - Compile and Flash ESP-3 with this code. Wait until the message "Hard resetting via RTS pin..." and now your ESP-32 board has a code to integrate with IoT AWS.
5 - Remove flash mode disconnecting "DO to GND" in ESP-32 Board and press the small button to reset
6 - Open Monitor Serial in Arduino IDE and watch communication happening..
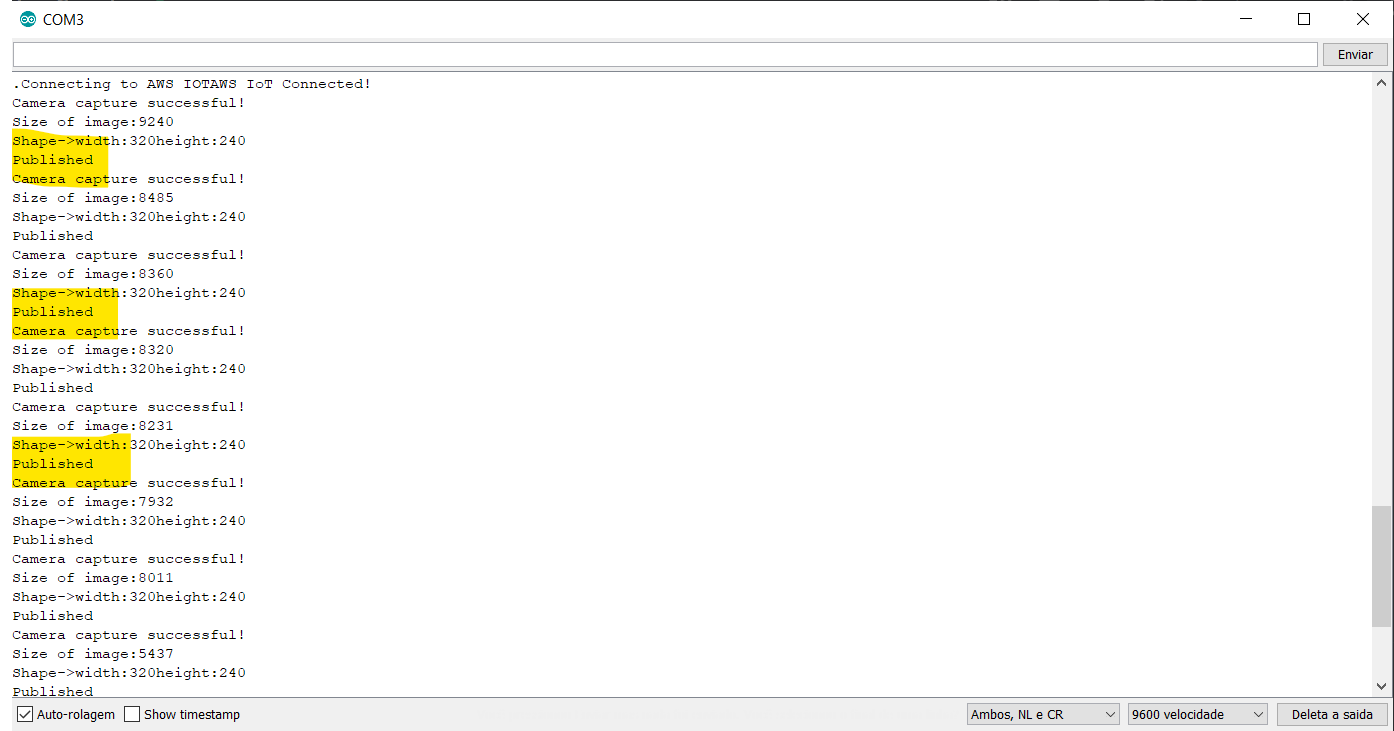
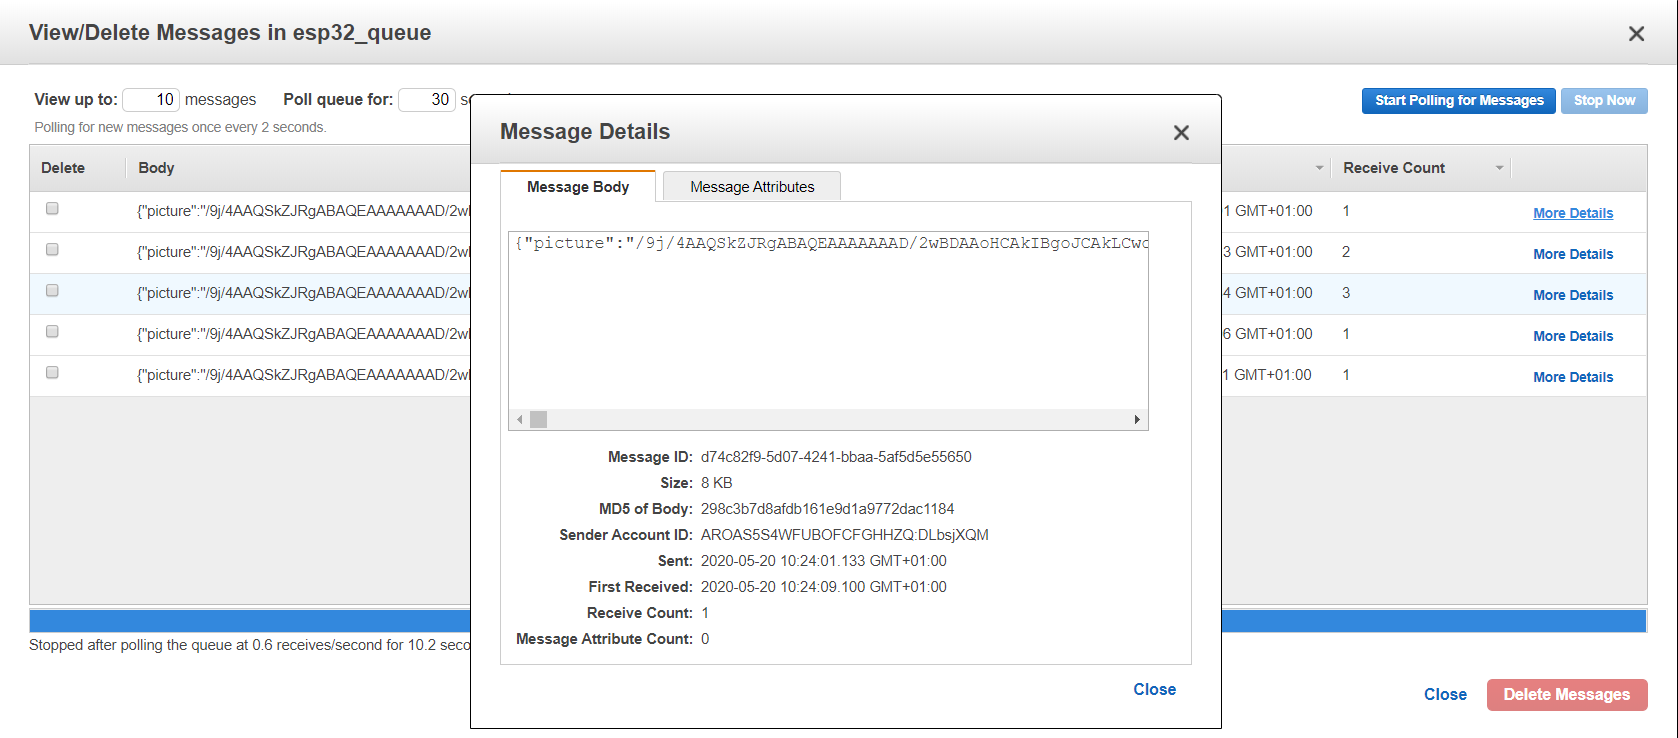
Every time that you see a message "Pusblished" in console, a new message is created in SQS Queue and will be analyzed for Lambda function.
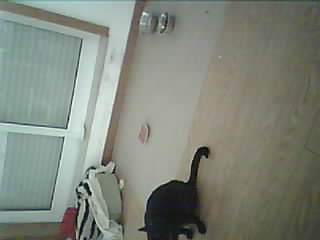
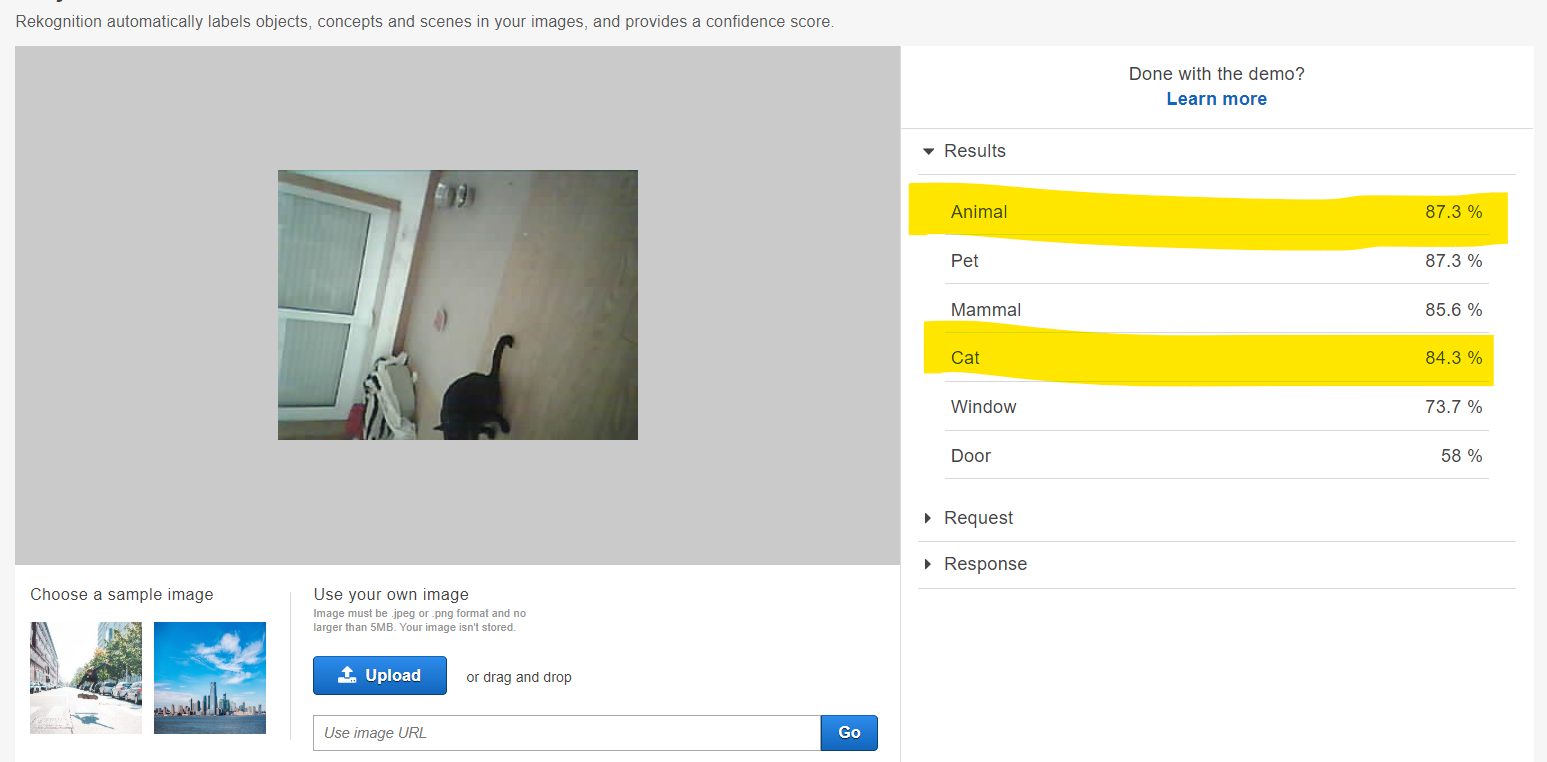
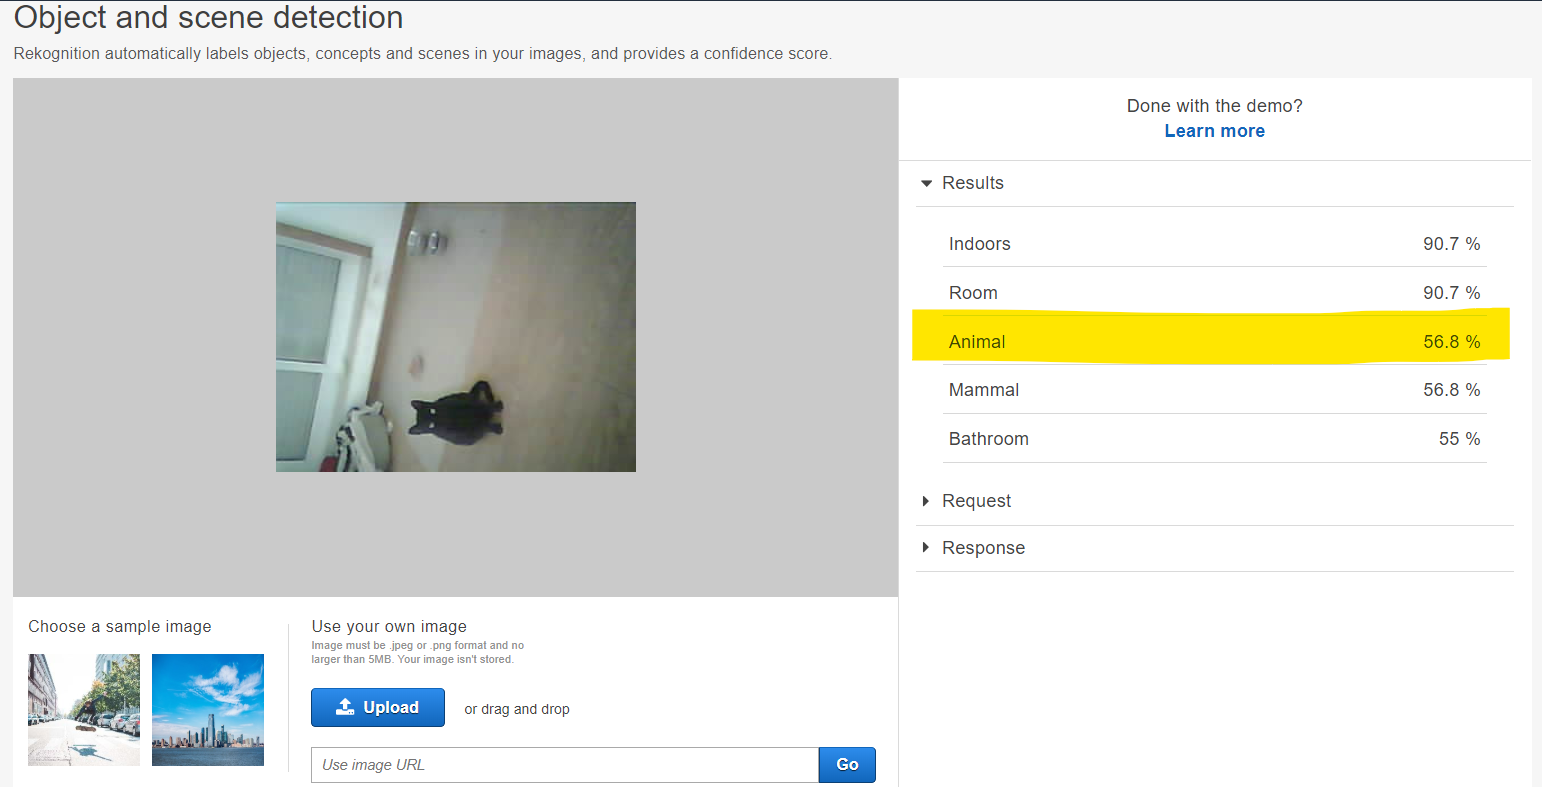
Bellow some pictures taked by ESP32-Cam and result of analyze using this solution:
-
PICS
-
ANALYZE
-
SNS Alert (Email sent to my GMAIL Account)


- ESP32 Cam is a small device and there is no enough memory to take pictures with a good qulity. You may change to XD-95 OV2640. available here
- You may need to reboot Arduino board every 6 or 7 days, because some memory leak happens and ESP32 stop to take pictures.
Although this solution is experimental, you can use the same concept to produce your commercial solutions.