In this practice you will learn how to create navigation for your Route paths
using layout routes, Links, NavLinks, Navigate components, and the
useNavigate hook.
Clone the starter repo, which you can access through the Download Project
button at the bottom of this page.
cd into the practice's root directory and run npm install. To start your
app, run npm run dev.
In your App.jsx file, import the Link component from react-router-dom.
You will use this component instead of the <a> element to which you are
accustomed.
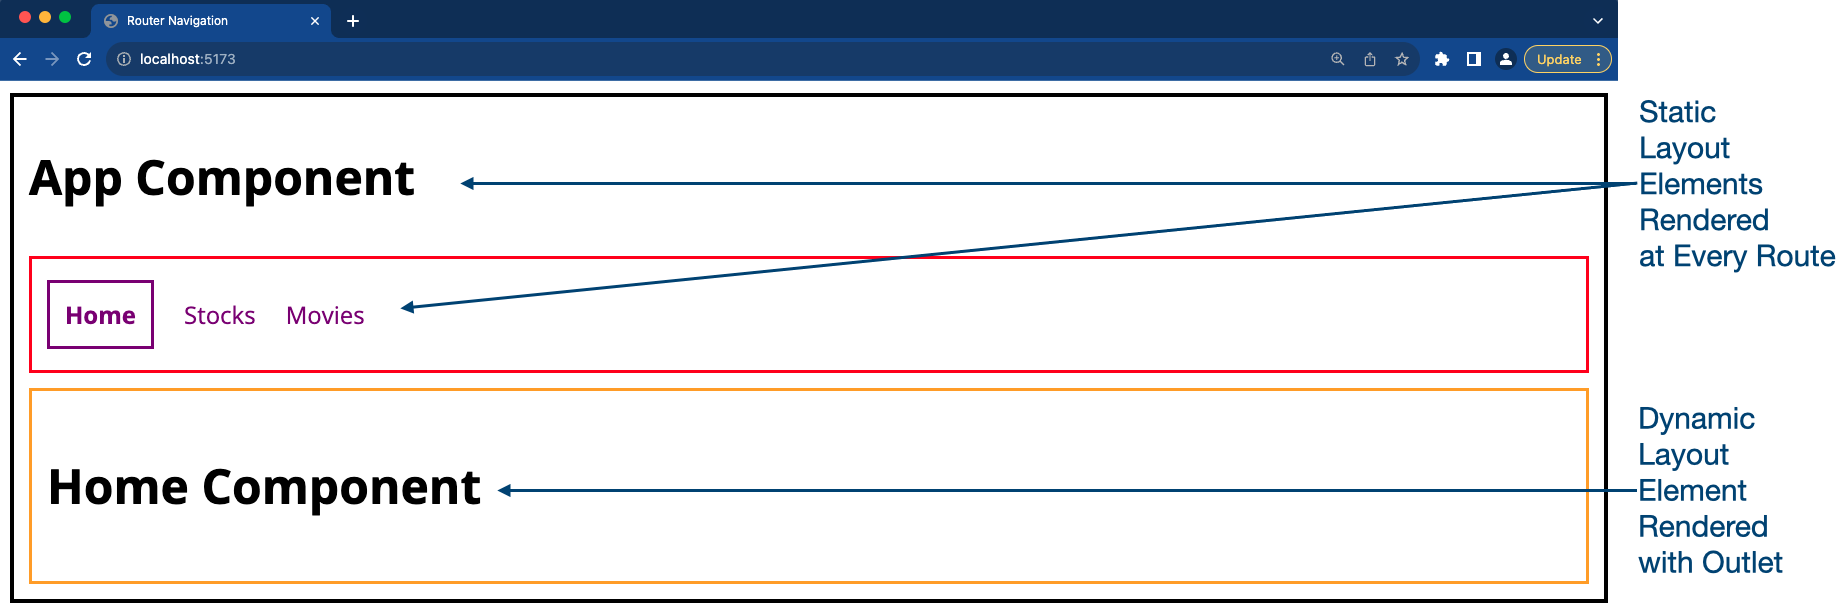
You want to create a navigation bar that appears under the title App Component, but this can be a little tricky. To see why, first add a Link to
Home between the h1 and the RouterProvider in App, like this:
// WARNING: THIS WILL NOT WORK!!!

function App() {
  return (
    <div className='app'>
      <h1>App Component</h1>
      <Link to='/'>Home</Link>
      <RouterProvider router={router} />
    </div>
  );
}
Everything seems to work well until you actually open your app in a browser, at
which point you will see only a blank screen. If you open the DevTools, you will
see a relatively unhelpful error message in the console essentially claiming
that a call to useContext in the Link component returns null. What went
wrong?
The actual problem is that Links--and NavLinks, which you'll get to in a
bit--only work in the context of a router. In the code above, however, you have
inserted a Link outside of the RouterProvider. That can't work. Go ahead and
remove the problematic Link. You need a way to get your nav bar inside the
router.
Enter layout routes. A layout route is a "route" that has no path so it will
always render. This enables you to manifest static elements, i.e., the layout.
Children routes--that is, the actual routes--are then rendered into the layout
using Outlet:
Let's construct a layout route!
First, create a new function component called Layout. (You could do this in a
new file, but for now just include it in App.jsx.) Go ahead and move the
static elements from App--i.e., everything but RouterProvider--into
Layout:
function Layout() {
  return (
    <div className='app'>
      <h1>App Component</h1>
    </div>
  )
}
(You could leave these elements in App, but they are part of the standard
layout so you might as well move them here to keep everything tidy.)
Your layout will be fairly simple: you just need a nav bar and whatever
component should be rendered for the current route. Accordingly, after the App Component h1, insert a nav element--add comp and nav classes so the
proper CSS will apply--and a main element.
Inside your main tags, render Outlet. (You will need to add it to the list
of imports from react-router-dom.) This is where the current route's component
will render. (You will set up the children routes for Layout in your router
in a moment.)
Your Layout component should now look like this:
function Layout() {
  return (
    <div className='app'>
      <h1>App Component</h1>
      <nav className="comp nav">
      </nav>
      <main>
        <Outlet />
      </main>
    </div>
  );
}
Inside the nav element, add an unordered list element. Then add a Link to
the / path that reads Home as a list item element. (See above if you've
forgotten how to set up a Link.) As a second list item, include a Link to
Stocks. For the link to /movies--list item #3--use a standard anchor tag
(a) instead of a Link component and name it Movies-Anchor. This will
provide a useful comparison point below.
Before you can test your Layout, you still need to incorporate it into your
router. Go to the array of routes that you are passing to createBrowserRouter.
As the first (and soon to be only) top-level route in the array, create a new
route with no path and Layout as the element. Add a key of children and
set the value to an array of all the other routes. These children routes will
now be displayed as Layout's Outlet when their path matches.
Your router should now look like this:
const router = createBrowserRouter([
  {
    element: <Layout />,
    children: [
      {
        path: '/',
        element: <Home />
      },
      {
        path: 'stocks',
        element: <Stocks />
      },
      {
        path: 'movies',
        element: <Movies />
      },
      {
        path: '*',
        element: <h1>Page Not Found</h1>
      }
    ]
  }
]);
That's it! In your browser, you should now see your functional nav bar displayed
between App Component and the route's component.
To truly understand why you are using the Link component, you should
compare your Links to the anchor tag that you added.
In your browser, click the Open In New Window button. Open the DevTools in the
new window to the Elements tab. Expand the html tree for both nav and main
as much as you can.
Notice that all of your nav list items appear as anchor tags. The links that
were created as Links, however, function differently. When you click on
Stocks (or Home), only the main portion of the page resets as the desired
component is switched out. Now, click on Movies-Anchor; the whole page
refreshes. Yikes! That's noticeable even on a simple page like this.
Therefore, always use Link components--not HTML anchor tags--to render
frontend links in React Router.
In your nav bar, it would be nice to see a difference between the active link
and the other links so a user could immediately see which page they were on. To
achieve that differentiation, you can use the NavLink component. (Remember
that a NavLink is just a Link component with extra functionality.)
Replace the Link import with the NavLink import and change all of your
Links (and the anchor tag!) to NavLinks.
Take a look in your browser. Notice that the active link is now red? Your
index.css defines an active class. NavLink automatically sees this and
applies it to the active link. Click each item and notice how the link changes.
Let's use the className prop to change the class that is applied to an
active link. For NavLinks, the className prop can also be set to a
function that receives an object with isActive and isPending keys. You can
use this functionality to change the active class name from the default active
to purple (another class already defined in index.css). Just add this
prop:
className={({isActive}) => isActive? 'purple' : ''}to each NavLink. Your active link in the browser should now have a purple
border around it.
The style prop on NavLinks works the same way as className but for
inline styling. (It also expects an object instead of a string.) Use this prop
to set the fontWeight to bold on active links. Now when you go to the
browser, you should notice that each active link has both a purple border and a
bold font.
Sometimes you want to allow access to a component only when a user is logged in.
Otherwise, you want to navigate the user in another direction. The
Navigate component enables you to do this.
In your App.jsx file, add a new route object as another child of Layout:
{
  path: '/not-logged-in',
  element: <h1>You Must Be Logged In To Enter.</h1>
}
Note: Does it matter where you insert this route among
Layout's children? No! The router will choose the most specific path match regardless of order.
Next, in your Stocks.jsx file, create a variable called loggedIn and
assign it to false.
Add an if statement that uses the Navigate component--don't forget to
import it!--to redirect the user to the /not-logged-in URL when the loggedIn
variable is false. (Remember that Navigate takes a to prop just like
Link and NavLink.) Note that you will also want to set the replace prop to
true; otherwise, every time you click Back it will return you to the
Stocks page, which will then immediately forward you to the /not-logged-in
page again.
Test your code in the browser by clicking on the Stocks link. It should
redirect you to the /not-logged-in route.
In Stocks.jsx, change the loggedIn variable to true. Now when you click
on the Stocks link, you should see the Stocks component.
You can use the useNavigate hook to navigate after some transaction has
taken place. In this case, your goal is to navigate back to Home after a user
clicks a button in the Stocks component.
First, under the h1 tag in your Stocks JSX, create a button with an
onClick event listener that looks like this:
<button onClick={handleClick}>Home</button>Event listeners differ in React in that the event listener is camelCased and will always be assigned to a function.
Here you have set the onClick event to invoke the function handleClick, but
you have not written handleClick yet.
Above the return, create a function called handleClick. It should alert the
user with a message:
  const handleClick = () => {
    window.alert('Sending info to the DB!');
  };
Test that the alert shows up in the browser.
Now you want to redirect after you click the ok button in the alert box.
Import the useNavigate hook from react-router-dom. In your component, invoke
the useNavigate hook and assign the function it returns to a new variable
called navigate.
After the window.alert in the handleClick function, call navigate and pass
it the path where you want your app to go:
navigate(`/`);It's that simple! Test your button in the browser.
Congratulations! In this practice you have learned how to
- Create a layout route that renders a navigation bar on every page
- Navigate to another address with the
Linkcomponent - Use the
NavLinkcomponent's added capability to set theactiveclass in CSS - Personalize the active links with specialized
NavLinkprops - Navigate the user to another location using the
Navigatecomponent anduseNavigatehook