Update 2023-09-29
The team can no longer keep maintaining this and we have not been able to find anyone to take over. Therefore, we have decided to archive the repo. Please reach out to us at eurekaml@equinor.no if you are interested in taking over responsibility.
This template repository is designed as a starting point for those who want to host their documentation in a way that provides:
- Fast, simple and downright gorgeous static web sites using documentation builders like MkDocs, Sphinx, or the static site generator of your choice.
- CI/CD pipeline that automatically builds and re-deploys your documentation whenever you commit changes to it.
- Lets you to keep the documentation "physically" close to your code, since you can have both the code and documentation in the same repo.
- Makes the documentation easily accessible through a (customizable) URL defined in Azure.
- Authentication using Azure Active Directory, allowing e.g. only members of your organization to access the documentation.
- Granular access control, where you can limit access for parts of the site to members granted specific roles.
Check out the live demo here.
The tutorial is split into several sections, adding on more and more of the features mentioned above. If you or your organization do not require all these features, feel free to follow along for as long as it makes sense for you. PS: Several chapter ends with an output-sections, which lists all the keys, secrets, values etc. that you should have written down before proceeding to the next step.
| Abbreviation | Description |
|---|---|
| AAD | Azure Active Directory |
| SWA | Static Web App |
This guide uses poetry to manage dependencies and virtual environments, but any package manager should work with some configuration. Please note that you will need the following to complete this setup:
- A GitHub-account
- An Azure account and subscription
Goal: After this section, you will be hosting a demo landing page for our documentation web page.
-
Fork this repository or click the template button above.
-
In Azure Portal, navigate to Azure Static Web App in Azure and create a new resource. Go through the setup wizard and connect it to your forked repository, as follows:
- Select a resource group. If you haven't already created a Resource Group, see the point below.
- (Optional) To create a new resource group, click the "Create new"-button underneath the drop-down for selecting resource groups. Alternatively, from the Azure Portal, go to "Resource Group" and click "Create". Go through the setup wizard to create you resource group.
- Give your SWA Resource a descriptive name.
- Hosting plan: If you want to enable custom authentication and follow along for the last steps in this tutorial, you must choose the Standard plan type.
- Select a desired region for hosting your resource. If you are part of an organization, they might have a policy for which you should chose.
- Press the button "Sign in with GitHub" and follow the instructions in the pop-up window.
-
Connect to GitHub (image below):
- After completing the GitHub login, use the "organization", "repository" and "branch" drop-down menus to select the repository you forked. In this tutorial, we connect the wep app to the
main-branch. If you want to keep a separate branch for built documentation, feel free to do so.
Important note: Do not connect to this template repository directly. Connect to your own fork of this template. - Select "Custom" in the "Build Presets"-dropdown and fill in the following fields:
- App location:
/ - Api location:
/api - Output location:
/docs/build
- App location:
- After completing the GitHub login, use the "organization", "repository" and "branch" drop-down menus to select the repository you forked. In this tutorial, we connect the wep app to the

- Finish the setup wizard by clicking the "Review + create"-button and then the "Create"-button.
- Once completed, go to your newly created resource. Your SWA has a deployment token which (see image below). Please write this down.
- You SWA also has an URL which we will refer to as
YOUR_SITE_URL. Please write this down as well.

- First, Azure automatically registers the deployment token as a secret in your repository, which you can view by visiting your GitHub Repo > Settings > Secrets > Actions. This gives the Web App access to your repo.
- Second, Azure commits a workflow-file to your repo which contains the necessary GitHub Action for deploying the website located in
/docs/build. This is triggered automatically when anything is pushed to main, and will handle the connection and deployment of content to your SWA.- You can view triggered actions by clicking on "Actions" in your GitHub repo. (NB! The
deploy-site.yml-action will fail at this point since we haven't yet created the GitHub secret that it expects. This will be fixed later). - You can view the newly created GitHub Action file in the folder
.\.github\workflows.
- You can view triggered actions by clicking on "Actions" in your GitHub repo. (NB! The
- After the GitHub Action has completed, you can visit the URL found to your SWA. If deployed successfully, you should be welcomed by the following demo page:

Feel free to click the "documentation examples" button and browse the two examples. The other buttons will not work properly yet.
Note: The text printout at the bottom of the page is only for debugging purposes, which will be useful in the sections related to authentication and role management..
deployment tokenYOUR_SITE_URL
Goal: After this section, the documentation examples will be built and deployed, making them visible on your SWA. Further, a Github Action workflow will ensure that the documentation automatically re-builds and re-deploys itself when new changes are committed to the branch.
NB! If you are working on integrating this template into an existing repository, follow along until you have completed the sub-chapter "Under-the-hood: What just happened?", then go to the chapter [(Optional) Implement this solution into an existing repo](#(Optional) Implement this solution into an existing repo).
SWAs does not support building non-Javascript projects and therefore you have to compile the docs before it gets deployed. Thankfully, Github Actions allows us to build and compile the HTML files as part of the action that deploys them to the web app. Doing it this way allows us to delete the build files, so that they don't clutter our repository. Neat! Furthermore, it ensures that we do not have to run any manual steps to update the documentation. Double-neat! This also means that we can use almost any type of documentation compiler as long as it is possible to install on the Github Action build server and it can compile to HTML. Triple-neat! For this repository, sphinx and mkdocs is used, but it can modified to work with your preferred build tool.
To build the docs using sphinx and mkdocs, we need to add some custom build steps to the workflow file that the SWA created during its setup. Rather than editing the newly created workflow file, we can use the file that comes with this repo.
NB! In the next steps we will delete the github action that was created by our SWA, and replace it with the deploy-site.yml that already exist in the template repo. However, this will break the link in your SWA's overview page which link to the github action it created itself. Currently, there is no way of updating this link. It will not affect operation, but if you would like to keep this link intact, you should copy the content from deploy-site.yml into the newly created yml-file, and delete the deploy-site.yml-file instead.
- Navigate to your GitHub Repo > Settings > Secrets > Actions > Repository secrets.
- There should only be one secret called
AZURE_STATIC_WEB_APPS_API_TOKEN_<URL-name>under "Actions secrets". Delete this secret by pressing "Remove". - Create a new repository secret by clicking "New repository secret" and use the following values:
- Name:
"DEPLOYMENT_TOKEN" - Value:
deployment token(output from previous chapter)
- Name:
- Locate your workflow files in
.\.github\workflow. There should be three files there, where you should delete the first one:azure-static-web-apps-<YOUR_SITE_URL>.yml: Delete this and commit changes. This file was created when you created the SWAdeploy-site.yml: This will replace the file abovelint-and-format.yml: This file is optional, feel free to delete it. It runs some linting and syntax checks on your code
The Github workflow committed by the SWA only contains the actions necessary for deploying the already built files that the template repo provided. The deploy-site.yml file contains additional steps that enable automatic building of the documentation using both MkDocs and Sphinx (in production, you would probably only use one).
- name: Set up Python 3.10
  uses: actions/setup-python@v2
  with:
    python-version: 3.10.8

- name: Build install poetry
  run: |
    curl -sSL https://github.com/raw/python-poetry/poetry/master/get-poetry.py | python -
    echo "$HOME/.poetry/bin" >> $GITHUB_PATH

- name: Install Poetry
  run: poetry install

- name: Build docs with Sphinx
  run: poetry run sphinx-build -b html docs/source/sphinx-example docs/build/sphinx-example

- name: Build docs with MkDocs
  run: poetry run mkdocs build --config-file docs/mkdocs.yml
Rather than modifying the workflow-file created by the SWA, we just renamed the github secret token to DEPLOYMENT_TOKEN (which is what the deploy-site.yml-file expects) and deleted the file created by the SWA. By modifying the secret before deleting the file, we ensured that the workflow was not triggered by a new commit before the renaming of the secret was handled.
To implement automatic doc-building into your own, existing repository, follow the next steps
Ok, the time has come to decide which doc-builder you want to use. For the next few steps, we will be using MkDocs. Other builders will have slightly different configurations that you will have to read up on yourselves.
Since this template repo uses two documentation builders, we have two sub-folder in the docs-directory. We will now only be using one builder, and should therefor restructure our repo to a more common folder structure:
- Create two empty folders in the repo's top directory called
docsandbuild.
Note: Git is often reluctant to stage empty folders. You might want to add an empty file if you are unable to stage the changes.
- If you want to use the Equinor theme, copy the
docs\source\equinor-example\stylesheets-folder into your newly createddocs-folder. - Move the
mkdocs.yml-file into the top folder. Open it add change the following two attributes:
docs_dir: 'docs'site_dir: 'build'
Note: You will have to update your navigation bar based on the documents and file structure you want. See the MkDocs documantetion for more information.
Note: You might want to change other attributes in this file to better match your GitHub and SWA information.
- Since you will only be using one doc-builder, please apply the following changes:
- In the
deploy-site.ymlfile, remove the action related to doc-builder that you will not be using. If you e.g. want to use MkDocs, remove the Sphinx-action. - If you are using MkDocs-case: since we moved the
mkdocs.yml-file into the root folder, we no longer have to provide a specific path. Therefor, modify the action as follows:run: poetry run mkdocs build - If you are using Poetry, navigate to the
pyproject.tomlfile and remove the dependencies related to the documentation builder that you are no longer using (in our casesphinxandmyst-parser). - Update the
output_locationin the Build And Deploy-step to"/build"
- In the
You may now continue on the rest of the original tutorial.
Sphinx:
Sphinx expects .rts-files as default, but can be extended to support a range of different file formats (like e.g. markdown). Locate the example in the .\docs\sources\sphinx-example-folder. To add a new pages, create the file and add it to the index.rst-file. Then re-build the documentation page by either pushing a new commit or by building it manually (see the next chapter).
MkDocs
MkDocs only supports markdown-files. An example is located in the .\docs\sources\equinor-example-folder. To add a new pages, create the file and add it to the mkdocs.yml-file. Then re-build the documentation page by either pushing a new commit or by building it manually (see the next chapter).
NB! The mkdocs.yml file would normally be placed at the top folder for the documentation files, but is currently placed on level above in this demo to make it easier to work with two documentation frameworks.
Note: In the
mkdocs.yml-file, please update the keyssite_url,repo_nameandrepo_urlto match your own project. The builder inserts these links into your page (in the logo and the edit-button)
-
Install poetry and then run
poetry installin the project folder OR use any package manager of your choice and ensure that you havesphinxand/ormkdocsinstalled.
NB! If you experience trouble installing poetry (especially if you're an Equinor employee on a Windows), try the following:-
Don't install Python using the Windows Store. Instead, download and install Python 3.10 (others have experienced issues with the MS Store version, see here and here).
-
As an Equinor employee, following the documentation might result in a socket-error: "socket.gaierror: [Errno 11001] getaddrinfo failed". This is probably a proxy-issue that occurs when you are on the work-network. Try repeating the installation step from a different network (e.g. hotspotting from your phone), or modify the relevant proxies.
-
Despite the Poetry documentation explicitly stating that it add the relevant PATH environment variables for you, this does not happen in all cases. If this becomes an issue, try manually adding
%USERPROFILE%\.poetry\bin. When this is done, verify that it works by runningpoetry --versionin your terminal. -
By default, Poetry creates a virtual environment in
{cache-dir}\virtualenvs(Windows). If you instead want it to be placed in the same folder as your project, enter the following command in you terminalpoetry config virtualenvs.in-project true. If you now runpoetry install, the relevant files should now be placed in your current working directory.
-
-
Depending on which documentation compiler you are using, choose either the first, the second or both options below. Make a change in the docs and see that is included in your build:
- Sphinx:
- Recompile the documentation by running
poetry run sphinx-build -b html docs/source/sphinx-example docs/build/sphinx-example. - Open the
index.html-file inside thebuild/sphinx-example-folder.
- Recompile the documentation by running
- MkDocs:
- Recompile the documentation by running
poetry run mkdocs build --config-file docs/mkdocs.yml. - You can serve the page locally as follows:
poetry run mkdocs serve -f docs/source/equinor-example/mkdocs.yml.
- Recompile the documentation by running
- Sphinx:
Goal: After this section, the user should be able to click the "login" button on the SWA and then have access to the content behind the "Verify authenticated role" button. This can be useful if you want to restrict content to employees of your company only.
For the next two steps, we will follow along with Microsoft's own tutorial.
By default, every user belongs to the built-in anonymous role, and all logged-in users are members of the authenticated role.
Also by default, SWAs allow authentication through Azure AD, github, Twitter, Facebook and Google. In this example, we only want employees of our organization to be able to authenticate, and other options has therefor manually been disabled in the staticwebapp.config.json-file.
The current chapter is based on this section in Microsoft's own documentation.
- In the Azure portal, search for and navigate to Azure Active Directory.
- In the menu bar, select App registrations.
- Select + New registration to open the Register an application page.
- NB! Your organization might require you to activate a role in Azure Privileged Identity Management with elevated privileges to do this.
- Enter a name for the application. For example, MyStaticWebApp.
- For Supported account types, select Accounts in this organizational directory only.
- For Redirect URIs, select Web and enter the AAD login authentication callback of your static web app. For example,
<YOUR_SITE_URL>/.auth/login/aad/callback.
Replace <YOUR_SITE_URL> with the URL of your static web app from a previous section.
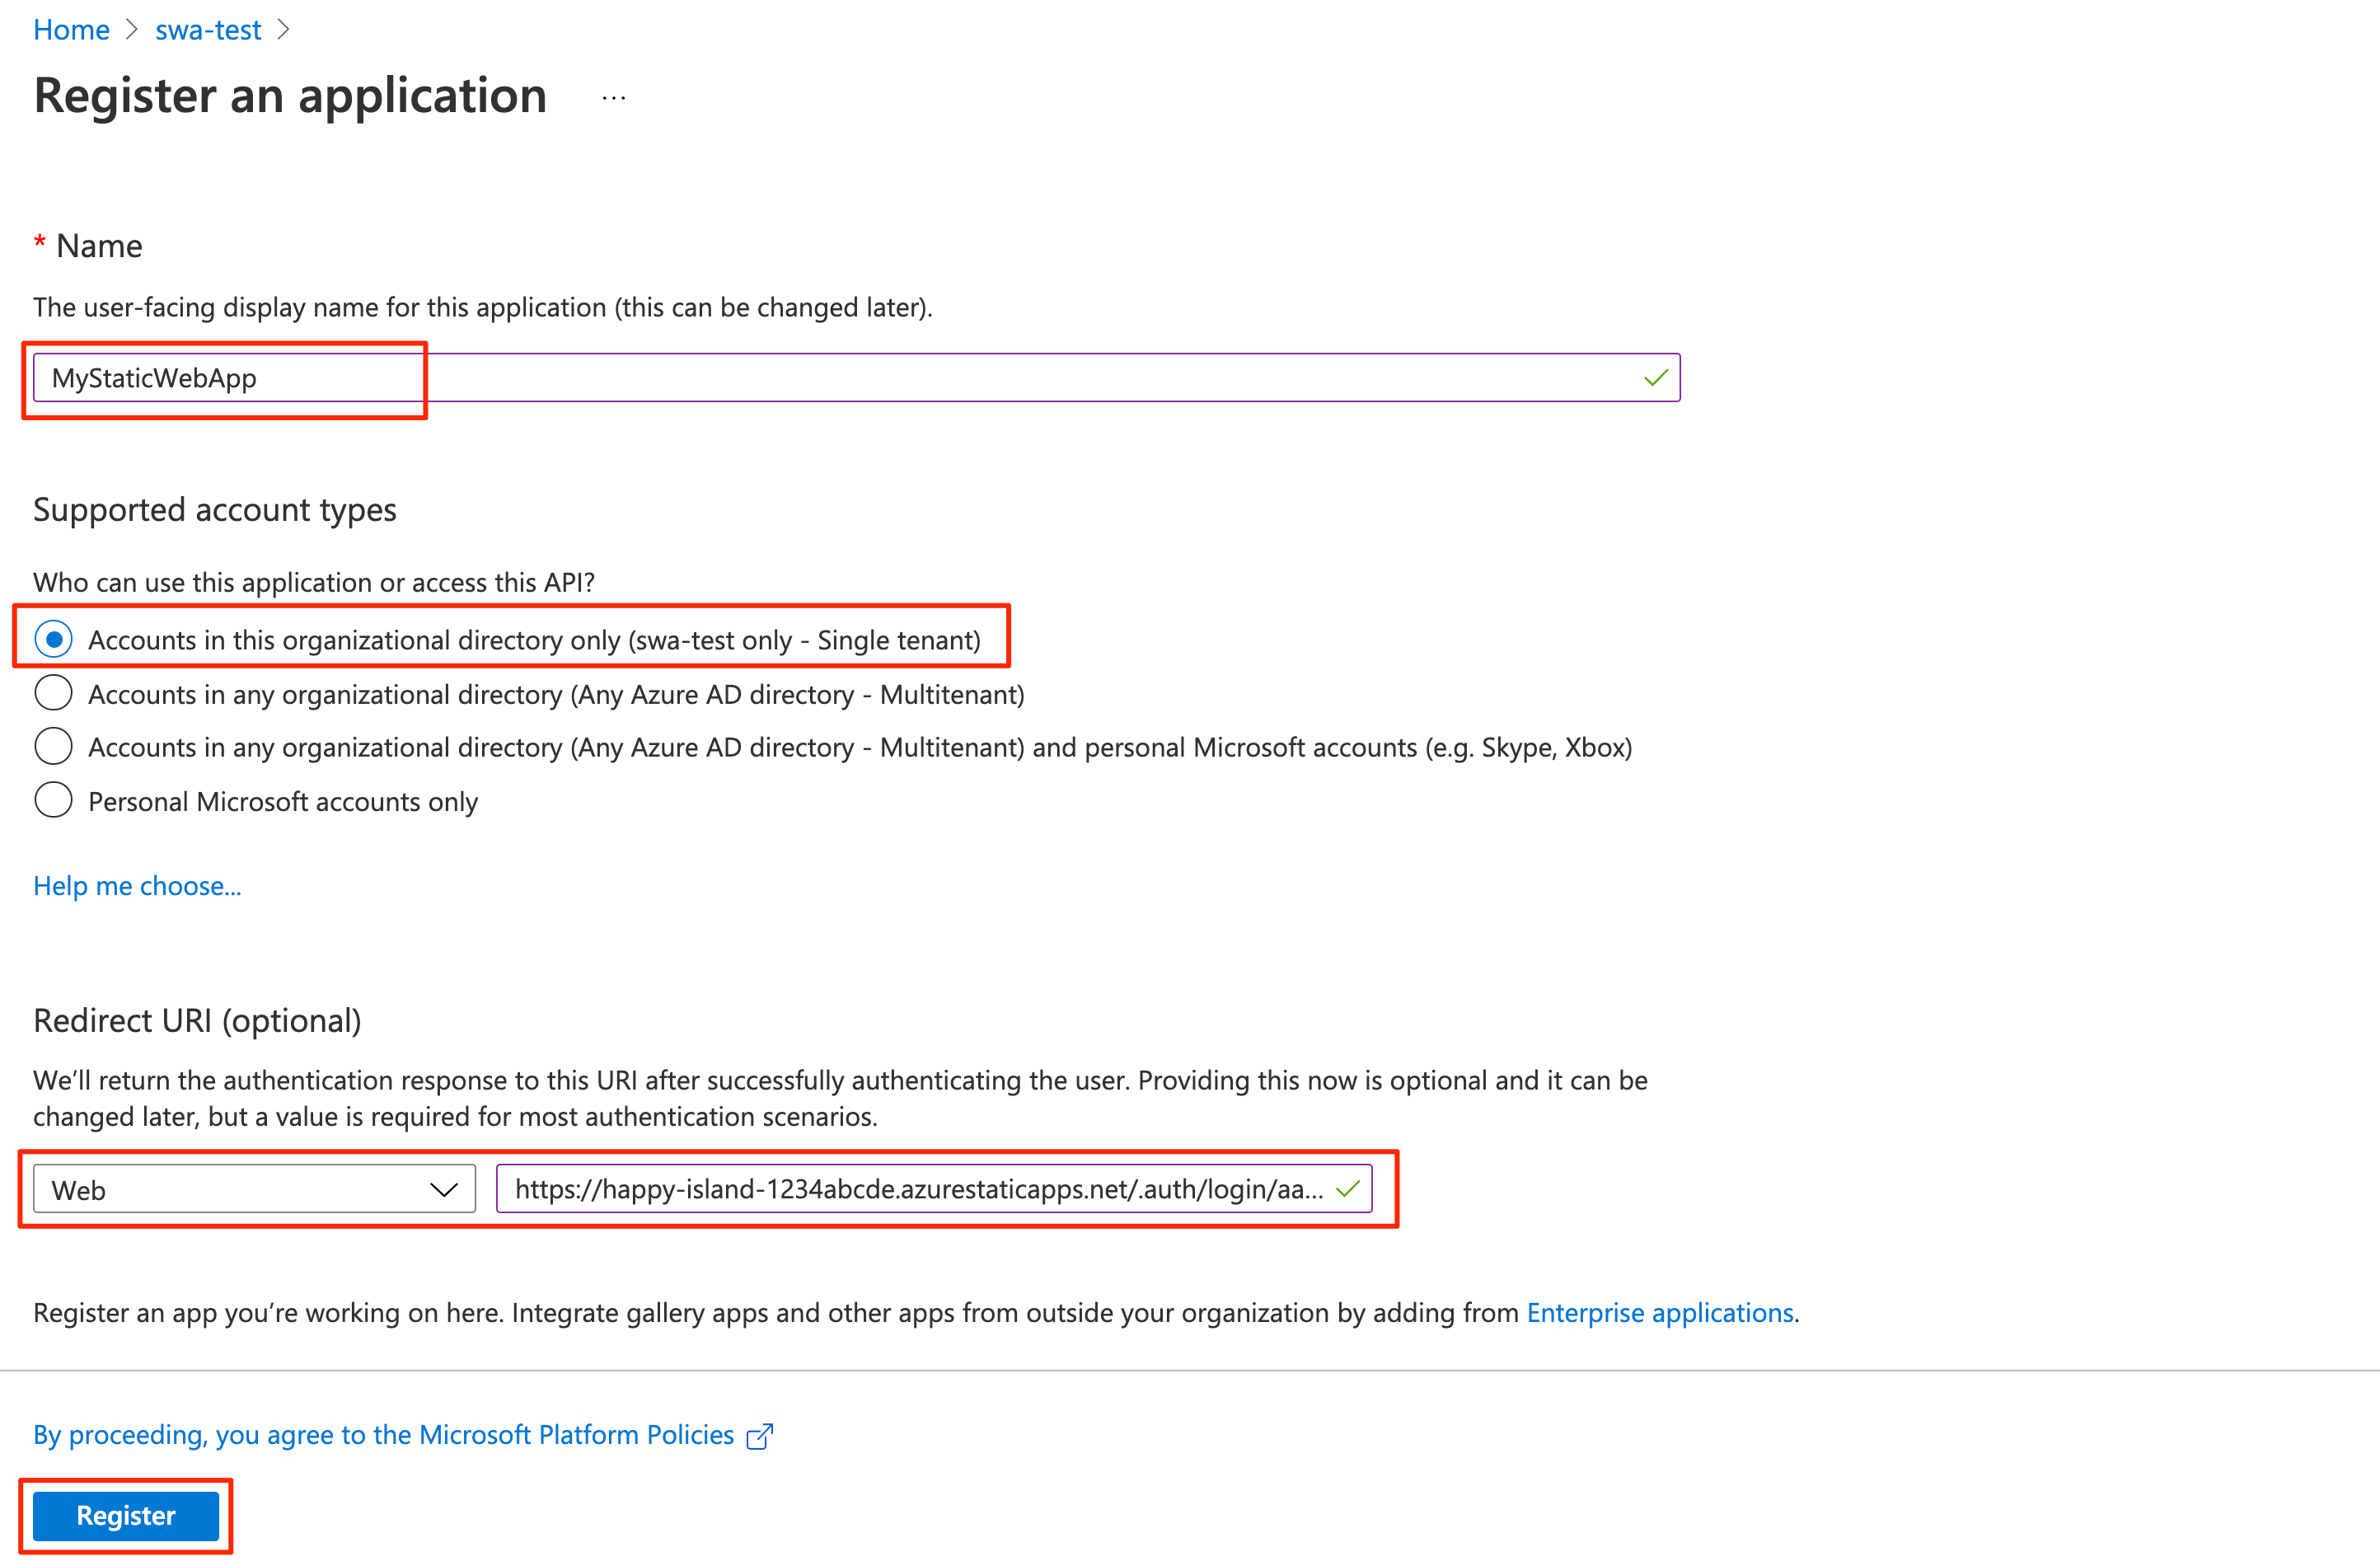
- Select Register.
- After the app registration is created, write down the Application (client) ID and Directory (tenant) ID in the Essentials section. You'll need these values to configure AAD authentication in your static web app.
We will now create a client secret:
- Select Authentication in the menu bar.
- In the Implicit grant and hybrid flows section, select ID tokens (used for implicit and hybrid flows).

This configuration is required by Static Web Apps to authenticate your users.
- Select Save.
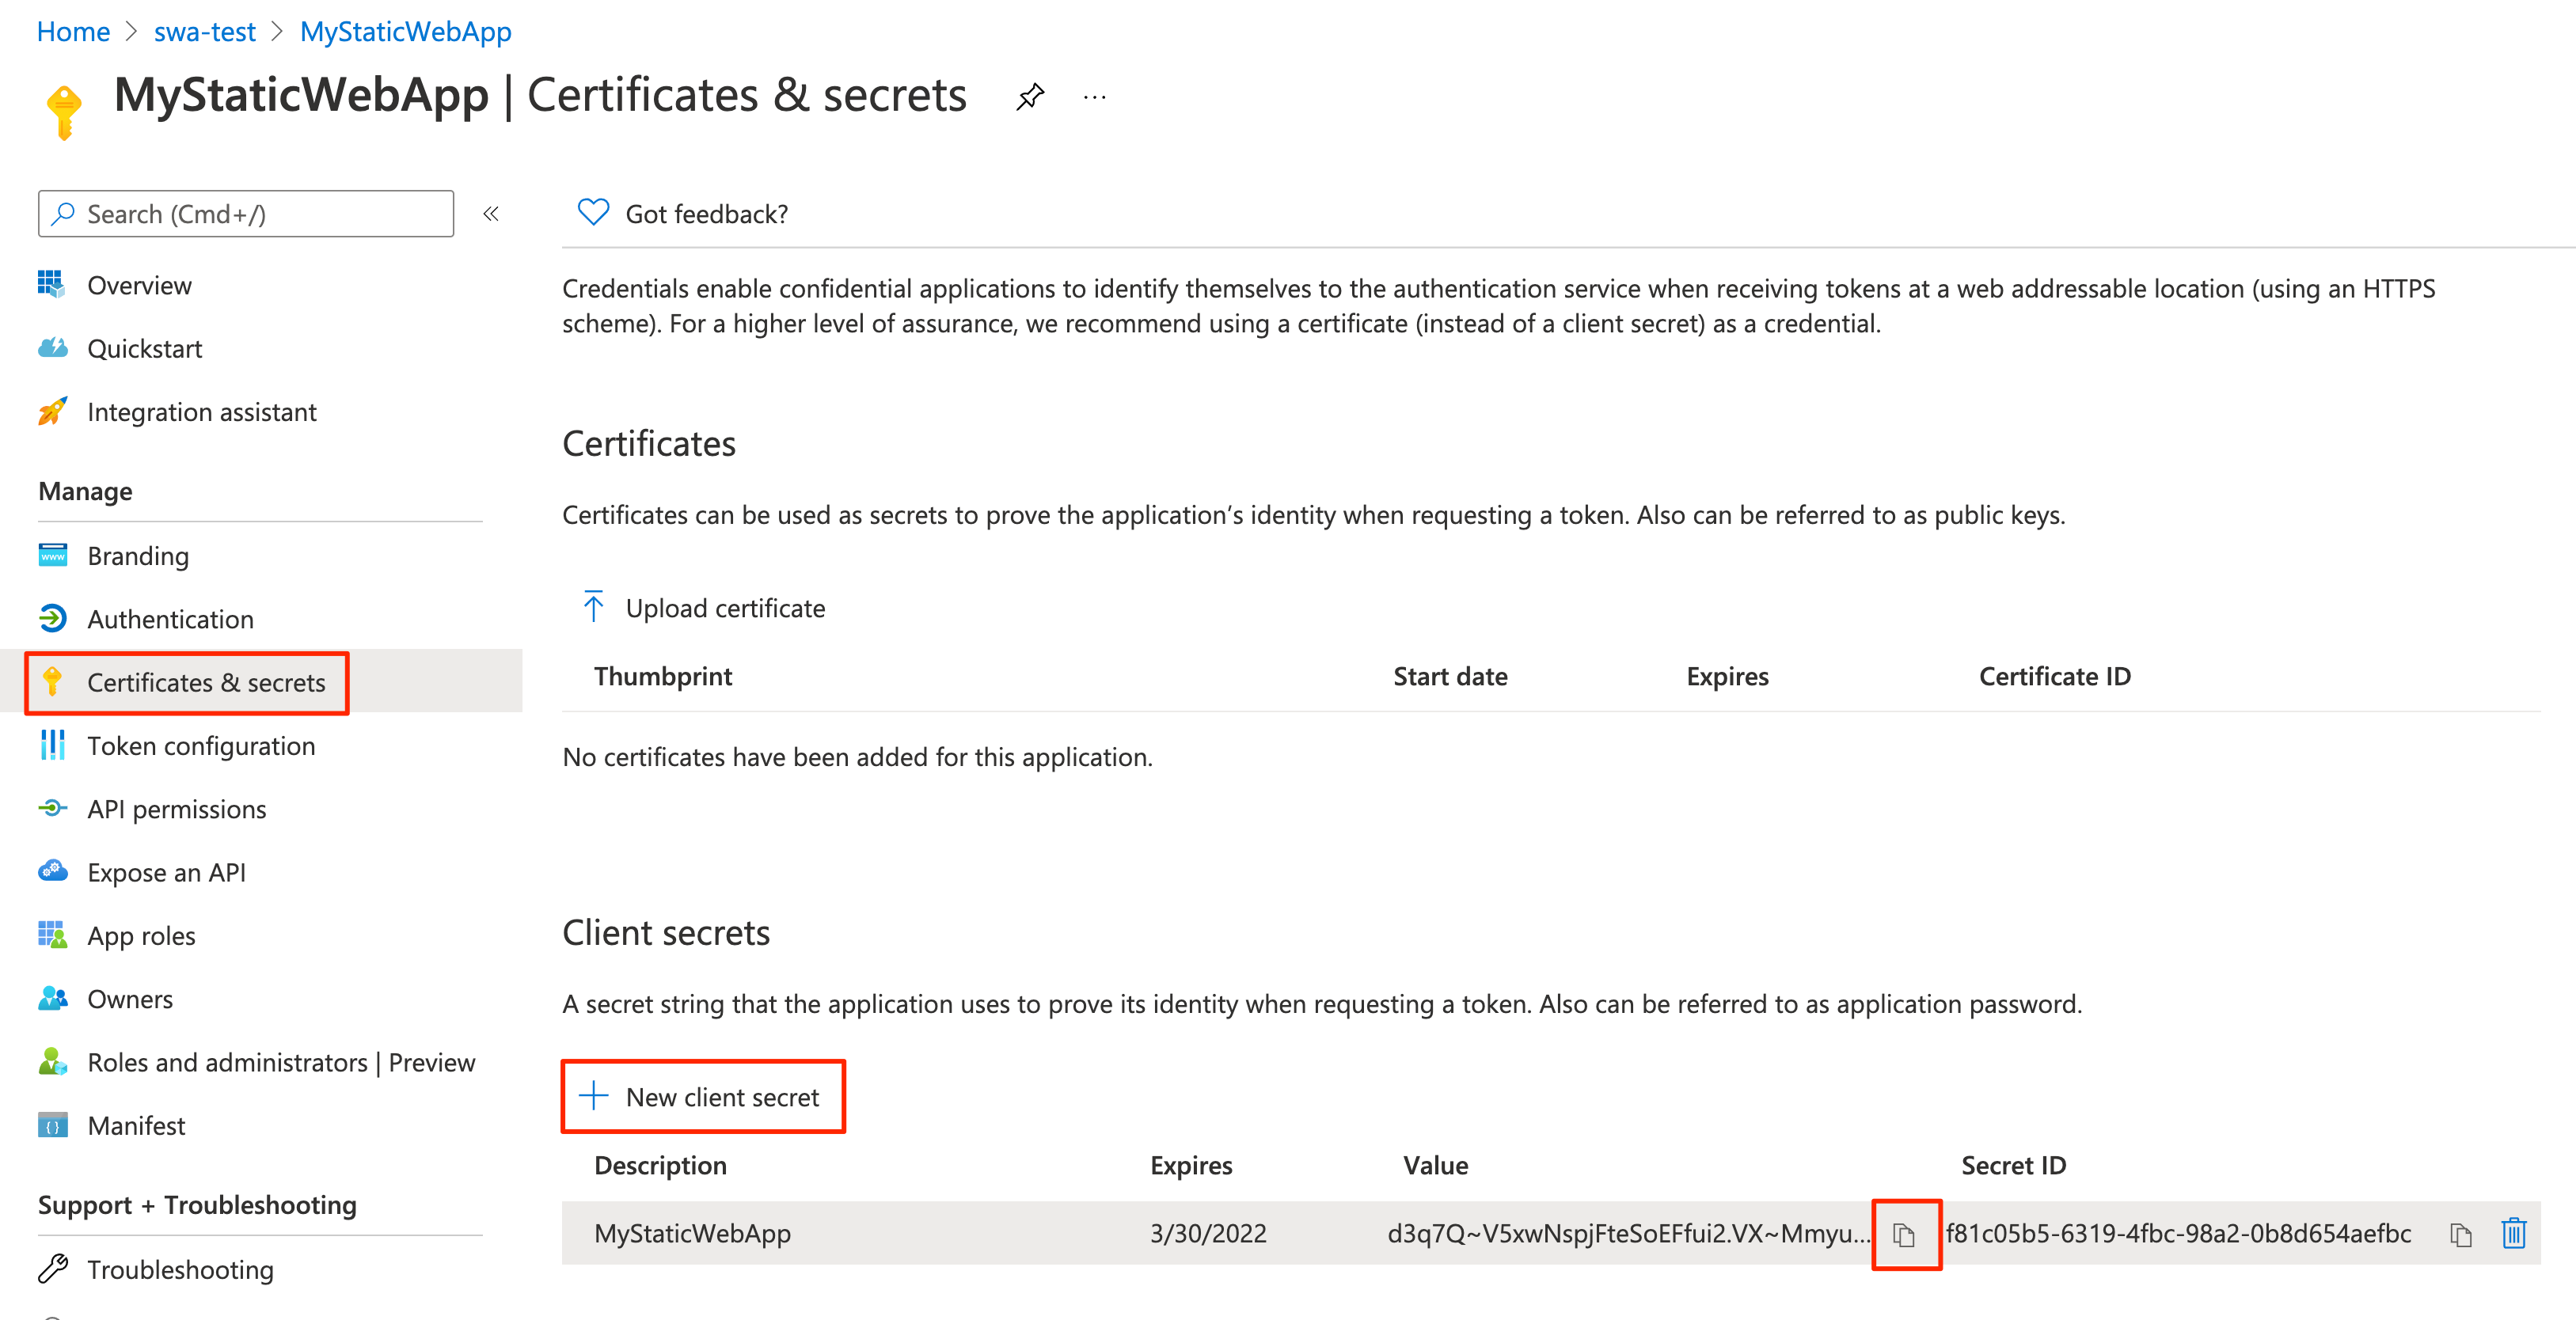
- Select Certificates & secrets in the menu bar.
- In the Client secrets section, select + New client secret.
- Enter a name for the client secret. For example, MyStaticWebApp.
- Choose a duration for the Expires field (default is 6 months).
Note: You must rotate the secret before the expiration date by generating a new secret and updating your app with its value.
- Select Add.
- Write down the Value of the client secret you created, which we will refer to as your client secret value. You'll need this value to configure AAD authentication in your static web app.
Application (client) IDDirectory (tenant) IDClient secret value
The current chapter is based on this section in Microsoft's own documentation.
- In a browser, open the GitHub repository containing the static web app you deployed. Navigate to the app's configuration file at staticwebapp.config.json. It contains the following section:
"auth": {
  "rolesSource": "/api/GetRoles",
  "identityProviders": {
    "azureActiveDirectory": {
      "userDetailsClaim": "http://schemas.xmlsoap.org/ws/2005/05/identity/claims/name",
      "registration": {
        "openIdIssuer": "https://login.microsoftonline.com/<YOUR_AAD_TENANT_ID>",
        "clientIdSettingName": "AAD_CLIENT_ID",
        "clientSecretSettingName": "AAD_CLIENT_SECRET"
      },
      "login": {
        "loginParameters": [
          "resource=https://graph.microsoft.com"
        ]
      }
    }
  }
},
Note: To obtain an access token for Microsoft Graph, the
loginParametersfield must be configured withresource=https://graph.microsoft.com.
- Select the Edit button to update the file.
- Update the openIdIssuer value of
https://login.microsoftonline.com/<YOUR_AAD_TENANT_ID>by replacing<YOUR_AAD_TENANT_ID>with the directory (tenant) ID of your AAD that you wrote down earlier. - Select Commit directly to the main branch and select Commit changes.
- A GitHub Actions run triggers to update the static web app.
- Navigate to your SWA resource in the Azure portal.
- Select Configuration in the menu bar.
- In the Application settings section, add the following settings:
| Name | Value |
|---|---|
AAD_CLIENT_ID |
Your AD application (client) ID |
AAD_CLIENT_SECRET |
Your AD application client secret value |
- Select Save.
If you visit our landing page and click the Verify "authenticated" role button, you will be met with an "401: Unauthorized" page.

If you instead clicks the Login-button, you will be offered to login in via an AAD portal, and then redirected back to your page. You should now have access to the content placed behind the Verify "authenticated" role button, which should look like this:

Note: Your organization might have special rules set up to manage who get's access. If you are not able to complete the login, you can try to first elevate your privileges in Azure's Privileged Identity Management and the retry logging in.
Note: Some organizations have extra safety steps in place in order to successfully set up authentication. This might include:
- Having to add two or more owners to the App Registration
- The API permissions of your App Registration might require you to forward a concent to an administrator to be evaluated, with a justification for requesting this app. These requests will typically go into an admin consent workflow. When accepted, users should no longer be prompted with this message.
AAD_CLIENT_IDAAD_CLIENT_SECRET
Goal: This section will show how to obtain even more granular access control by assigning access roles to a subset of your organization.
The current chapter is based on this section in Microsoft's own documentation.
In the previous chapter, we enforced that users had to log in to access the content behind the Verify "authenticated" role button. In this chapter, we will create a custom "reader" role that we can assign to users who should be able access the content behind the Verify "reader" role button. If a user is not already given the "reader" role, they will still not have access to the content behind the Verify "reader" role button, and will be met with the following page:

To achieve this, the template repo contains a serverless function (api/GetRoles/index.js) that queries Microsoft Graph to determine if a user is in a pre-defined group. Based on the user's group memberships, the function assigns custom roles to the user. The application is configured to restrict certain routes based on these custom roles. You can read more about Azure Functions in SWA here.
- In AAD, navigate to "groups" and find a group to which you want to assign the reader role. Write down the Object Id.

- In your GitHub repository, navigate to the GetRoles function located at api/GetRoles/index.js. Near the top, there is a
roleGroupMappingsobject that maps custom user roles to AAD groups. - Click the Edit button.
- Update the object with your custom role name (e.g. "reader") and the group ID(s) from your AAD tenant.
const roleGroupMappings = {
  'reader': '<Object ID>'
};
The GetRoles function is called whenever a user is successfully authenticated with Azure Active Directory. The function uses the user's access token to query their Active Directory group membership from Microsoft Graph. If the user is a member of any groups defined in the roleGroupMappings object, the corresponding custom roles are returned by the function.
Note: The current function app only supports the assignment of one AAD Group per role. If you would like to assign the same role to multiple groups, you must re-write the function a little. Feel free to open a PR if you decide to do so ;)
In the above example, if a user is a member of the Active Directory group that you selected in the first step, they are granted the reader role.
- Select Commit directly to the main branch and select Commit changes.
- A GitHub Actions run triggers to update the static web app.
- When the deployment is complete, you can verify your changes by navigating to the app's URL.
- Log in to your static web app using AAD.
- You should now be able to see the content behind the Verify "reader" role button, but not the content behind the Verify "admin" role button.

See the Configure Azure Static Web Apps for more information about routing and setting the role requirements for the different part of the website. This is all configured in the staticwebapp.config.json-file.
Note:
routes.json, which was previously used to configure routing, is deprecated.
If you want to require that users log in before even landing on your page, consider adding e.g. the following routes rule staticwebapp.config.json
{
    "route": "/*",
    "allowedRoles": [
        "authenticated"
    ]
}
This will require all users to have the role "authenticated" (i.e. be logged in), and will by default great them with 401: Unauthorized. To handle this, add the following response override to the same config file:
"responseOverrides": {
        "401": {
            "redirect": "/.auth/login/aad?post_login_redirect_uri=.referrer",
            "statusCode": 302
        },
Which automatically will redirect all unauthorized users to the login portal.
A graphical overview of where the different keys, secrets, IDs, etc. goes.

Here is an description of the main files and folders in this project:
Project
└───.github
|   └───workflows
|           deploy-site.yml                 - Github Action workflow for building documentation and deploying the service to Azure
|           lint-and-format.yml             - Github Action workflow for linting and validating syntax
|
└───api
|   |   (...)                               - Several config files for the serverless function powered by Azure Function)
|   └───GetRoles
|       └───function.json                   - Azure Function config
|       └───index.js                        - Serverless Function that assigns custom roles to users
|
└───docs
|   └───source                              - Contains source files for documentation.
│   |   └───equinor-example                 - Source folder for the Sphinx example documentation code.
|   |   └───sphinx-example                  - Source folder for the MkDocs example documentation code.
|   |
|   └───build                               - Custom and compiled HTML files than can be manually configured and will be hosted through the Azure Static Web Apps.
|       |   index.html                      - Landing page
|       |   doc_index.html                  - Page for choosing which documentation example you would like to see
|       |   authenticated.html              - Demonstrating the "authenticated" role
|       |   reader_role.html                - Demonstrating the "reader" role
|       |   staticwebapp.config.json        - Azure Static Web Apps routes/authentication configuration (see: https://docs.microsoft.com/en-us/azure/static-web-apps/configuration)
|       |
|       └───sphinx-example                  - Build folder for the Sphinx example documentation code.
|       └───equinor-example                 - Build folder for the MkDocs example documentation code.
|
└───img                                     - Images used in this readme-file
|
|   pyproject.toml                          - (Optional) Project config used by the [Poetry package manager](https://python-poetry.org/).
|   poetry.lock                             - (Optional) Package description used by the package manager.