Configuration
This page describes how to create an instance of the CLA-Bot, and how to
run it locally. Some of the things described here don't apply for a production
installation: especially how secrets are handled in environmental variables
or .env file for the Next.js web application.
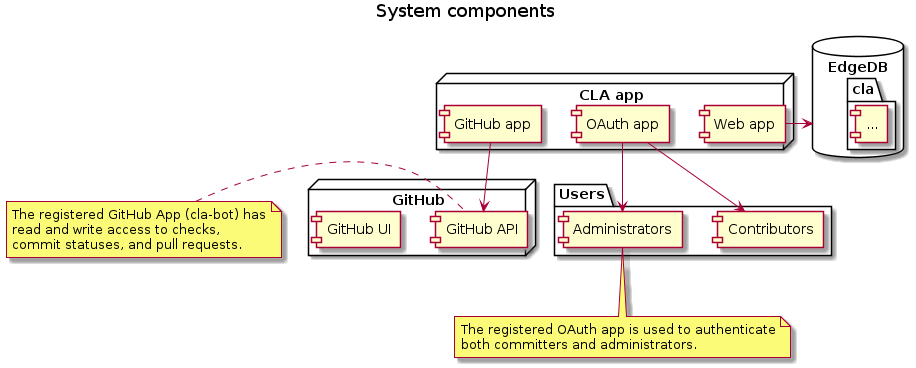
The service requires:
- an instance of EdgeDB with a configured database
- a pull request web hook configured in the desired GitHub organization
- a GitHub application configured with necessary rights
- a OAuth application to handle users' sign-in
- Connect to an instance of EdgeDB
- Create a database called "cla"
- Use the provided
migrationsto create the structure of the database
To run migrations manually, navigate with a CLI to the root folder of the
project (the one that contains dbschema folder`. From this folder, run:
edgedb --password --host $DBHOST --port $DBPORT --user edgedb -d cla migrateUsing appropriate db host and port parameters.
Configure the EdgeDB server instance host, user, and password in the .env
file as EDGEDB_HOST, EDGEDB_USER, and EDGEDB_PASSWORD settings.
Create an organization webhook to notify the CLA-Bot service of pull request events.
Configure the payload URL to match this pattern:
https://{INSTANCE_DOMAIN}/api/pullrequesthook.
Select the radio button Let me select individual events., and check
Pull requests events. Ensure that the webhook is active.
The service requires a GitHub app to interact with PR statuses and comments,
and also listing the list of organization's members to grant access to the
administrators of the organization.
Configure a GitHub app under account Settings > Developer settings having
the following permissions:
- Members
Read only(used during admins' sign-in, under Organization permissions) - Commit statuses
Read & write - Pull requests
Read & writeand required metadata (automatically set by GitHub UI).
Then, a private RSA key must be generated and downloaded to be used by the CLA-Bot.
The private RSA key is read from file system, and its path is
configured as environmental variable GITHUB_RSA_PRIVATE_KEY, in the .env
file.
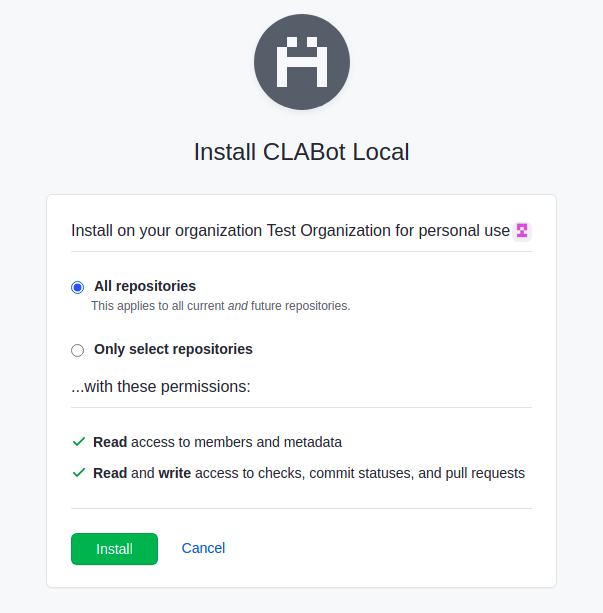
Finally, install the GitHub App onto the organization. Grant access to all repositories (although, the CLA-Bot supports also access to specific repositories).
To install the application, click on the Install app link in the application's settings page.
The service requires an OAuth application to enable sign-in for contributors
and administrators through GitHub. A new OAuth application can be configured
under GitHub account Settings > Developer settings > OAuth Apps.
The application is assigned automatically a Client ID and Client Secret. These
values are used by the web service to implement OAuth flows, and must be
configured in the .env file as GITHUB_OAUTH_APPLICATION_ID
and GITHUB_OAUTH_APPLICATION_SECRET settings.
Homepage URL should be configured to a company page that describes the owner of the OAuth application. However, this value is irrelevant for the CLA-Bot service.
Authorization callback URL must be configured to the root URL where the CLA-Bot service will be served. It is important to configure this value as the root of the web application because the same OAuth app is used at different paths, to implement sign-in of both administrators and contributors. For example, if an OAuth application is configured for local development, its authorization callback URL could be http://localhost:3000/.
Since the OAuth settings require the URL where a user is redirected after login,
configure in .env file the base URL of the service as SERVER_URL. For
example, if an instance in edbcloud is published at:
This value must be configured as SERVER_URL.
The following table describes the application settings required by the service.
These can be either configured as environmental variables, or .env file at
the application root folder.
| Name | Description | Example value |
|---|---|---|
| EDGEDB_HOST | EdgeDB host | 127.0.0.1 |
| EDGEDB_USER | EdgeDB user | edgedb |
| EDGEDB_PASSWORD | EdgeDB password | ******** |
| GITHUB_APPLICATION_ID | GitHub application id | 12327 |
| GITHUB_RSA_PRIVATE_KEY | File path to the private RSA key of the GitHub application | example.pem |
| GITHUB_OAUTH_APPLICATION_ID | Id of the OAuth application used for users' sign-in | 30cd618b8740eb66a95c |
| GITHUB_OAUTH_APPLICATION_SECRET | Secret of the OAuth application used for users' sign-in | 12310928301920asd9123 |
| SERVER_URL | URL to the root of the web service itself, this is used for OAuth flows | https://myorg-cla.com |
| SECRET | Secret used to generate and validate JWTs issued by the web service | https://myorg-cla.com |
| ORGANIZATION_NAME | Name of the organization | edgedb |
| ORGANIZATION_DISPLAY_NAME | Display name of the organization, used in the homepage. | EdgeDB |
During local development, it is recommended to use ngrok
to create a tunnel and use public endpoints provided by this tool. This tool
is also recommended by GitHub. If a paid license is available, it's possible
to use a fixed DNS name, which is convenient to configure only once the
redirect URI for the OAuth application, the web hook for pull requests,
and SERVER_URL application setting.
For example, if a subdomain eg-edgedb is reserved with ngrok, run ngrok with
this command:
ngrok http 3000 -subdomain=eg-edgedb
In such scenario, the GitHub web hook would be configured with this value:
https://eg-edgedb.ngrok.io/api/pullrequesthook
While the OAuth authorization URL can still use localhost to enable faster development.
- https://www.npmjs.com/package/client-oauth2
- https://www.npmjs.com/package/client-oauth2#authorization-code-grant
To configure an instance in edbcloud, see the instructions
Running in EdgeDB Cloud.
For instructions on how to start using the cla-bot with repositories, see
the Getting Started Wiki page.