Um exemplo passo a passo de como usar um Formulário HTML para enviar uma mensagem do tipo "Fale Conosco" por e-mail sem um servidor back-end usando um script do Google - sem PHP, Python, Ruby, Java, Node.js etc.
Em vez de usar um servidor para enviar seu e-mail, o que é fácil, mas exige manutenção, use o Google para enviar e-mails em seu nome e use o Google Spreadsheets para acompanhar os dados!
DEMONSTRAÇÃO: https://doni7brandao.github.io/email_via_google/
Observação: a API do Google tem limites sobre quantos e-mails podem ser enviados por dia. Isso pode variar em sua conta do Google, veja os limites aqui. Recomendamos implementar este tutorial na Parte 3, pois os dados sempre serão adicionados à planilha primeiro e, em seguida, se tiver tudo certo, enviados por e-mail.
Porque queremos enviar um e-mail a partir de uma Página HTML "estática" quando você (não quer) ou não tem um servidor.
- Nenhum "Backend" para implantar/manter/ou pagar
- Totalmente customizável - cada aspecto é personalizável!
- E-mail enviado por meio do Gmail, que tem alta performance de fornecimento
- Você pode Recolher/Guardar quaisquer dados do formulário em uma planilha para facilitar a visualização
(perfeito se você precisa compartilhá-lo com pessoas não-técnicas)
Exemplo: https://docs.google.com/spreadsheets/d/1Uvy4hmHj3lh4bXatxLV6FUC9HRlXKjOlYGR3Iwdr-Ps/copy
Faça login na sua conta do Google e clique em "Fazer uma cópia..."
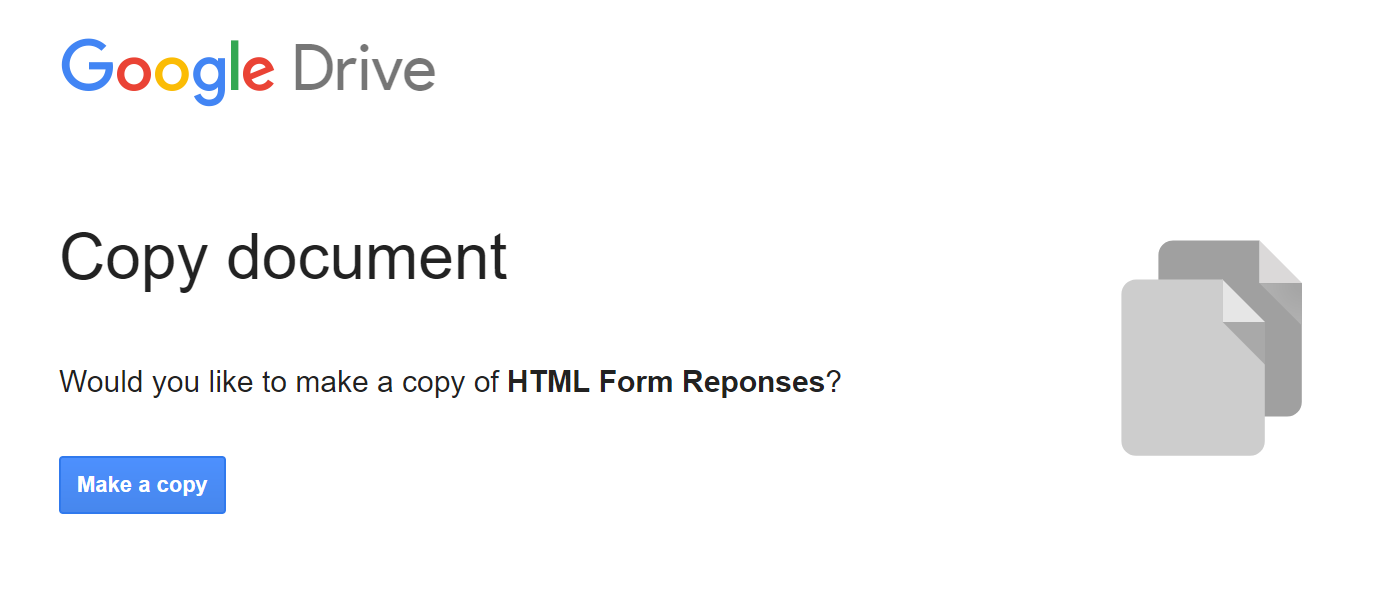
Isso deve lhe dar algo assim:

Note: Feel free to change the name of the Copy to anything you want, it will not affect the outcome.
Abra o Editor de Script... clicando em "Ferramentas" > "Editor de Script..."

Aqui está um modelo limpo (sem comentários) do script que você precisa : google-script-just-email.js
Observação: Se você não descomentar e definir seu e-mail como o valor de
TO_ADDRESS, é possível que alguém que tenha habilidades na web altere seu
formulário e envie dados por e-mail para um endereço de e-mail arbitrário.
Descomente o código da variável TO_ADDRESS e defina esse valor como igual
ao email que deve receber os dados do formulário quando enviado.

Parece muito óbvio mas após Salvar você tem que clicar em "Gerenciar Versões..."

Em seguida crie sua nova versão:


Selecione a versão mais recente do projeto para implantar.
Anyone, even anonymous na lista suspensa 'quem tem acesso ao App' ou as respostas ao formulário não serão adicionadas à planilha!


A menos que você verify your script with Google, será necessário clicar em "Avançado" e "Ir para... (inseguro)" para conceder permissões a este aplicativo.
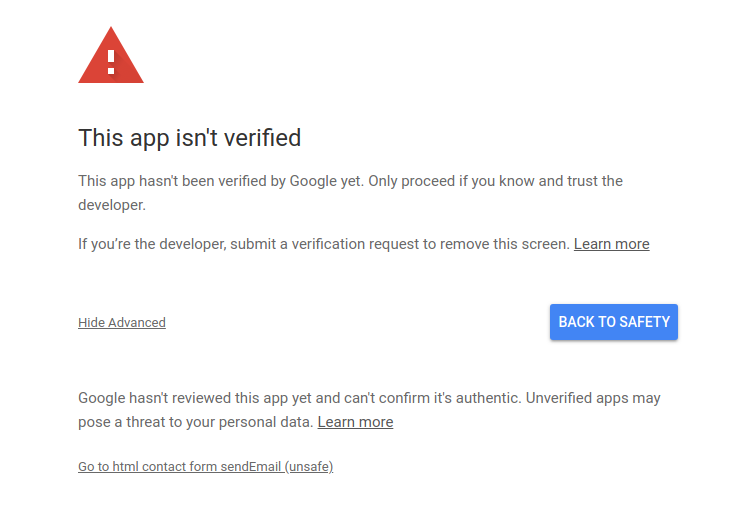

Copie o URL do aplicativo da web para sua placa de recados / bloco de notas. Em seguida, clique em "OK".

Usando o template index.html neste repo, crie seu próprio arquivo html com o formulário básico. (salve o arquivo)
- Cada um dos seus elementos de formulário deve ter um atributo
Nomeigual ao nome de sua coluna na planilha do Google - Os formulários
classdeve sergform, ou seja<form class="gform"> - Se você quiser alterar isso mais tarde, você precisará criar sua própria versão de
script-google-apps.jse alterar o esperadoclass
Lembre-se de alterar a URL do
actionpara o formulário que você copiou na etapa anterior:

Preencha alguns dados de amostra no formulário HTML:

Envie o formulário. Você deve ver assim uma confirmação de que foi enviada:

Abra a caixa de entrada para o endereço de e-mail que você definiu na Etapa 3 (acima)

Pronto!!!. É isso aí. Você acabou de criar um formulário HTML que envia e-mail!
Vamos manter ele assim, usando um estilo Super Limpo usando o PURE CSS f (corrija o formulário HTML "simples" criado na Etapa 8).
Corrija o submit do formulário usando JQuery "AJAX" para a resposta a sua mensagem (mantendo assim a pessoa na sua página!)
To prevent the page from changing to the JSON response/result
we need to submit the form using AJAX.
Download the following Javascript file and update your index.html to point to it at the end of your file
(*before the closing </body> tag)
<script data-cfasync="false" type="text/javascript" src="form-submission-handler.js"></script>Warning: If you did not set the TO_ADDRESS variable in Step 3, then
you need to include a data-email="example@email.net" attribute inside the
main form element. See the example form for more details. Otherwise, if you did
set this variable, then you do not need this form attribute.
This will now display a "Thank You" message when the form is submitted:

Keeps the person on the same page. No refresh.
Taylor your message by editing the thankyou_message div:

For this example we are using Pure CSS: http://purecss.io/start/
because its light weight (4.0KB minified and gzipped)
and solves our current "problem": Making it Look Good.


Without spending too much time on this, we can make the form look a lot nicer:

By default, the sent email's body contains the key-value pairs from the form, with the key as an <h4> and the value as a <div>. This is a fairly basic, and foolproof view for the data.
You should get something that looks roughly like:

Bear in mind that this is a work in progress and does potentially open you up to getting more than you bargained for in the email. Because the email content is now looping over all the data sent in the form, if a robot or malicious user decides to
POSTmore than you've asked for, you'll likely get it in your inbox. Use with caution for now. We're investigating improvements.
You can modify this though, via the script editor. The line:
result += "<h4 style='text-transform: capitalize; margin-bottom: 0'>" + key + "</h4><div>" + obj[key] + "</div>";has all you need. You can adjust the markup to suit you. We chose an <h4> because it was the best size for the email, and added the small amount of CSS to it to fix the capitalisation (the keys are all lower case in the JS object) and a bit of default spacing. While inline styles like this are generally bad practice on normal web pages, for email HTML they're about the only reliable way to do CSS!
We went with a <div> for the value part, because it could be anything - single-line, multiline (a <p> for example wouldn't cut it).
While we're here, there's also a replyTo option for the sendEmail() method which is commented out by default:
MailApp.sendEmail({
  to: TO_ADDRESS,
  subject: "Contact form submitted",
  // replyTo: String(mailData.email), // This is optional and reliant on your form actually collecting a field named `email`
  htmlBody: formatMailBody(mailData)
});
You can uncomment that if you want to add a reply-to field to your email. The example in the script will set the reply-to as the email submitted in the form.
Google's documentation provides more information about MailApp.sendEmail (for example cc/bcc etc.) if you're interested:
https://developers.google.com/apps-script/reference/mail/mail-app
Sending the form data directly to your email inbox is a good first step, but we can do better. Also, as noted above, Google has limits on how many emails you can send in a day, so storing the data into a spreadsheet is safer and less prone to data loss.

This will record the data received from the POST as a row in the spreadsheet.
See: google-apps-script.js for the full code you can copy-paste.
Follow Steps 4, 5 & 6 to save a new version and re-publish the script.


Because we are loading external .js files, our web browser will not allow us to simply open the index.html from a local directory for testing out the form.
Open your terminal and run this command to install the node modules and start the live server:
npm install live-server --save-dev && node_modules/.bin/live-server --port=8000It will take a minute to install,
but once that's done your live-server will start up.
That starts a node.js HTTP server on port 8000 and opens the form you just created in your default browser. If you wish to update the form styles in style.css or the client-side Javascript in form-submission-handler.js, please be sure to edit index.html to load those resources locally rather than via GitHub.
Note: This is a light taste of Node.js for absolute beginners. You do not need node.js to "deploy" this form, you can run it on an any web server that serves HTML/CSS/JavaScript. If you have never used Node.js before, see: http://nodeguide.com/beginner.html but for the purposes of this exercise (submitting a form without a server) you don't need node.js or
live-serverit's just a nice thing to have when you are creating your form because it automatically re-loads the page when you make changes in your text editor!
If you want us to take this tutorial further, please let us know!
For your convenience, we have hosted a working demo of the field on GitHub Pages, check it out to see the code and how it works: https://dwyl.github.io/learn-to-send-email-via-google-script-html-no-server/
In response to Henry Beary's request we made the form handler generic which means you can now add any fields you want to the form.
We also created a form, test.html, which uses all kinds of form input elements
so you can just copy and paste elements as desired into your own form. Just be
sure to update their names and IDs. You can find a working example of this test
form here:
https://dwyl.github.io/learn-to-send-email-via-google-script-html-no-server/test.html
Remember to include the fields inside the form that has the class gform
and ensure that the name of the form element matches the new column heading in your spreadsheet.
e.g:
<fieldset class="pure-group">
  <label for="color">Favourite Color: </label>
  <input id="color" name="color" placeholder="green" />
</fieldset>
This will allow you to capture the person's favourite color:
e.g:

Let us know if you have any questions!
In order to avoid getting spammed and fill up google apps usage quota, we will be implementing a simple SPAM prevention technique that's known as Honeypot where it essentially creates a hidden text field that if filled up is assumed as a spam bot and prevents the form from submit.
<form action="https://script.google.com/macros/s/..." method="post">
  <!--input id must be honeypot or else it wont work-->
  <label class="sr-only">Keep this field blank</label>
  <input id="honeypot" type="text" name="honeypot" value="" />
  <!--the rest of your form-->
</form>#honeypot {
display: none; /*makes the field not visible to humans*/
}/* form-submission-handler.js */
/* remove the comment from this if statement */
if (validateHuman(data.honeypot)) { //if form is filled, form will not be submitted
return false;
}This resource may help you get started on uploading files to Google Drive from the Google Script.
- How can I get help using this tutorial?
- Feel free to post an issue describing in detail which steps you have gone through and what isn't working. To get a helpful response, please provide a working example that reproduces your issue. For example, see this sample CodePen.
- Can I get edit access to the example spreadsheet?
- No. This is being used to show a working example for anyone to copy, and an editable version could be broken accidentally, or maliciously, by any user.
- Why is the webpage forwarding to a bunch of text when I hit submit?
- You are not properly loading the required Javascript which submits the data via AJAX, or your browser does not support AJAX. Please see Part 2 and check your console logs in case you are finding errors.
- Why is the webpage not successfully submitting the form?
- Check your Javascript console logs. There could be an error while reading in the Javascript we have provided. There could be errors while submitting the form. It is required that your form have a class of
gform, and also adata-emailattribute if you have not set theTO_ADDRESSvariable inside the Google Script file. Furthermore, the provided Javascript code also expects to see an email form element which it uses to check, a warning message for that element when an improper email is submitted, and then athank-youdiv as well, which is shown after a form is successfully submitted. Please ensure that all of these HTML elements are in your form. See the sample file for code you can copy and paste. When you have all of these elements and a proper form set up, you should not see any error messages in your Javascript console when you hit submit.
- The webpage is saying my data was submitted, but why isn't my data being saved or sent to me?
- When you copied the spreadsheet and published the Google Script, did you set the permissions to "Anyone, even Anonymous"? This is required for the form to work, since anyone on the internet can hit send to give you their data. Be sure that you have deployed the proper version of the script and used "Manage versions..." when making changes.
- How do I change the emails this script sends?
- You can tweak the Google Script on the server to send emails to anyone and in whatever format you wish. This could be used to send a confirmation email to those contacting you, but we have not added this feature to this tutorial to avoid potential spamming. The sender of the email will always be the Google account you use to create the form/script, however. Further details on how to customize the email can be found in the
MailAppAPI. You can instead use theGmailAppAPI which may be more flexible for certain use-cases.
- Is this secure? Can I use it for sensitive data?
- No. While data that is sent over POST may be more protected, the information could easily be intercepted by a third party or middleman, and Google has complete access to the data inside a Google Spreadsheet. Email is also not a very secure communication medium by default. We would recommend you invest in a secure platform and server for storing your data if this is a requirement.
- Google Apps Scripts Basics: https://developers.google.com/apps-script/articles
- Logger (like console.log): https://developers.google.com/apps-script/reference/base/logger
- Simple Mail Merge using Google Spreadsheets: https://developers.google.com/apps-script/articles/mail_merge
- Original Tutorial: AJAX post to google spreadsheet: http://stackoverflow.com/questions/10000020/ajax-post-to-google-spreadsheet which points to: