
- Super fast and accurate 3D object detection based on LiDAR
- Fast training, fast inference
- An Anchor-free approach
- No Non-Max-Suppression
- Support distributed data parallel training
- Release pre-trained models
- The technical details are described here
- The great introduction and explanation from
Computer Vision and Perception for Self-Driving Cars CourseYoutube link - SFA3D is used for the second course in the
Udacity Self-Driving Car Engineer Nanodegree Program: Sensor Fusion and TrackingGitHub link
Update 2020.09.06: Add ROS source code. The great work has been done by @AhmedARadwan.
The implementation is here
The instructions for setting up a virtual environment is here.
git clone https://github.com/PanterSoft/SFA3D_ROS.git SFA3D_ROS
cd SFA3D/
pip install -r requirements.txt
pip install .Download the 3D KITTI detection dataset from here.
The downloaded data includes:
- Velodyne point clouds (29 GB)
- Training labels of object data set (5 MB)
- Camera calibration matrices of object data set (16 MB)
- Left color images of object data set (12 GB) (For visualization purpose only)
Please make sure that you construct the source code & dataset directories structure as below.
To visualize 3D point clouds with 3D boxes, let's execute:
cd sfa/data_process/
python kitti_dataset.pyThe pre-trained model was pushed to this repo.
python test.py --gpu_idx 0 --peak_thresh 0.2
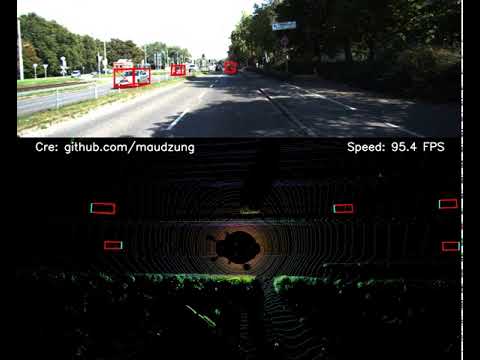
python demo_2_sides.py --gpu_idx 0 --peak_thresh 0.2
The data for the demonstration will be automatically downloaded by executing the above command.
python train.py --gpu_idx 0- Single machine (node), multiple GPUs
python train.py --multiprocessing-distributed --world-size 1 --rank 0 --batch_size 64 --num_workers 8
-
Two machines (two nodes), multiple GPUs
- First machine
python train.py --dist-url 'tcp://IP_OF_NODE1:FREEPORT' --multiprocessing-distributed --world-size 2 --rank 0 --batch_size 64 --num_workers 8- Second machine
python train.py --dist-url 'tcp://IP_OF_NODE2:FREEPORT' --multiprocessing-distributed --world-size 2 --rank 1 --batch_size 64 --num_workers 8
- To track the training progress, go to the
logs/folder and
cd logs/<saved_fn>/tensorboard/
tensorboard --logdir=./- Then go to http://localhost:6006/
sudo apt install ros-noetic-autoware-msgs
cd ros/
catkin_make
for some users you have to specify which python you want to use in this case execute
catkin_make -DPYTHON_EXECUTABLE=/usr/bin/python3
chmod +x /src/super_fast_object_detection/src/rosInference.py
source devel/setup.bash
rosrun super_fast_object_detection rosInference.py
# Terminal 1: Start ROS Master
roscore

# Terminal 2: Start Rviz
rviz rviz

# Terminal 3: Start Inference Node
cd ros/
source devel/setup.bash
rosrun super_fast_object_detection rosInference.py

# Terminal 4: Start Vizualisation Node
cd ros/
source devel/setup.bash
roslaunch detected_objects_visualizer detected_objects_vis.launch

# Terminal 5: Play Rosbag or Live Inference
rosbag play xxxx.bag
For running on custom dataset with custom messagenames edit rosInference.py in ros/src/super_fast_object_detection/
in Line 35-42: class names and the Id´s
in Line 119: path to trained model
in Line 123: cuda device
in Line 131-134: Topic names and message typ
Topic Name: points_raw, Message Type: sensor_msgs/PointCloud2
Topic Name: detected_objects, Message Type: autoware_msgs/DetectedObjectArray
If you think this work is useful, please give me a star!
If you find any errors or have any suggestions, please contact me (Email: nguyenmaudung93.kstn@gmail.com).
Thank you!
@misc{Super-Fast-Accurate-3D-Object-Detection-PyTorch,
  author =       {Nguyen Mau Dung},
  title =        {{Super-Fast-Accurate-3D-Object-Detection-PyTorch}},
  howpublished = {\url{https://github.com/maudzung/Super-Fast-Accurate-3D-Object-Detection}},
  year =         {2020}
}[1] CenterNet: Objects as Points paper, PyTorch Implementation
[2] RTM3D: PyTorch Implementation
[3] Libra_R-CNN: PyTorch Implementation
The YOLO-based models with the same BEV maps input:
[4] Complex-YOLO: v4, v3, v2
3D LiDAR Point pre-processing:
[5] VoxelNet: PyTorch Implementation
${ROOT}
└── checkpoints/
    ├── fpn_resnet_18/
        ├── fpn_resnet_18_epoch_300.pth
└── dataset/
    └── kitti/
        ├──ImageSets/
        │   ├── test.txt
        │   ├── train.txt
        │   └── val.txt
        ├── training/
        │   ├── image_2/ (left color camera)
        │   ├── calib/
        │   ├── label_2/
        │   └── velodyne/
        └── testing/
        │   ├── image_2/ (left color camera)
        │   ├── calib/
        │   └── velodyne/
        └── classes_names.txt
└── sfa/
    ├── config/
    │   ├── train_config.py
    │   └── kitti_config.py
    ├── data_process/
    │   ├── kitti_dataloader.py
    │   ├── kitti_dataset.py
    │   └── kitti_data_utils.py
    ├── models/
    │   ├── fpn_resnet.py
    │   ├── resnet.py
    │   └── model_utils.py
    └── utils/
    │   ├── demo_utils.py
    │   ├── evaluation_utils.py
    │   ├── logger.py
    │   ├── misc.py
    │   ├── torch_utils.py
    │   ├── train_utils.py
    │   └── visualization_utils.py
    ├── demo_2_sides.py
    ├── demo_front.py
    ├── test.py
    └── train.py
├── README.md
└── requirements.txt