React.js is a JavaScript library for dynamic websites with rich user interfaces.
This guide will help you build and use the multi stack communication extension using React.js. This extension helps to communicate between more than one stack, accessing their data and assets based on various options/parameters.
Let's look at the steps to build the multi stack communication extension using React.js.
- Basic understanding of React.js
- Contentstack account
- Node.js version 12 or later
Note : For this tutorial, we have assumed that you are familiar with Contentstack and React.js. If not, please refer to the Contentstack docs, and React docs for more details.
This involves three parts:
- Setting up the Multi Stack Communication extension in Contentstack
- Setting up React.js code for the extension
- Using the extension in content type entry
To set up the extension, log in to your Contentstack account and proceed with the following steps:
-
Go to your stack, navigate to the Settings icon, and select Extensions.
-
On the Extensions page, click on the + Add Extension button and then on Create new. Alternatively, you can click on the + Add Extension button at the bottom, as shown below:
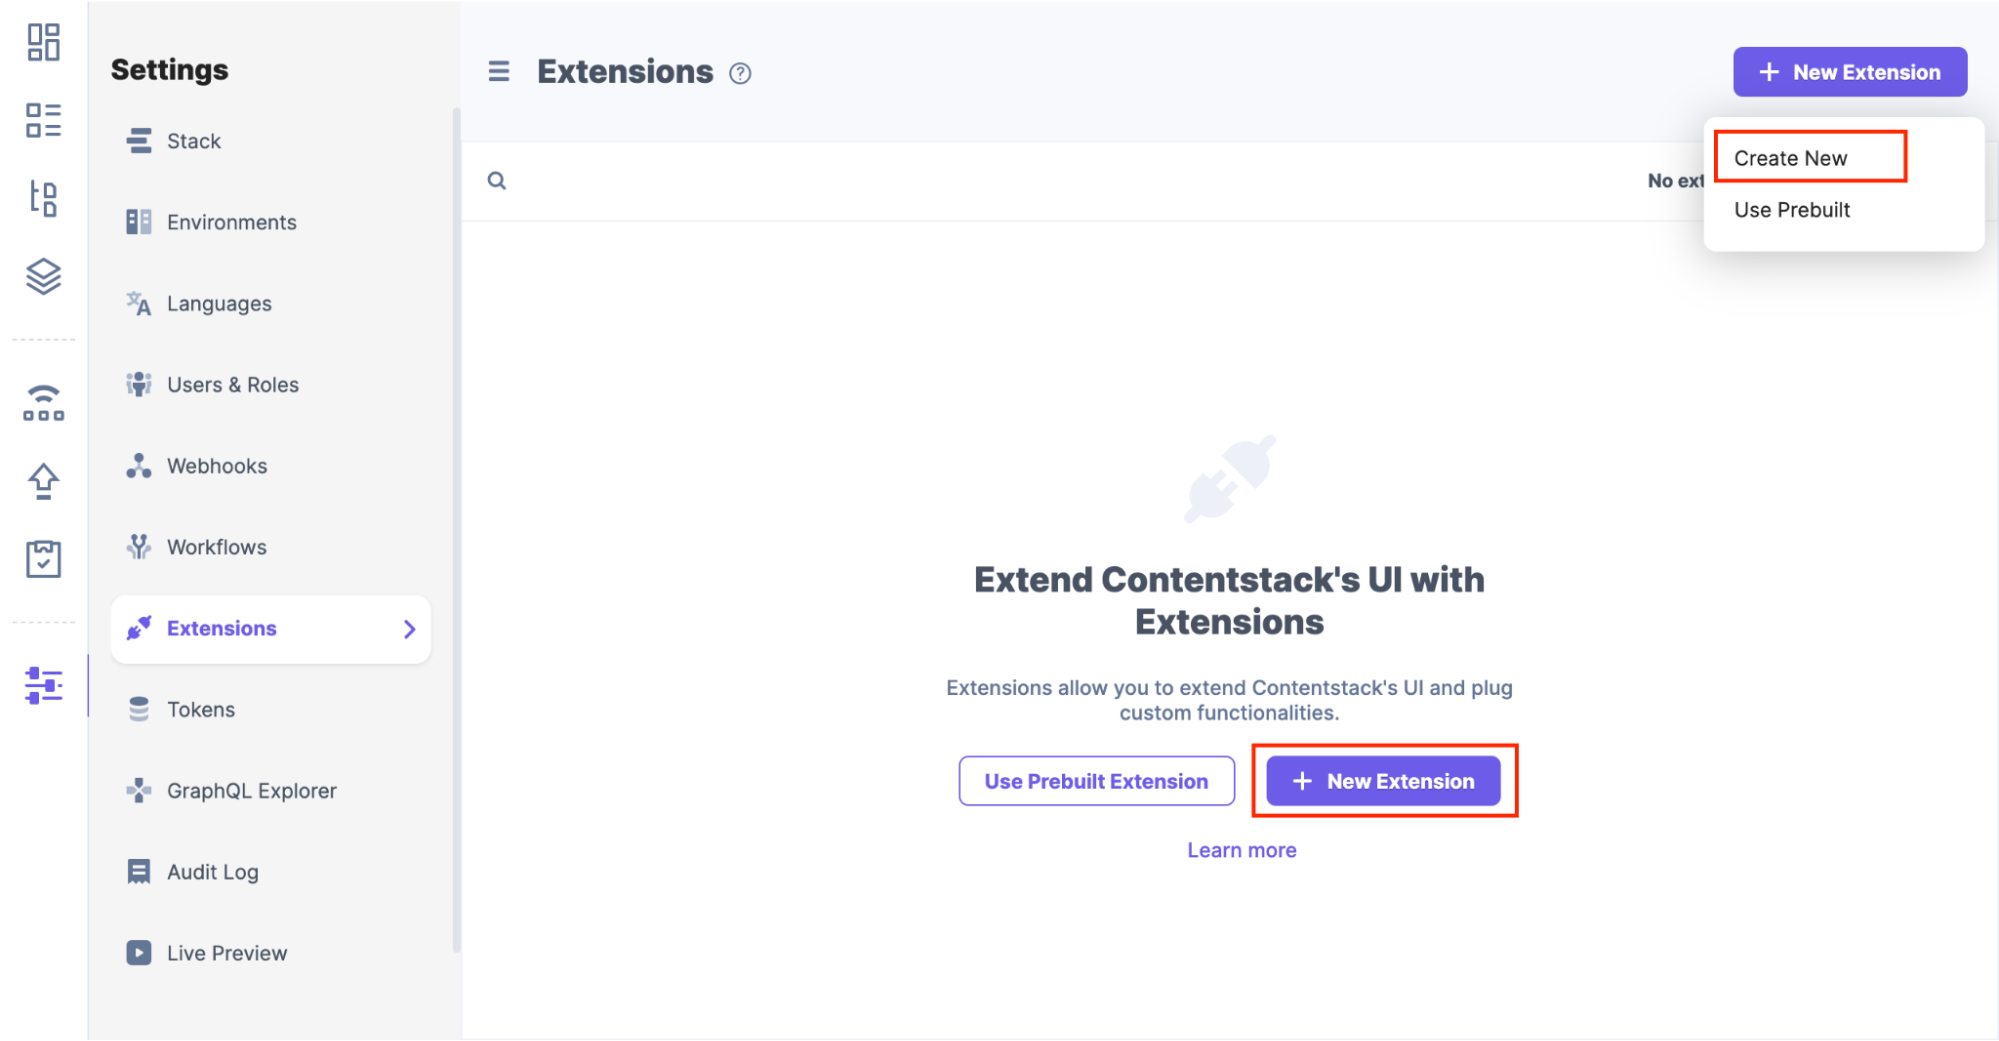
- In the Select Extension Type window, select Custom Field.
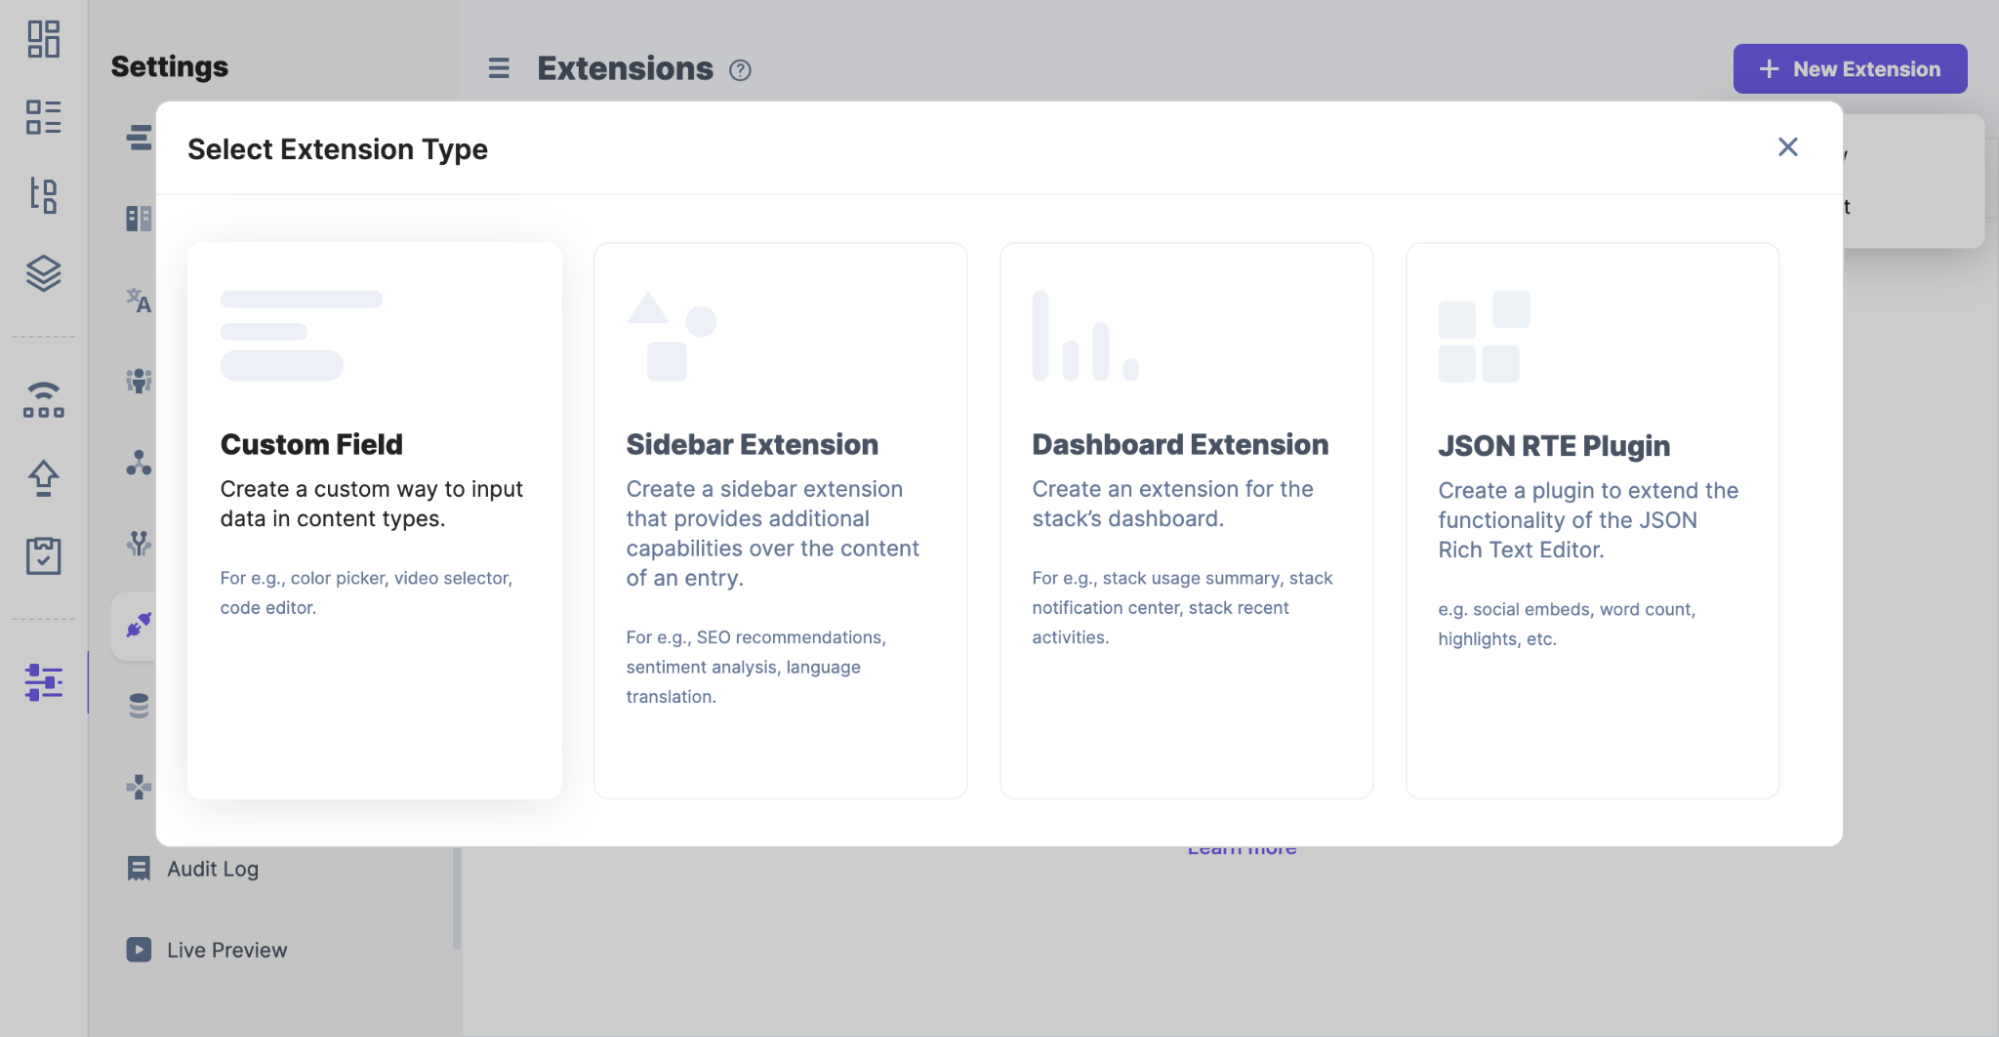
- On the Create New Extension page, enter values in the fields as given below:
a) Title (required): Provide a suitable title, for example Multi Stack Communication , for your custom field. This title will be visible when you select the extension in the custom field in your content type.
b) Field data type (required): Select the data type in which the input data of the field should be saved in Contentstack. In this case, select JSON.
c) Multiple (optional): Leave this field unchecked.
d) Hosting method (required): Select External Hosting as the hosting method for this content type and enter the url which contains the React.js extension code. In this case, enter url as http://localhost:3000/
e) Config parameter : (optional): Specify the required config. This is based on the structure of your extension code. In this case, please refer the following config as shown below:
{
	"stackA": [
	{
		"api_key": "YOUR API KEY",
		"management_token": "YOUR MANAGEMENT TOKEN",
		"access_token": "YOUR ACCESS TOKEN",
		"baseUrl": "api.contentstack.io",
		"assetsType": [
			"image/svg+xml",
			"image/gif",
			"image/png",
			"application/json",
	"application/vnd.openxmlformats-officedocument.wordprocessingml.document",
			"video/webm",
			"application/pdf",
			"video/quicktime",
			"application/zip"
		]
	}
	],
	"stackB": [
	{
		"api_key": "YOUR API KEY",
		"management_token": "YOUR MANAGEMENT TOKEN",
		"access_token": "YOUR ACCESS TOKEN",
		"baseUrl": "api.contentstack.io",
		"assetsType": [
			"image/svg+xml",
			"image/jpeg",
			"image/png",
			"application/json"
		]
	}
	]
}
The config is an object which stores multiple Stack information which is used for fetching their content type data and assets. You can choose any name for each Stack object. In this case, it's stackA and stackB. Each Stack is an array which contains following key value pairs:
-
api_key (required): Specifies the api key of the stack. For more info, click here.
-
management_token (required): Specifies the management token of the stack. For more info, click here.
-
access_token (required): Specifies the access token of the stack. For more info, click here.
-
baseUrl (required): Specifies the base url to be used for the Contentstack client. The urls can be as follows -
- NA Region - https://api.contentstack.io
- EU Region - https://eu-api.contentstack.com/
-
assetsType (required): Specifies the list of asset types.
-
Once you have added these details, click on Save.
To set up the React code for the extension, proceed with the following steps:
-
Clone the code from our repository.
-
Open the code in any appropriate code editor application.
-
Open the command prompt and move inside the project root directory. Then, run the command npm install to install the required dependencies.
-
In the command terminal, execute the command: npm start
-
In your web-browser enter the following address: http://localhost:3000/
To understand the code structure, please visit here.
To integrate Multi Stack Communication extension with Contentstack, we have created a content type named Multi-Communication Extension that has the following structure (Please note that the following content type is created for demo purpose only. You can add this extension to any existing content types or create your own new one) :
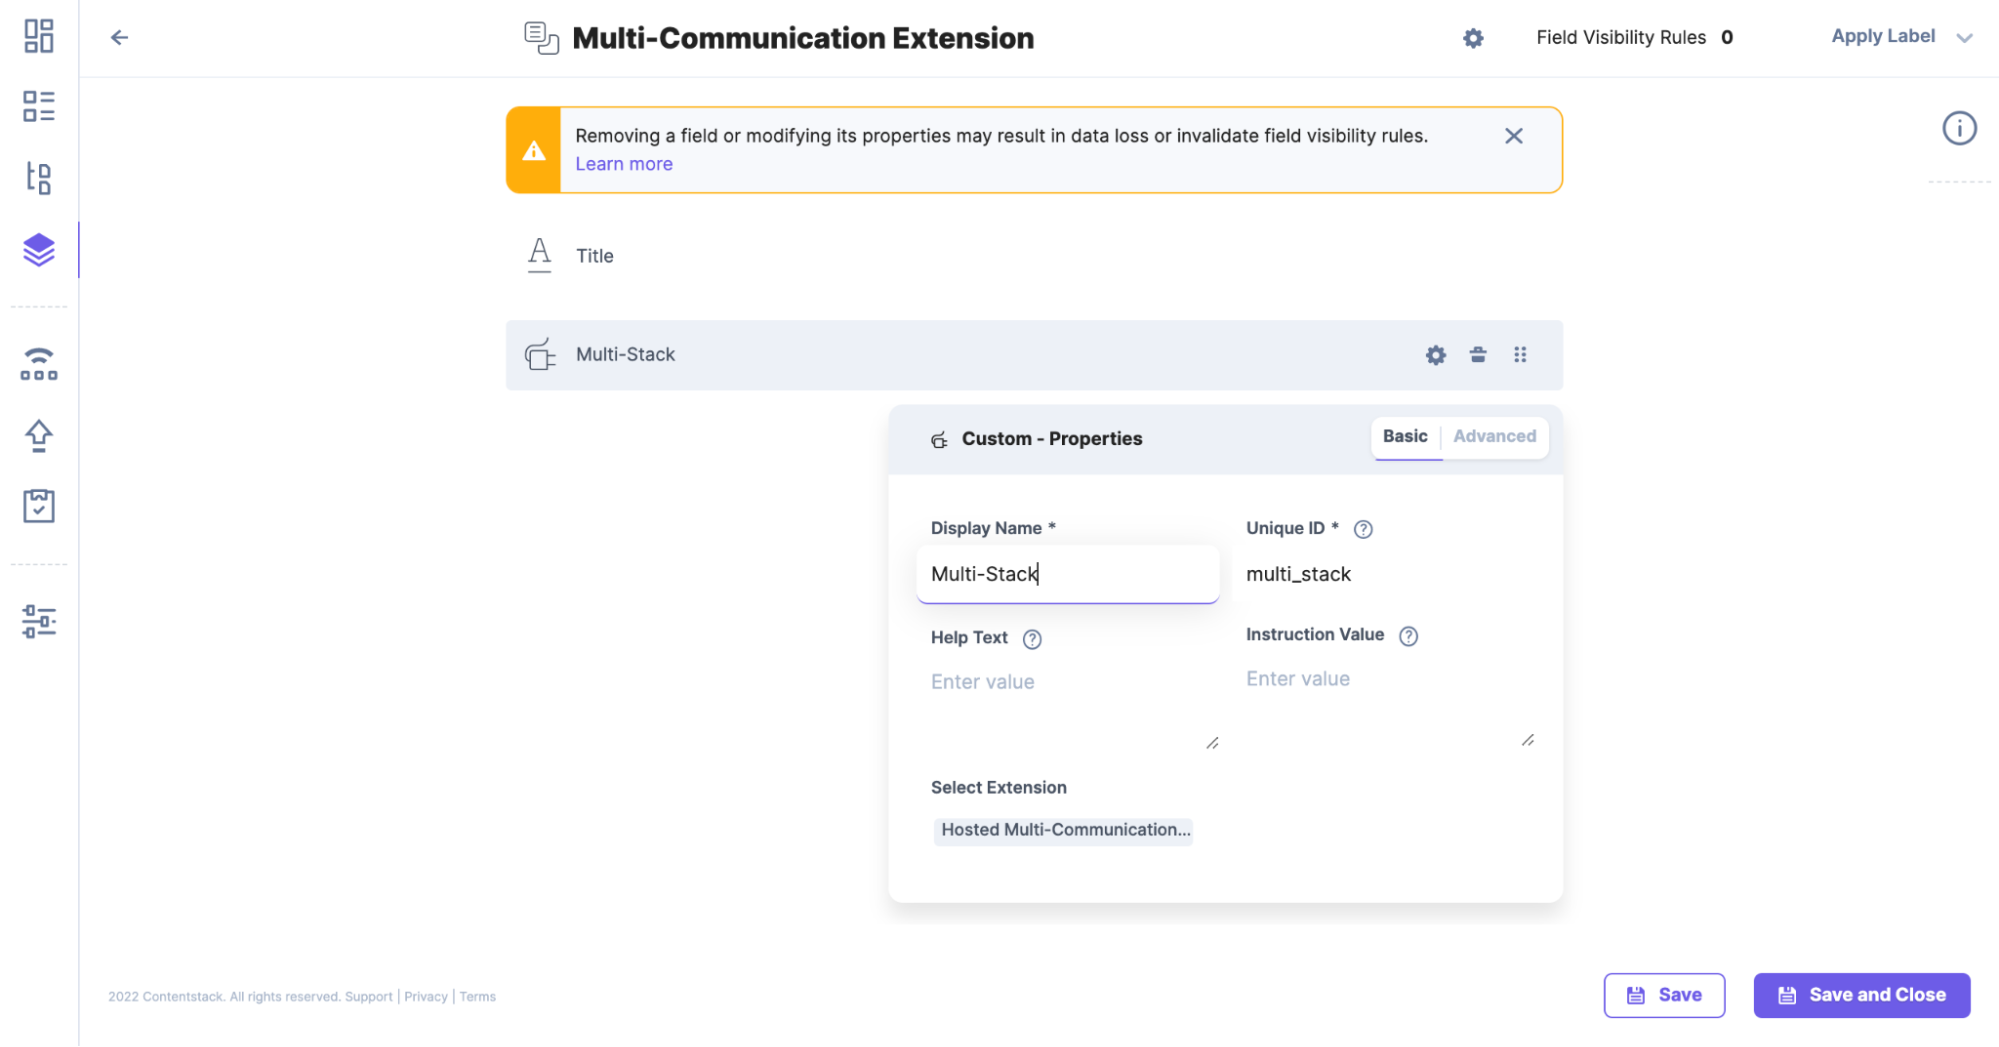
As you can see above, its content type consists of Title field and Custom field which is used to add the extension that we created.
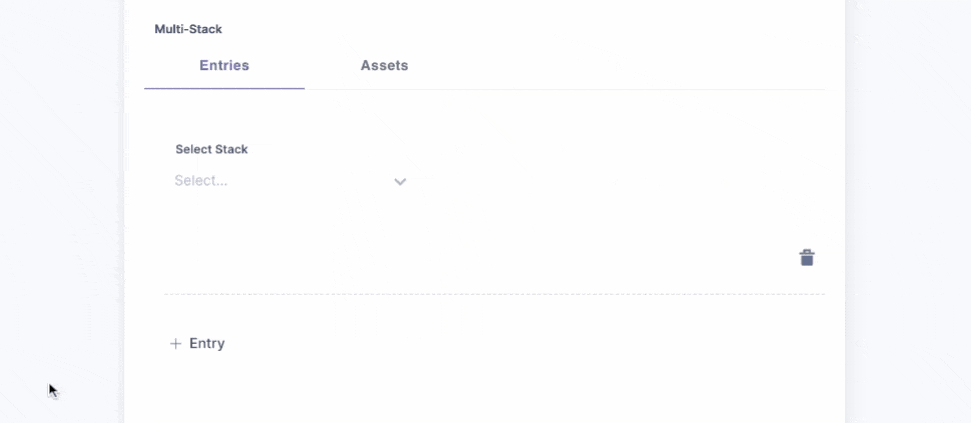
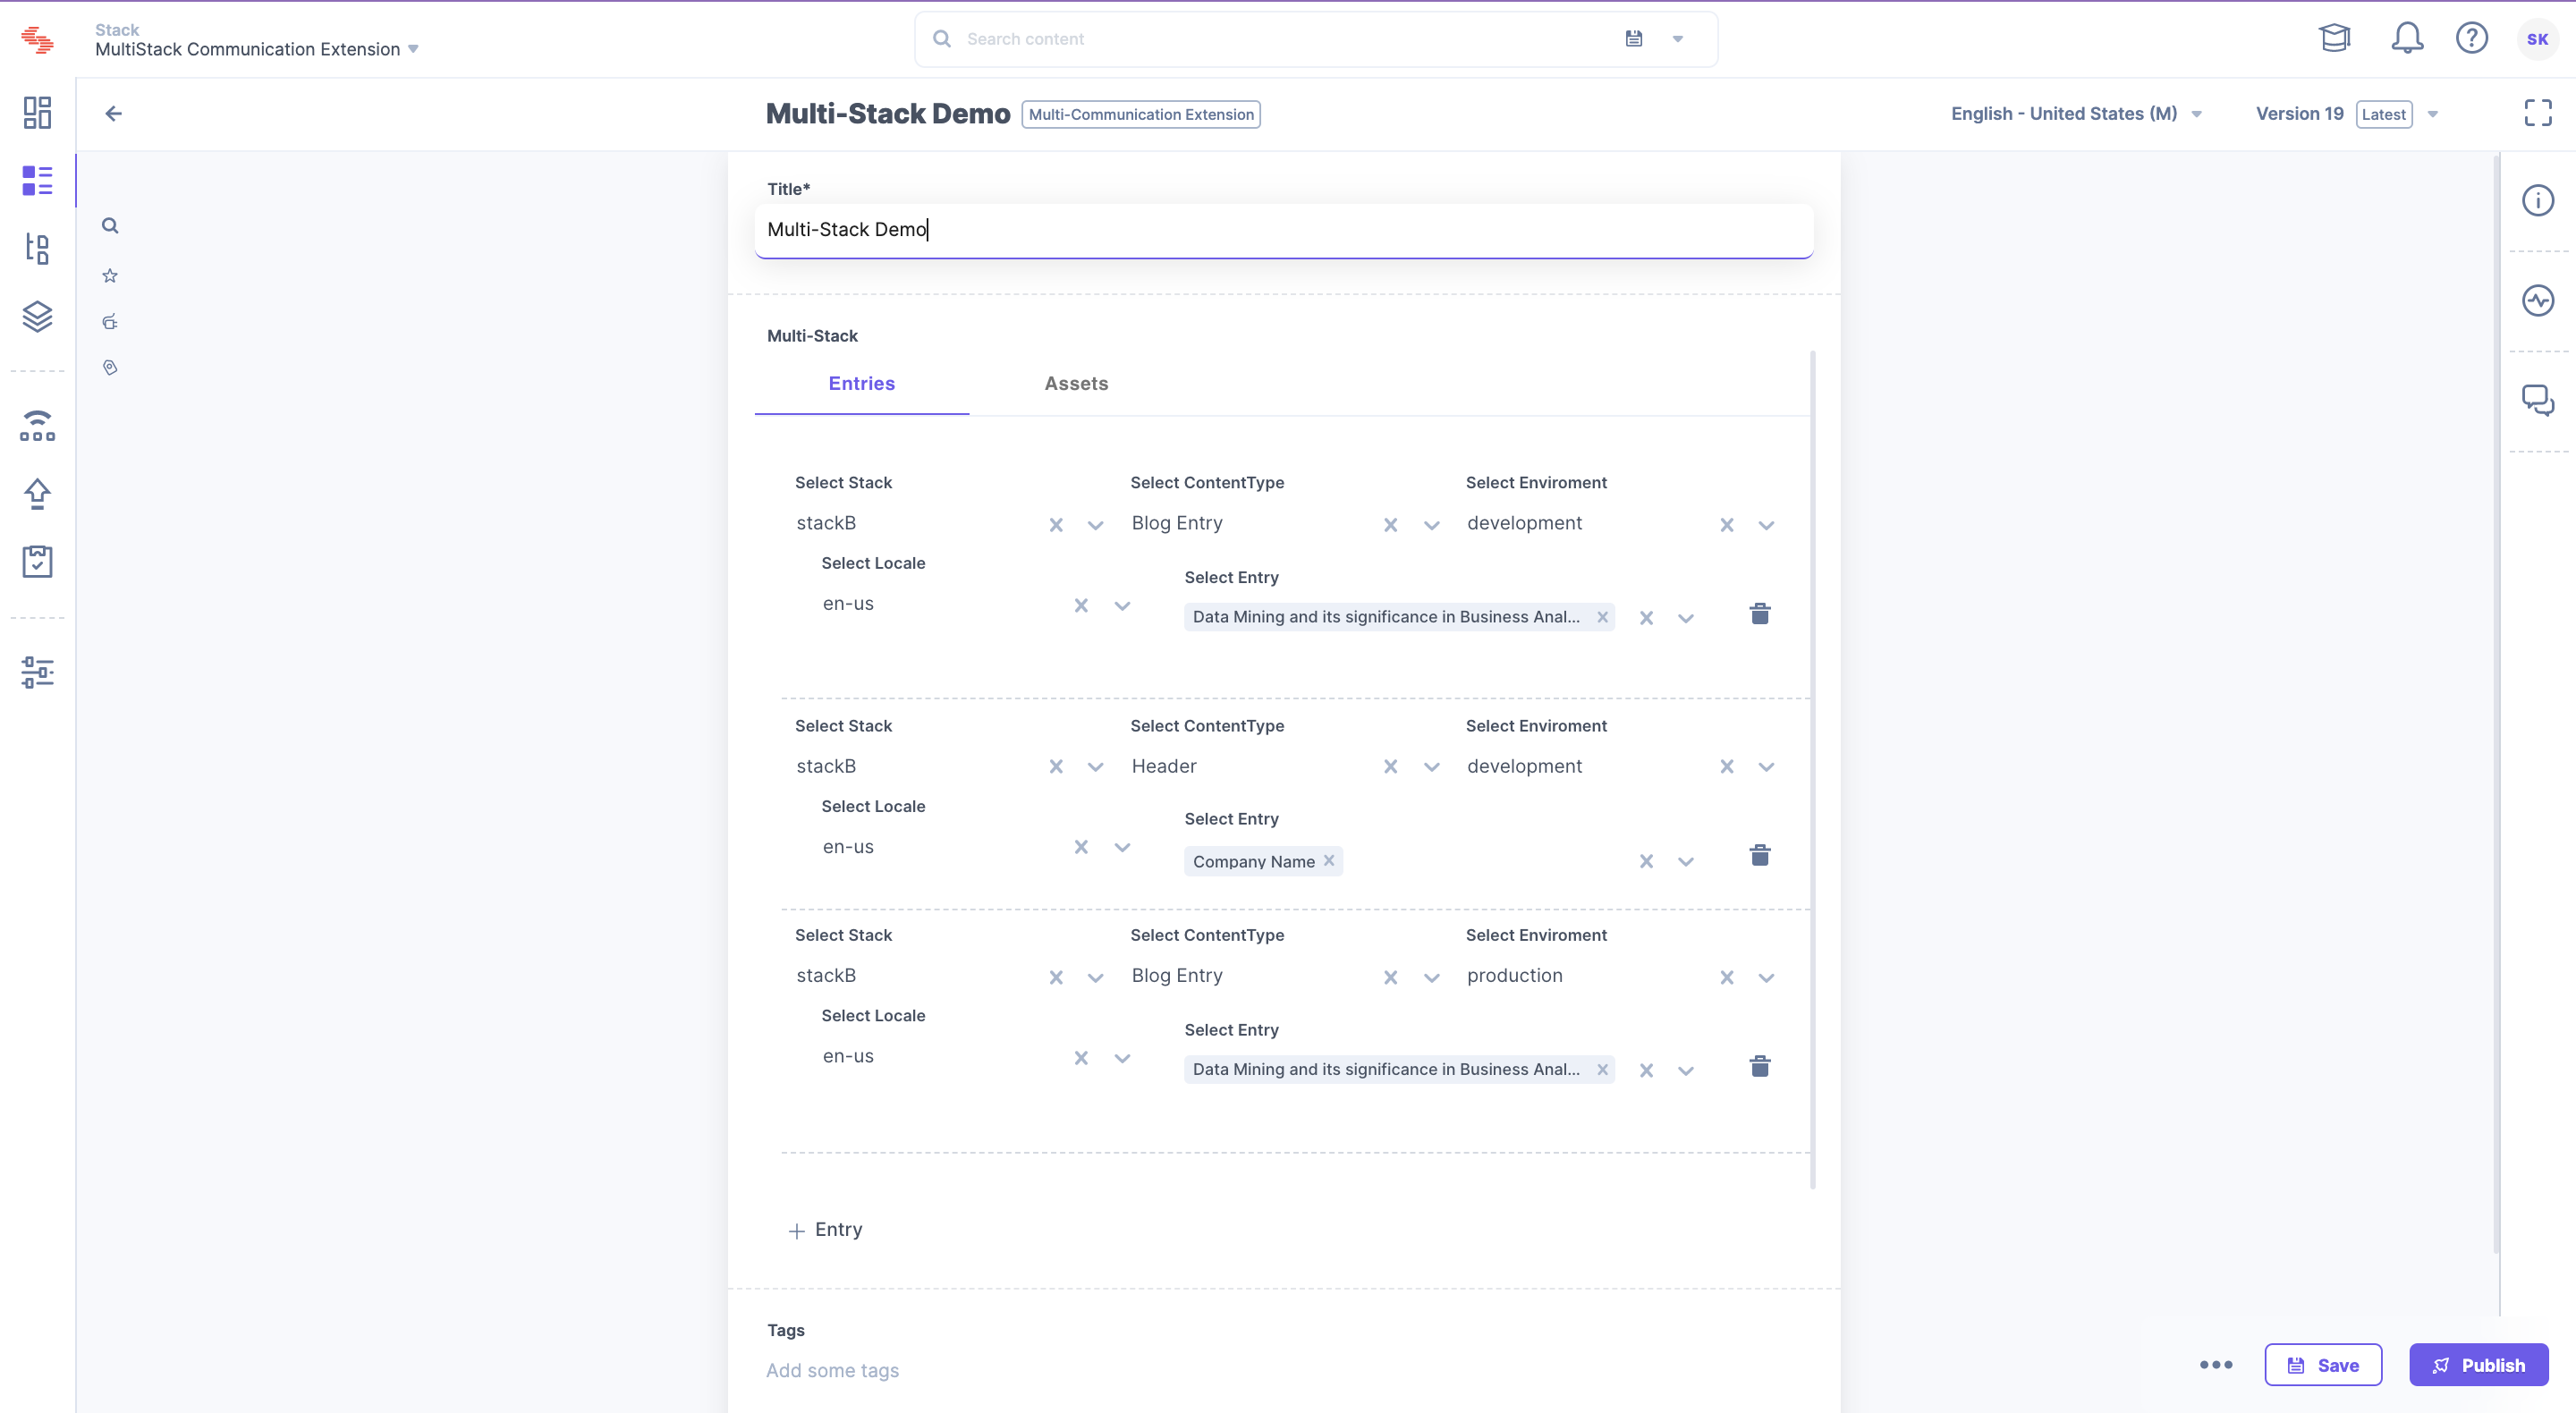
The entry of this Multi-Communication Extension is shown below:

As seen above, the Multi-Stack field(which is our extension) contains the following fields:
-
Entries - This section is used to create multiple entries that will fetch required data from multiple stacks and content types.
-
Assets - This section is used to create multiple assets that will fetch required assets from multiple stacks.
The Entries section has the following structure:

As seen above, the Entries section contains the following fields in the order of their selection:
-
Select Stack - This field shows a list of stacks that we configured before in the Config Parameter section in the extension. In this case, we selected Stack B.
-
Select ContentType - Upon selection of Stack, this field shows the list of respective Content Types. In this case, we selected Page.
-
Select Environment - Upon selection of ContentType, this field shows the list of respective Environments. In this case, we selected development.
-
Select Locale - Upon selection of Environment, this field shows the list of respective Locales. In this case, we selected en-us.
-
Select Entry - Upon selection of Locale, this field shows the list of respective Entries. In this case, we selected Home. We can select multiple entries.
The Assets section has the following structure:
As seen above, the Assets section contains the following fields in the order of their selection:
-
Select Stack - This field shows a list of stacks that we configured before in the Config Parameter section in the extension. In this case, we selected Stack B.
-
Select Folder - Upon selection of Folder, this field shows the list of respective asset folders available in the Stack. If there are no folders, this field will not be visible. In this case, we selected Authors. We can select multiple folders.
-
Select AssetType - Upon selection of Folder, this field shows the list of respective Asset types. In this case, we selected image/png. We can select multiple asset types.
-
Select Assets - Upon selection of AssetType, this field shows the list of respective assets. We can select multiple assets.
Other features of this extension are as follows:
-
We can create more than one entry and asset.
-
For the fields that contain multiple selection, you can search for the data.
-
Using the delete icon, any of the entries and assets can be deleted.
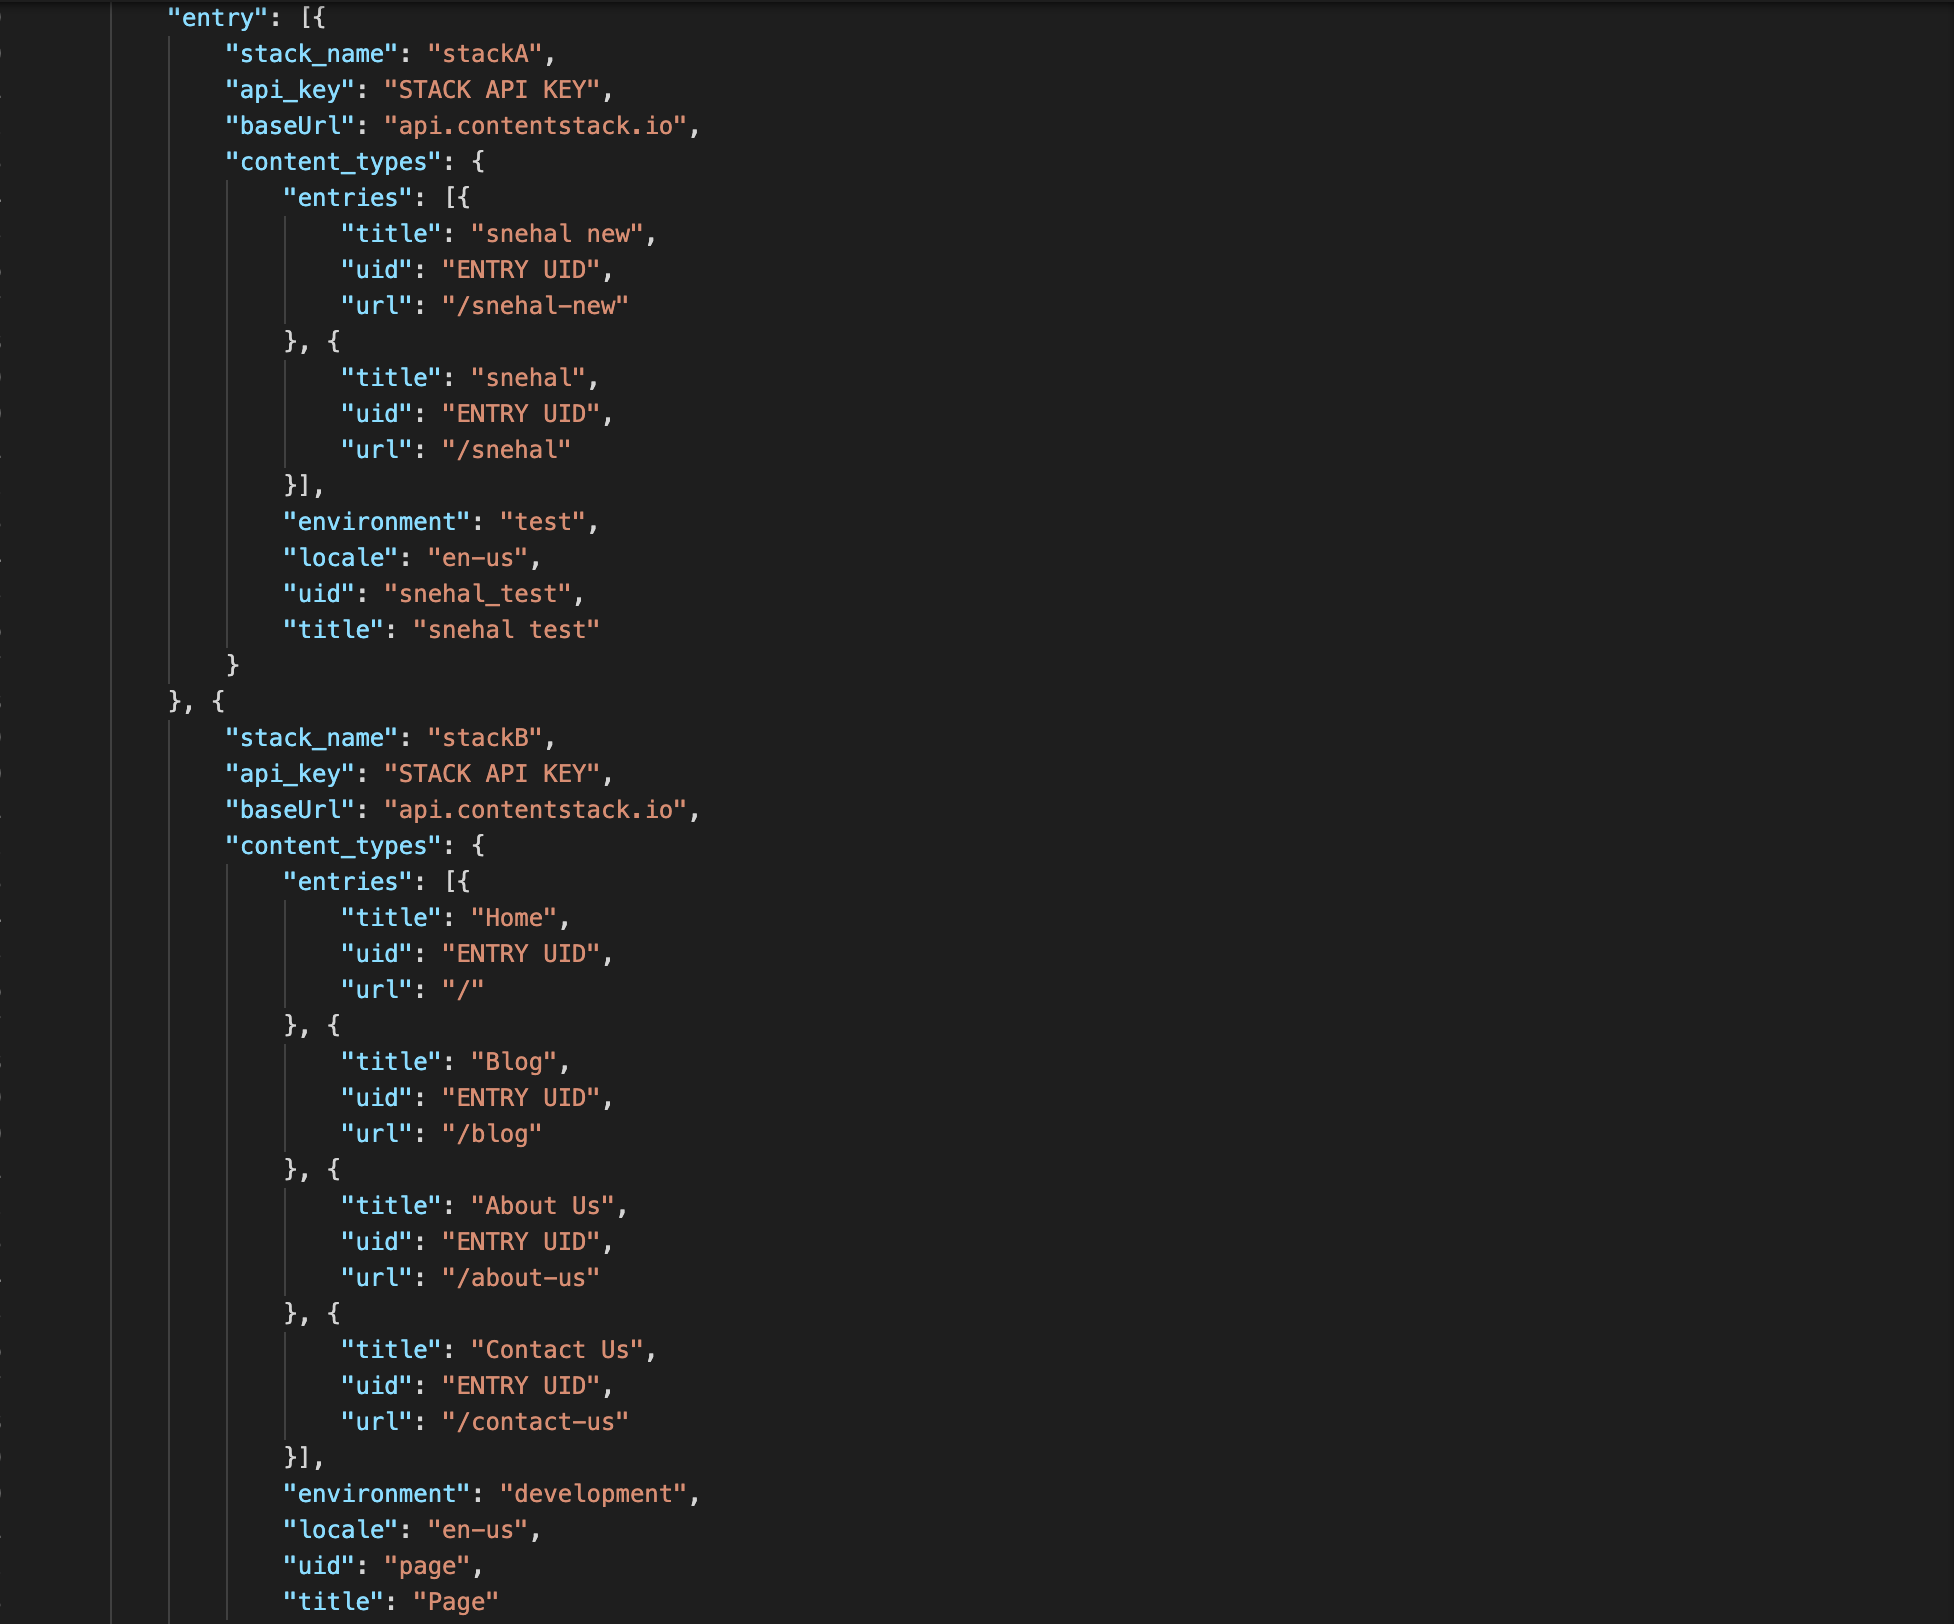
Once you have added required entries and assets, click on Save. To check if the data entry is saved successfully, click on the three dots icon and select Export. This will download a JSON file which will contain the JSON object for the extension which has the following structure. We can achieve this JSON output using our Contentstack Management API as well. To know more you can click here.
Entries structure :
Assets structure :
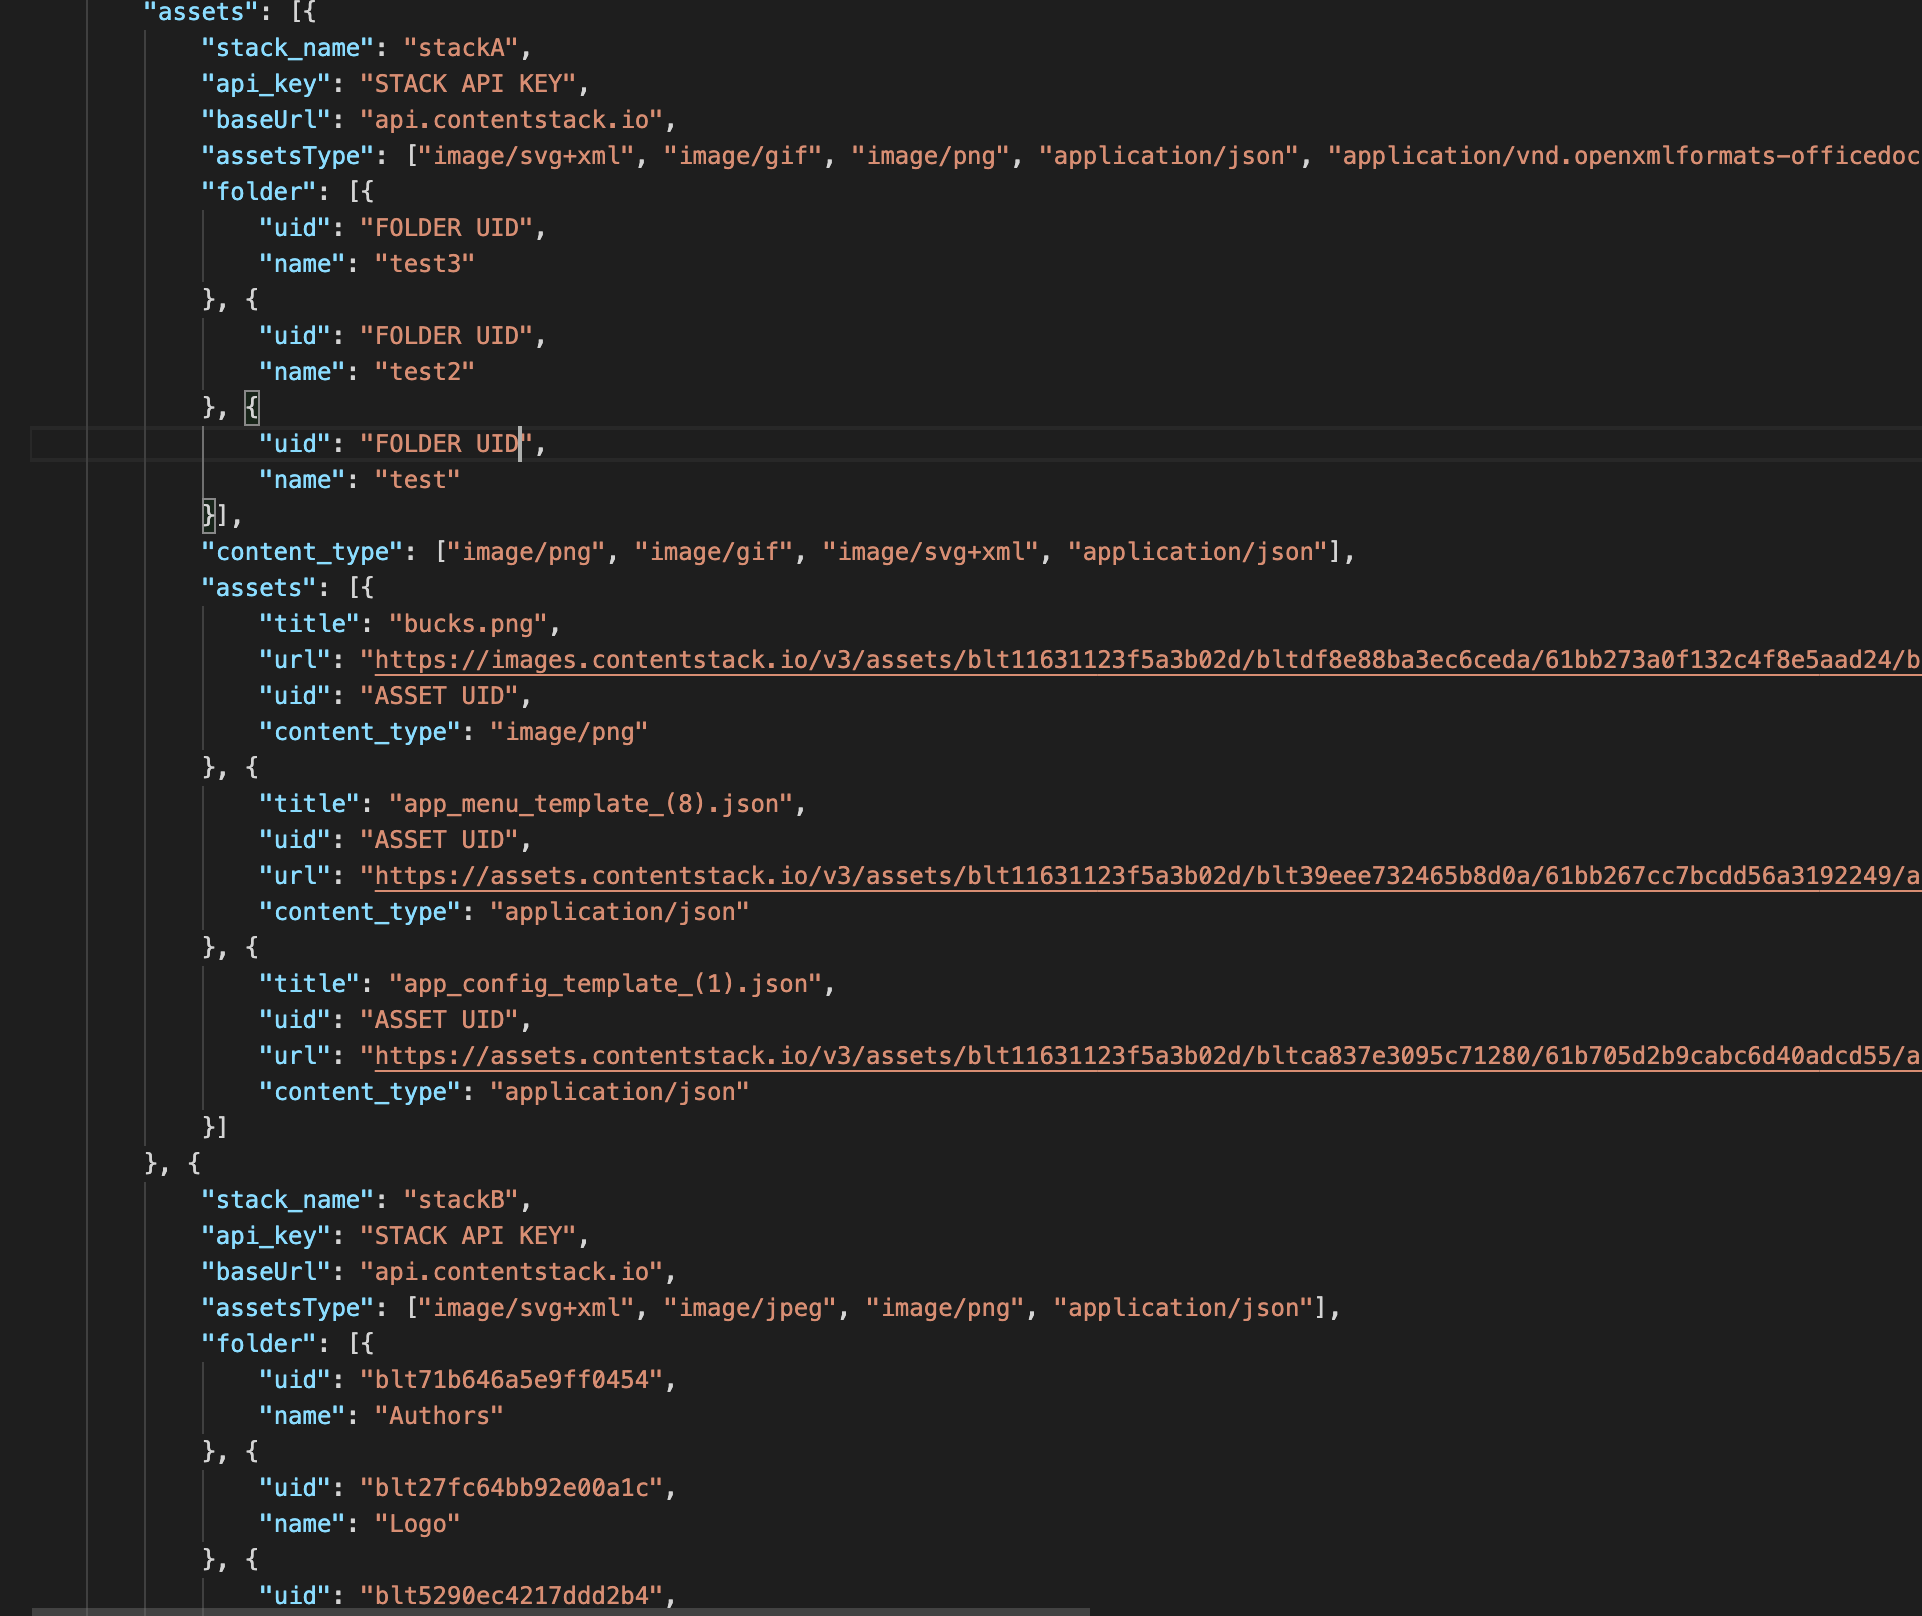
This JSON object contains the data that we captured for entries/assets.
-
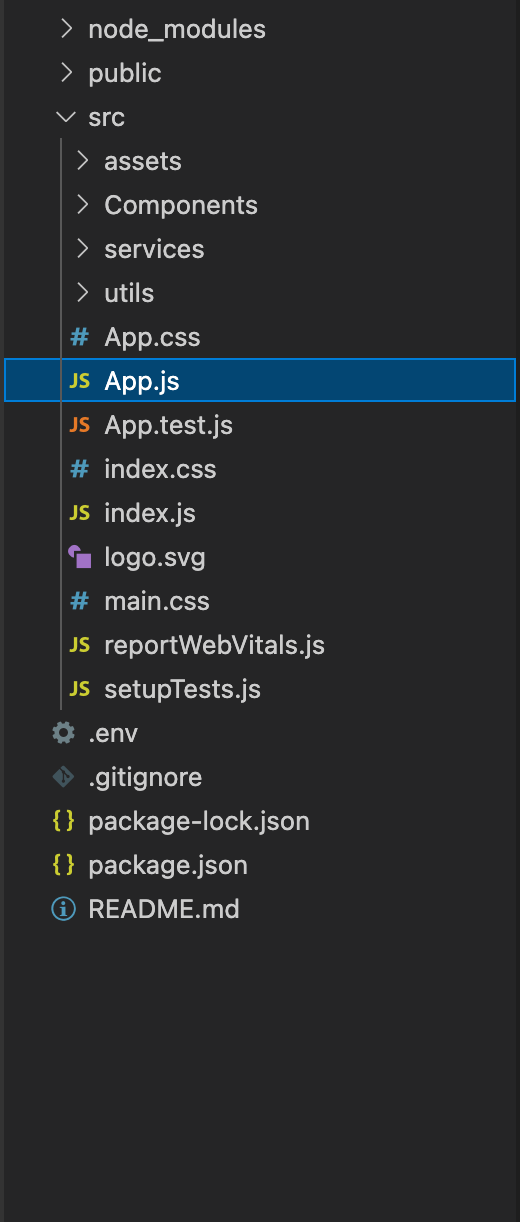
The entry point for the extension is the 'App.js' file. It initializes the extension and passes the data to the required components for 'Entries' and 'Assets'. The extension makes use of Venus components and extension sdk.
-
'Components' folder contains separate components for 'Entries' and 'Assets', namely, 'AddEntry' and 'AddAssets', respectively.
-
'AddEntry' manages the data fields 'content_type', 'entry', 'local' and 'environment'. The 'index.js' file manages the state of these fields and accordingly handles fetching and adding of entries.
-
'AddAssets' manages the data fields 'assets', 'file_types' and 'folders'. The 'index.js' file manages the state of these fields and accordingly handles fetching and adding of assets.
-
The extension uses an SDK for fetching entries and Management API for fetching assets.