![]()
Currently, there is no easy way to match all that are in need with those that are providing help, at the same time is difficult to find all the information at the local and global level of the different initiatives, projects, researchers, donors, investors, FREE or discounted tools for builders, the grants available and other relevant information. That's why Fight Pandemics was born.
Please check our notion to get a better understanding of the problem that we are trying to solve: https://www.notion.so/fightpandemics/FightPandemics-Overview-cd01dcfc05f24312ac454ac94a37eb5e
- Frontend
- React Hooks, Ant Design, Ant Design Mobile, styled-components
- Mobile first design
- Backend
- Fastify, MongoDB
- Auth0, Google Maps API
- DevOps
- Docker
Follow the inital project setup for non-engineers described in Notion.
- If you want to contribute, fork this repository
- Clone it to your local development machine
- Copy
client/.env.exampletoclient/.env - Copy
backend/.env.exampletobackend/.env - Replace
TODOentries in both files with correct values (this is not needed to run the project in a responding but non-functional state). Consult the non-engineer guide and ask in Slack for AUTH variable values. - Run
docker-compose upthis will take quite some time. (Starting the development server...is not the final line). - Finally, navigate to localhost:3000 in your browser - the page title should be "Fight Pandemics" and you should see a styled page.
Contributing:
- Check the projects tab of the original repository for available tickets.
To check the API documentation which is automatically generated using fastify-oas , go to http://localhost:8000/documentation
Note that whenever you add a new NPM dependency, you must run npm install from within the container. This is because
NPM dependency installs may not necessarily be cross-platform. There are two ways that you can install the dependencies
within the container:
Run docker-compose run backend-service npm install, or cd into the backend directory and run npm run install-docker.
Run docker-compose run client npm install, or cd into the client directory and run npm run install-docker.
Be sure to also commit any changes to the package-lock.json so that dependencies used by third-parties are also locked to specific versions.
We are noting any special considerations and handling done in the code so that developers are aware of these caveats while developing. This is a living document, so feel free to add any notes that you feel are worth mentioning here.
- Please be sure to often merge or rebase the latest from the master branch into your feature/working branches to minimize merge conflicts and so that it doesn't fall too far behind master.
- If possible, try to keep changes in pull requests small so that it'll be faster for reviewers to review and easier for contributors to make revisions. If you forsee there will be many changes, make sure to commit often. This will help break down a pull request more easily.
- API requests are validated using Ajv and JSON schema's are defined with FluentSchema
- By default, the schema's allow additional properties unless explicitly set that additional properties are not allowed.
There's a utility function
strictSchema()inlib/endpoints/schemas/utils.jsthat can be used to initialize all schema's. - Rather than silently suppress additional properties, as is the default behavior for Fastify's ajv configuration, we are instead returning a 400 bad request error if additional properties are passed in. This makes it easier to debug issues due to a misspelled property name.
- Read more about validation in Fastify in the docs https://www.fastify.io/docs/v2.2.x/Validation-and-Serialization/#validation
- By default, the schema's allow additional properties unless explicitly set that additional properties are not allowed.
There's a utility function
- Endpoint handlers should use async functions, and return values or throw httpErrors.
- This is using some sensible defaults provided by https://github.com/fastify/fastify-sensible
- If an error is thrown, a generic error handler returns a 500 Internal Server Error response and logs the error details, without returning all error details in the response.
- Some more useful tools are provided by fastify-sensible such as built-in
fastify.httpErrorsandfastify.to()to wrap async-await - Read more in the Fastify documentation about using asyc/await with fastify https://www.fastify.io/docs/latest/Routes/#async-await
- We have the beginnings of a theme. The file can be found here:
src/constants/theme.jswhich has sections for typography, colors, buttons styles and media queries.- Limit the use of inline styling.
- Limit the use of
pxvalues, currently the root font size is 62.5%,1rem = 10px - No use of
.cssor.scssfiles, please style with styled-components instead.
- Use assets such as icons from the designs on Figma
- Select the screen that you are going to design
- On the left side of Figma, unlock the screen (Only the one that you are going to use)
- Select an icon or component -> right click -> Copy/Paste -> Copy as CSS/SVG
- You can also get exact CSS values on the top right of Figma
- After you are done with your screen, lock it again!!
- For most components, we can use components from Ant Design and override styling where needed. Please refrain from reinventing the wheel.
import styled from "styled-components"; import { Button } from "antd"; const StyledButton = styled(Button)` // target antd selectors and override styles here `; - For new pages, create a new route in
client/src/routes.jsand import a page component fromclient/src/pages - Refrain from making the Redux state too big as it will affect speed performance. React’s Context API is ONLY helpful for avoiding nested prop threading so stick with Redux where Context fails.
Every time you push code up to the repository, a build based off of your feature review branch will be deployed to AWS. Note that in order for a build to run, the branch name must have the feature/ prefix. You can view the build logs in GitHub Actions. After the build successfully completes, you can view the URL to which your app was deployed by clicking on the "Deployment URL" step in the deploy_review job in the workflow run for your build:
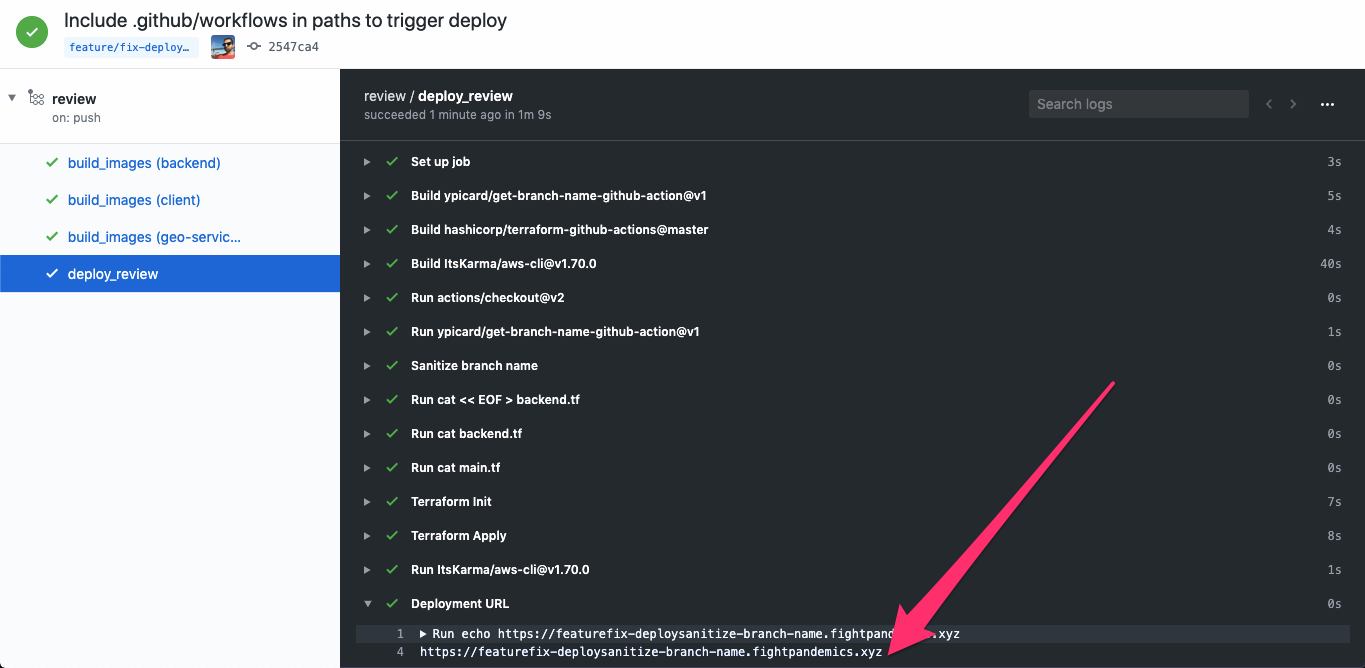
Note that it may take a few minutes for the app to be accessible, or for changes to be reflected, since it takes time for AWS to spin up the Docker containers.
When a pull request is merged to master, it will automatically be deployed to the staging environment. You can view the build logs in GitHub Actions. After the build successfully completes, wait a few minutes for the changes to be reflected, and then access the staging app at http://staging.fightpandemics.work.
Coming soon...