The project of we did in the Stem for Girls workshop in Zmigrod, is based on the parts and diagrams described in the Tamaguino project by Alojz Jakob.
To be able to set up the Arduino that we built in the camp with the Tamagotchi code, you need to download the arduino code, and install the Adafruit_SSD1306 library, following the same steps in the library manager, you followed for the u8g2 library.
If you don't want to use git to clone the repository, you can also download the zip file directly, the code for the Tamagotchi will be under stem4dziewczynek-v.0.1.0/BarbieTamagotchi/, install the library Adafruit_SSD1306 and it's dependencies via Library Manager on the Arduino IDE and after you upload the code to your BarbieKomputerek, you will be rewarded with a functioning Tamagotchi.
Watch the video:
If you haven't set up your Arduino IDE, follow the instructions below
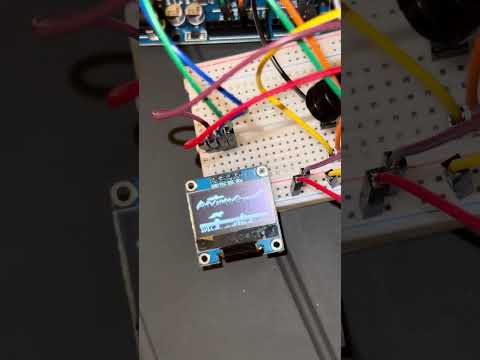
Our version is using without resistors, with active LOW, and the picture below shows the setup of cables and pieces, the display is different to the one in the diagram, but the name of the pins on the display are the same:

To quickly test the display connection, open buzzer.ino from the ArtesEdu/stem4dziewczynek repository, there are other examples available too, you can browse the repository, this is the code we used in the workshop.
To enable the display in a new project, two lines are required:
#include <U8g2lib.h>   // imports the u8g2 library for the display

U8G2_SH1106_128X64_NONAME_F_HW_I2C u8g2(U8G2_R0, U8X8_PIN_NONE); // enables the library under the u8g2 alias
                                                                 // this could also be display to make it more natural
To upload the code and program the BarbieKomputerek arduino board with the new firmware (link in polish) we need to download first the Arduino IDE and there is also a cloud version.
When downloading, and prompted for donation, either donate or click "Just download", if you have the google translate extension and it gets translated automatically, the button will not show up, but it is there ;). If you can spare the money, donate, but is not required.

After the IDE is installed, connect the BarbieKomputerek, and click on Select Board:

In the next screen, search for Arduino UNO or type it in the search bar, if the board is connected, the port should also show up, (COMX for windows, /dev/ttyUSBX and /dev/cu.xxx for MacOS). If the port does not show up, try the cloud version (I am not sure if it's going to work, but let us know).

To download the library for the display, click on Sketch -> Include Library

When the library manager shows up, look for u8g2 by Oliver

To quickly test the display connection, open buzzer.ino from the ArtesEdu/stem4dziewczynek repository, there are other examples available too, you can browse the repository, this is the code we used in the workshop.
There are also examples available for the display, and in the basics too for blinking with leds, etc:

Examples with the display need to have the following line, before the setup() function, usually found at line #79 of the display examples, commented by //, delete the // to enable it.:
U8G2_SH1106_128X64_NONAME_F_HW_I2C u8g2(U8G2_R0, U8X8_PIN_NONE); // enables the library under the u8g2 alias
Now you can start hacking! Happy hacking, hack the planet!