In this lesson, we'll take on a task of gesture recognition where we will attempt to recognize three gestures (FLIP, WAVE, and IDLE) using Wio Terminal's built-in 3-axis accelerometer.

It is quite hard to accomplish using rule-based programming because gestures are not performed the same way all the time. Trying to solve this problem using traditional Programming requires hundred of different rules for each mode of action. Even if we consider an idealized situation, we still miss a lot of motions such as speed, angle, and direction. A slight change in these factors requires a new set of rules to be defined but machine learning can handle these variations very easily.
Wio Terminal displays the current recognition results for the Wio Terminal's actions in real-time. FLIP, WAVE, and IDLE.


Hardware requirements: Wio Terminal
Connection method:

As you might guess from the name, accelerometers are devices that measure the acceleration of a body. It is defined as the rate of change of the velocity of an object.
Accelerometers are capable of measuring acceleration either in meters per second squared (m/s2) or in G-forces (g). A single G-force on Earth is equivalent to 9.8 m/s2. There are different kinds of accelerometers. The earliest accelerometers were based on mechanical architecture.
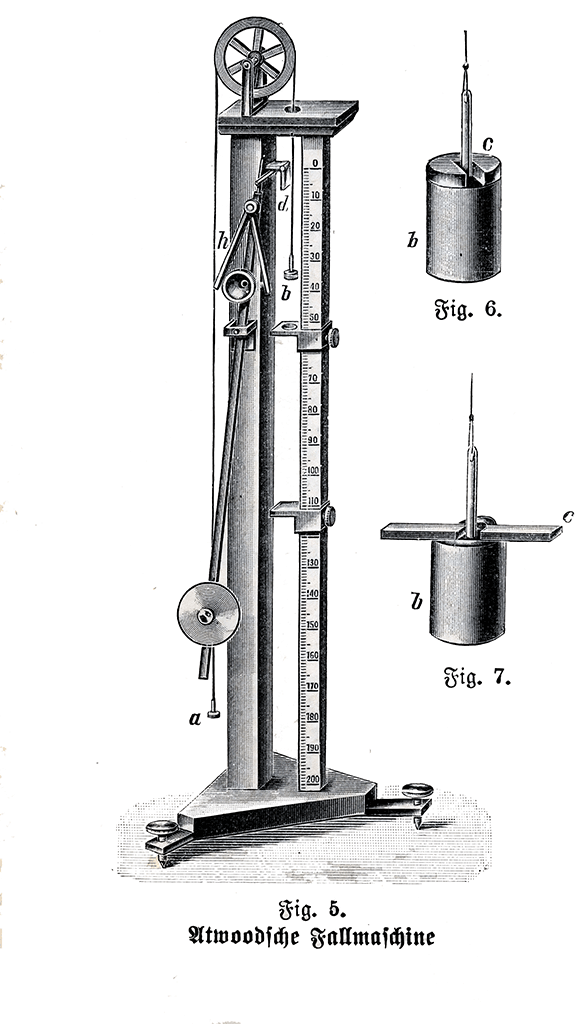
The first accelerometer was called the Atwood machine. It was invented by an English physicist George Atwood.

The accelerometers commonly used in mobile phones are MEMS (Microelectromechanical) accelerometers. The module is used in Wio Terminal is called 3-Axis Digital Accelerometer (LIS3DHTR). Generally, the internal structure of accelerometers consists of Capacitive Plates. Some types of accelerometers use fixed capacitive plates, while some of them have the plates attached to minuscule springs that move internally depending upon the acceleration forces acting on the sensor.

- Create and Select Models
- Data Acquisition
- Training and Deployment
- Programming
Please Open https://ide.tinkergen.com/
Click on "Model Creation", click on "Motion Recognition(Built-in accelerometer)", as shown in steps 1 and 2 below.

Enter a NAME according to the requirements.

Click "Ok"

Click "Ok" and it will automatically jump to the Data Acquisition interface.


When the Wio Terminal is connected, in the Codecraft surface, click as shown in the figure. This action will upload the default data acquisition program.

The "Upload" pop-up window will appear as shown in the figure below. Select the serial port number corresponding to the current Wio Terminal (not necessarily COM26 as shown in the figure) and click the "OK" button.

A pop-up window indicates that the program is being uploaded, please wait...

Usually, it takes 10 seconds to upload. Once the program is uploaded, the "Upload Successful" window will appear on the screen shown below. This is shown in the image below.

Click "Roger" to close the upload success pop-up window and return to the programming screen.
Caution For the web version of Codecraft, you may get the message in the image below if you don't install or run the Device Assistant.
Check this page for further information: Download, installation and "Device Assistance" Usage.


In the upper right hyperlink, you will find a step-by-step introduction to data acquisition. Follow the instructions to collect data.

Attention:
- Wio Terminal button location.
- Animated GIF has been accelerated, the actual action can slightly slow down.
- Please notice the red tips.
- Point the cursor over Description Texts for more detailed content.


Starting and finish data acquisition according to the Wio Terminal display.
This signal means data is being collected.

OK means Data collection is complete.

Wio Terminal shows that the data acquisition is finished and CodeCraft is still uploading the data. It takes 1~2s to transfer the data from Wio Terminal to CodeCraft.
Now, the data acquisition is finished.

Click on "Training & Deployment".

Select the suitable neural network size: one of small, medium, and large. Set parameters, number of training cycles (positive integer), learning rate (number from 0 to 1), and minimum confidence rating(number from 0 to 1). The interface provides default parameter values.

Click "Start training".

When you click "Start training", the interface displays "Loading...".

The duration of "Loading.." varies depending on the size of the selected neural network (small, medium and large) and the number of training cycles. Larger is the network size and number of training cycles, the longer it takes.
You can also infer waiting time by observing the "Log". In the figure below, "Epoch: 22/30" indicates the total number of training rounds is 30 while 22 rounds have been trained.

After loading, "TrainModel Job Completed" appears in the "Log" and a "Model Training Report" shows up on the interface.

In the "Model Training Report" window, you can observe training results including the accuracy, loss and performance of the model. If the training results are not satisfactory, you can go back to the first step of training the model, select another size of the neural network or adjust the parameters and train it until you get a model with satisfactory results.

In the "Model Training Report" window, click "Deploy Model".


Once the deployment is completed, click "Ok" to jump to the "Programming" window.

In the "Programming" interface, click on "Use Model" to use the deployed model.

Try to use your model by writing the following program.

Click the "Upload" button.

Select the serial port number corresponding to the current Wio Terminal (not necessarily COM26 as shown in the figure) and click the "OK" button.

The first upload time is usually long and it increases with the complexity of the model. The upload time for smaller models is about 4 minutes or longer(depending on the performance of your machine).


Flip your Wio Terminal to see whether its screen show "Flip".Try other motions, and see whether the Wio Terminal recognizes your motions.
Congratulations! You have completed your first TinyML model. I believe you are interested in understanding the significance of each operation you do, so let's learn the basic theoretical knowledge of machine learning, first look at our input.
Input:
- Label
- Dataset
- Training set, Val set, and Test set
- Amount of dataset
- Way to get data
- Quality of dataset

As the name suggests, data is labeled when you add meaningful labels and tags or assign classes to the raw data that you've collected. This means that you add labels to data and set a target. The AI learns by example. Now, let's see how this works. If you have a set of fruits labeled with "Lemon", "Orange" or "Banana". The classification trains your model to tell if the fruit is "Lemon". When the training is over, newly added fruit will be classified into one of these three groups. The input element may belong to multiple categories at once.

If you are looking for a working and reliable software, you need a large amount of relevant, high-quality data. It means that you have to train your ML model by providing it with thousands of examples and it memorizes the correlations between your data pieces. The Full Dataset is consists of training set and testing set:

The data you feed to the model is called training dataset while the data you provide to the model to predict is called testing set.

In addition, the training set can be divided into two groups. We can observe the Log after we start training, finding that Training Set will be split into "Training Set" and "Validation Set".

Training set: Training set is the data that an algorithm uses to learn.
Validation set: After training using the training set, the points in the validation set are used to compute the accuracy or error of the classifier. The key insight here is that we know the true labels of every point in the validation set, but we're temporarily going to pretend like we don't. We can use every point in the validation set as input to our classifier. We then receive a classification for that point. We can now peek at the true label of the validation point and see whether we got it right or not. If we do this for every point in the validation set, we can compute the validation error!
After training using the training set, the validation set is used to provide an unbiased evaluation of a model fit on the training dataset while tuning model hyperparameters. We know the true label of each sample in the validation set, but pretend not to know it for the moment. We can take each sample in the validation set as an input to the classifier, then receive the classification results for that sample. We can now peek at the true labels of the validation points and see if we guessed correctly. If we do this for every sample in the validation set, we can calculate the validation error. Hence the model occasionally sees this data, but never does it “Learn” from this.
We use the validation set results, and update higher level hyperparameters. So the validation set affects a model, but only indirectly. The validation set is also known as the Dev set or the Development set. This makes sense since this dataset helps during the “development” stage of the model.
The short answer is, there is no correct answer. The slightly longer answer: every specific project will require a different amount of training data and the only way to know how much you'll need is by trial and error. There are a few broad guidelines that may help you get a basic idea about why this question has no answer:
- Usually, more sophisticated models with more attributes and links between them (like ANNs) will require more data to train properly.
- The scope of application along with the complexity of the real-life phenomena that your model is being trained to predict also plays a role in how much training data is required. Beware of the exceptions and blind spots.
- With time, you will likely need to re-train or tweak your model as the trends that it predicts change which will require more data in the long term.
The amount of required training data depends upon a lot of factors. As a rule of thumb, experienced engineers have at least a general idea about the amount of data that will suffice to train your model. You should start listening to them and then get more training data as you go on.

- Get by yourself: using the Wio Terminal with sensors and other devices.
- Open Source: some data science communities like Kaggle.
- Internet: according to your goal, search the dataset your want online.
- Accuracy
- Relevance
- Coverage
- Balance
Accuracy: Accuracy refers to how well the data describes real-world conditions it aims to describe. If you try teaching a computer to recognize a cat, you need to label the cat as "cat" rather than "dog".
Relevance: The data you collect should also be useful for initiatives you plan to use it for. If it is not relevant to your goals, it is not useful for you. If you want to teach a computer to recognize a cat by its picture, you don't need to provide photos of cat's food. It's important to set goals for your data collection so that you know what kind of data to collect.
Coverage: If you try teaching a computer to recognize a cat, you'll need to show thousands of images of cats that differ in size, color, and form to make your model capable of identifying a cat accurately.
Balance: Imbalance is Common.
Most classification data sets do not have equal number of instances in each class but such a little difference does not matter.
What happens to our models when we train on an imbalanced dataset? Our models look at the data and cleverly decides to always predict "Class-1" and achieve high accuracy, 90%.

How to Solve the Imbalance?

Over-sampling (Up Sampling): Increases the number of minority class members in the training set.
Under-sampling (Down Sampling): Reduces the number of majority samples to balance the class distribution.
- Theroy:
- Accelerometer
- TinyML practice

- ML theory (Input)
- Label: Assign classes to the raw data that you have collected.
- Dataset:
- Training set, Validation set and Testing set: the training set is fed into the model, the validation set is used to validate the results to improve the model and the testing set is used to predict.
- Required Data volume: More is better.
- Way to get data: Get by yourself, open sources, Internet.
- Quality of a dataset: Accuracy, relevance, coverage, balance.