Sign-up to CloudOS if you haven't already and join your team workspace. (While you don't have to join a team it is important to have your cloud account linked. Joining your team means that you won't need to do this and can collaborate with colleagues).
Generate and upload reads.csv and rmats_pairs.txt - see instructions regarding contents of these files.
Use Google Cloud SDK shell to upload:
- Put reads.csv and rmats_pairs.txt into a folder (ex Dataset_forCloudOS). -For TCGA, you will use a reads.txt file.
- Open SDK Shell and navigate to master Dataset folder (which contains the "forCloudOS" folder). (Ex -
cd c:\Users\urbanl\Box\Anczukow-lab NGS raw data\Dataset_folder) - To copy the forCloudOS folder to the cloud use
gsutil -m cp -R c:\Users\urbanl\Box\Anczukow-lab NGS raw data\Dataset_folder\Dataset_folder_forCloudOS gs://anczukow-bucket - Make dataset folder on ClouOS. On cloudOS platform, click Data tab on left side. Click green plus sign to make new dataset. Name your dataset with designated Dataset number and name. Click green tab in upper right corner, choose import. Select anczukow-bucket and then select the folder you just uploaded. Using same method, add gtf and star overhangs (located in human/Gencode folder). Note: all necessary files need to be in this dataset folder in order for you to use them in a pipeline run.
If you want to duplicate parameters from an existing job, you can clone that job. To do this, click on the job you wish to clone. Select clone in upper right corner.
If you want to start a new analysis, select new analysis in upper right corner of home page. Select pipeline by choosing TEAM PIPELINES & TOOLS. Choose pipeline TheJacksonLaboratory/splicing-pipelines-nf-April2021.
Refer to usage.md for descriptions of all parameters
Enter all parameters as shown below. [LU BA add note about which parameter is different between cloud and sumner]. There are defaults on CloudOS just like on Sumner, but it is often good to specify each parameter you want.
If analyzing TCGA, GTEX, SRA (SRA Toolkit) or FTP (SRA FTP), you will need to specify the download_from parameter by either passing TCGA, GTEX, SRA or FTP respectively. Each of these inputs have slightly different processes that are run. For example, TCGA will download the bams and perform bamtofastq step. For more information
There is a special parameter --gc_disk_size which is specific to google-cloud executor. Adds disk-space for few aggregative processes. (default: "200 GB" based on 100 samples. Which is 2GB x Number of Samples)
Click Choose instance. Select Cost saving instance from upper left corner. Select 8 CPU and n1-standard-8.
Make sure to increase Added storage if necessary. This is useful for large datasets.
Below is a guide to choosing storage. You may need more if the files are larger.
For one sample to run the first part of the pipeline (having steps - get_tcga_bams, bamtofastq, fastqc, trmmomatic, fastqc_trimmed, star, multiqc) require about 20 GB of results space per sample. So in order to accommodate that you need to specify 20Number of samples in the CloudOS GUI while selecting an instance. (Example 100 samples 20100 = 2000 GB).
Click blue confirm button to confirm your selection.
If you wish to make the job resumable (which is recommended) make sure to check the make job resumable box below your instance selection.
When all parameters and instances have been selected, click Run job in upper right corner. It will take a few minutes to load the job.
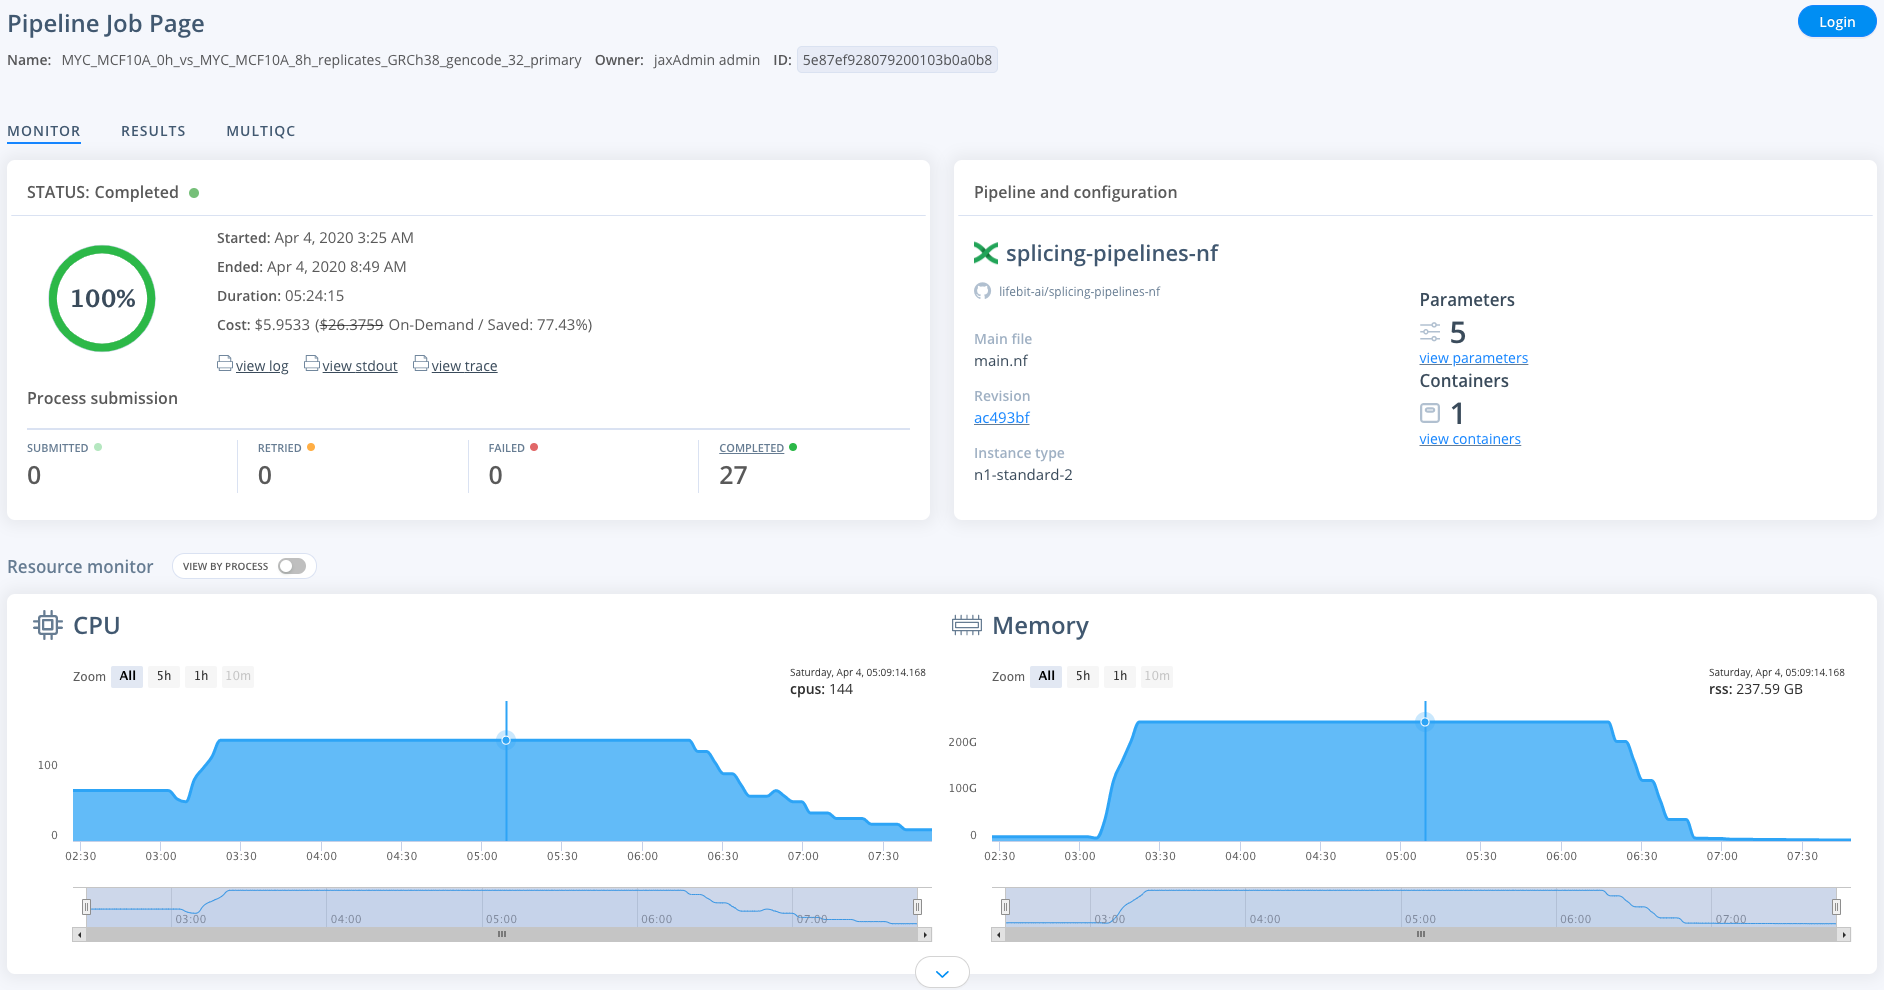
To monitor jobs you can click on the row for any given job. Immediately after running a job its status will be initialising. This normally occurs for ~5mins before you are able to view the progress of the job.
Once on the job monitor page, you can see the progress of the job update in real time. Information such as the resources i.e. memory & CPUs is displayed.
This page is completely sharable, for example, you can view a successfully completed example job here
- Select job you wish to download results for.
- Select
view login Status box. - Scroll over to the right until you see
-w. Copy this path up until/work, which is the path to the work directory. Paste into a text editor. - Get path to results by adding
/results/resultsto path. This will be the path to your results. See below for example: - original path: gs://cloudosinputdata/deploit/teams/5ec2c818d663c5c2c3bd991/users/5ec3dbf417954701035a2b7f/projects/6053bcc029b82f011272c90c/jobs/606dc7955395e200e4596cf0/
- new path: gs://cloudosinputdata/deploit/teams/5ec2c818d663c5c23bd991/users/5ec3dbf417954701035a2b7f/projects/6053bcc029b82f011272c90c/jobs/606dc7955395e200e4596cf0/results/results
Note, if you had to resume your job, the above method will not work sad face. Instead, do the following.
- Select the job you wish to download results for
- Click the results tab above the Status box
- Navigate to a small file such as the MultiQC or b1.txt files.
- Click on the file and the blue download button will light up. Click the download button. This should open the file in a new tab.
- Copy the url for this tab. Paste into Word.
- Delete
https://storage.googleapis.comfrom the beginning of the path - add
gs:/to the beginning of the path. The path should now start withgs://cloudosinputdata/. - Delete everything after
%2Fresults%2Fresults - Click Replace and replace all
%2Fwith/ - The final path is the path to your results. For example see below
- original path: https://storage.googleapis.com/cloudosinputdata/deploit%2Fteams%2F5ec2c818d66c5c2cd3bd991%2Fusers%2F5ec3dbf417954701035a2b7f%2Fprojects%2F6053bcc029b82f011272c90c%2Fjobs%2F606efd8088b32200e432bb67%2Fresults%2Fresults%2FrMATS_out%2Fmeso_MYC_hvl_gencode%2Fb1.txt?GoogleAccessId=cloudos-serviceaccount%40jax-poc-lifebit-01.iam.gserviceaccount.com&Expires=1617998736&Signature=phmDIz9kIdTXTz54mOEpIgoqWt6Nw%2BEgLXS0gaN0tLVr9XC5otALr9AE7CfciiyhuGoygwqW%2B5x%2FJ9m%2BNM9L%2Fj1fvAmtYWGK5uIhfqHcfQT9tawRyrs%2FWJT51o8W28r32KX6fjKvvdqdNgOTeqDQJCkc2TI1FniqX6cR8d92kjOUGJ10hBd5RHc3akC0KJIhkkzXnnViDGwi4ly0iYAqEkCiwEbhQh97NBfjn7%2BNp4OsbzTYGhLooufrl7HZkRWHfxu8tjDGM6cIrXcPxcBJ06ROEh2Ld%2Bld1877YLKsjYCxo4gQiS1F2JxGGFcCKIwwhBpAx337%2B1vXgGSsjDVXYA%3D%3D
- new path: gs://cloudosinputdata/deploit/teams/5ec2c818d663c5c2cd3bd991/users/5ec3dbf47954701035a2b7f/projects/6053bcc029b82f011272c90c/jobs/606efd8088b32200e432bb67/results/results
- Open SDK shell and navigate to the location where you wish to download data. This should be within the NGS Dataset folder.
- List contents of your results folder
gsutil ls path_to_results - Naviate to the file you wish to download
- To download
gsutil -m cp file_to_download .. This will download your file into your current directory.
Import the Pipeline Information on how to run TCGA Information on how to run GTEX