
- Requirements
- Connecting USB-UART adapter
- Partitions
- Backup factory firmware
- Flashing OpenIPC U-Boot
- Flashing OpenIPC kernel
- Flashing OpenIPC rootfs
- WiFi setup
- Settings
- Frequently asked questions
- Rolling back to factory firmware from backup
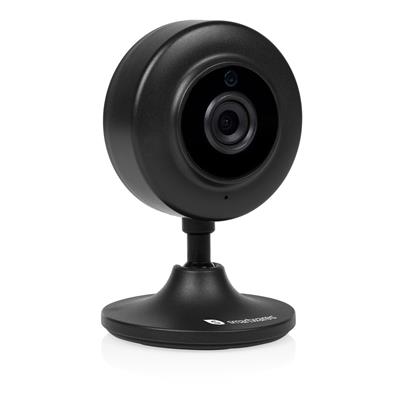
- WiFi IP Camera Smartwares CIP-37210 with SoC HiSilicon 3518EV200 version (not with SoC Ingenic T21). At the moment there are known of the existence of three modifications of the camera with this name.

- Phillips screwdriver

-
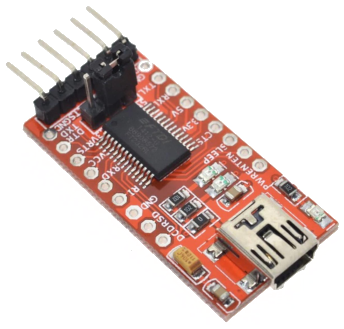
USB-UART adapter and wires.
Don't forget to select 3.3 volts jumper.
We recommend this adapter:
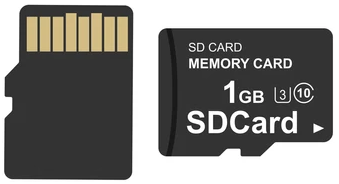
- Working microSD card
- Installed and prepared OpenIPC BURN utility
https://www.youtube.com/playlist?list=PLh0sgk8j8CfsMPq9OraSt5dobTIe8NXmw
Open the camera:
open-cip37210.mp4
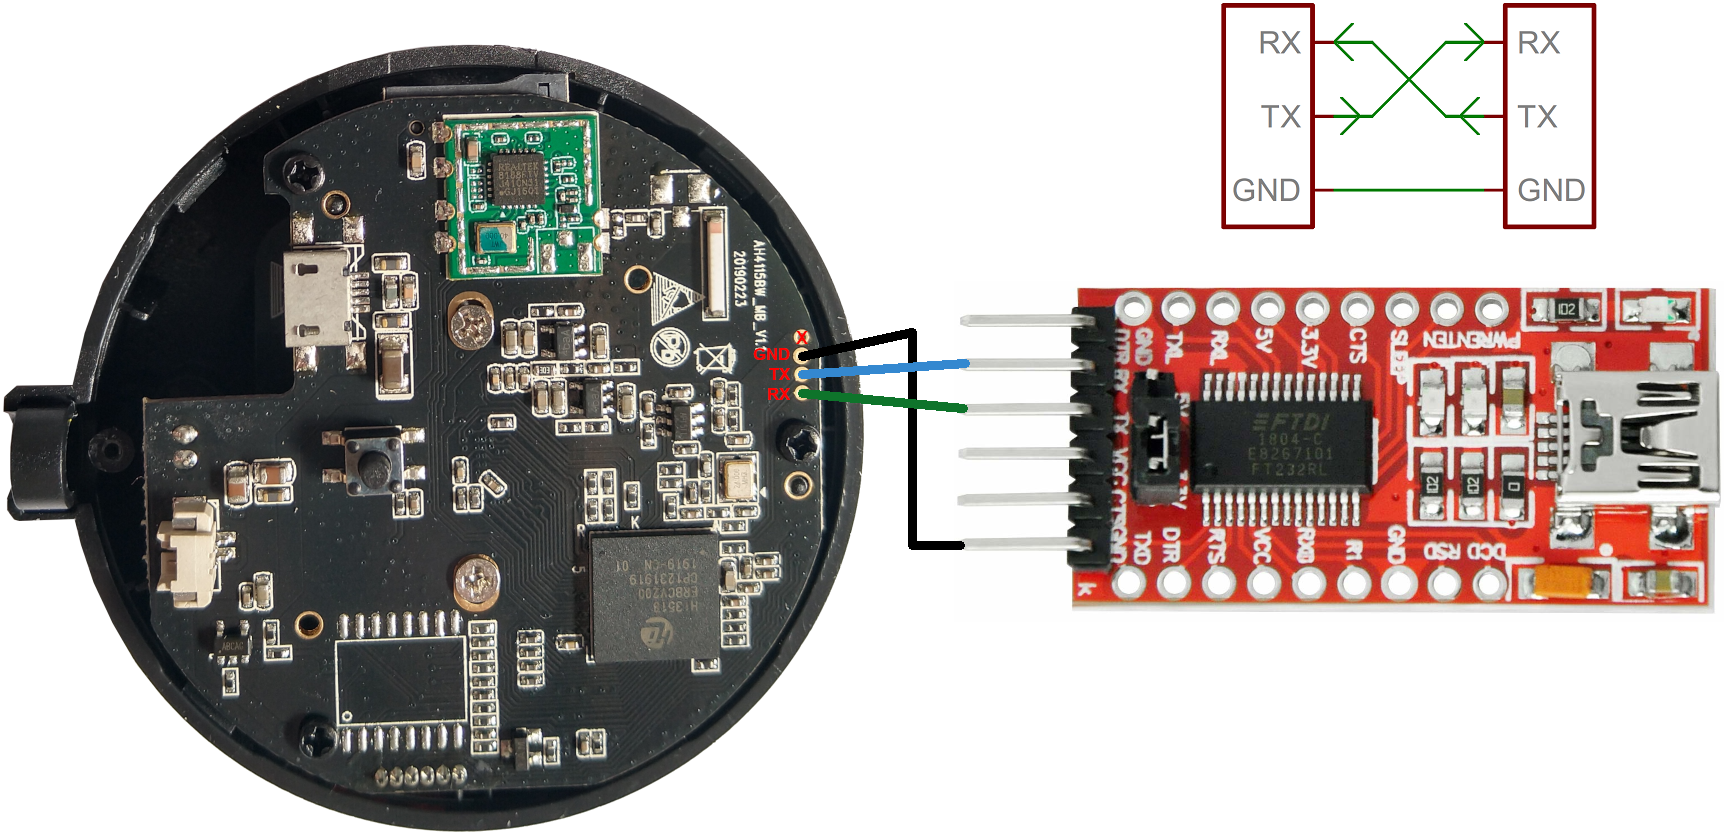
Сonnect the USB-UART adapter to the camera according to the circuit diagram:
wires.mp4
Do not short the wire ends together! Do not short the contacts together!
CIP-37210 16mb SPI flash partitions table for OpenIPC
| MTD | Decimal size mega bytes | Decimal size kilo bytes | Decimal size bytes | Hexadecimal size bytes | Hexadecimal start address | Hexadecimal end address | |
|---|---|---|---|---|---|---|---|
| U-Boot | mtd0 | 0,25 MB | 256 KB | 262144 bytes | 0x40000 | 0x0 | 0x3FFFF |
| U-boot environment | mtd1 | 0,0625 MB | 64 KB | 65536 bytes | 0x10000 | 0x40000 | 0x4FFFF |
| Kernel (uImage) | mtd2 | 2 MB | 2048 KB | 2097152 bytes | 0x200000 | 0x50000 | 0x24FFFF |
| Root file system | mtd3 | 5 MB | 5120 KB | 5242880 bytes | 0x500000 | 0x250000 | 0x74FFFF |
| Rootfs data (overlay) | mtd4 | 8,6875 MB | 8896 KB | 9109504 bytes | 0x8B0000 | 0x750000 | 0xFFFFFF |
| TOTAL | 16 MB | 16384 KB | 16777216 bytes | 0x1000000 |
MTD subsystem (stands for Memory Technology Devices) provides an abstraction layer for raw flash devices. It makes it possible to use the same API when working with different flash types and technologies, e.g. NAND Flash, NOR Flash, etc. NAND and NOR are basic digital logic functions or gates. NAND stands for “Not AND” and “NOR” for “Not OR”.
U-Boot (short for Universal Bootloader) is an open-source boot loader software that is commonly used in embedded systems and devices. It is responsible for initializing the hardware and starting the operating system on the device.
U-Boot environment (often referred to as "env") is a set of variables that are stored in non-volatile memory and used by U-Boot at boot time. These variables contain configuration information, such as the boot device, kernel parameters, and network settings.
The Linux kernel (uImage) is a compressed image of the Linux kernel that contains the necessary components to start the operating system. It includes the kernel code, device drivers, and other essential components. The uImage format includes a header that provides information about the kernel image, such as its size, load address, and entry point. It is used by U-Boot to load the kernel image into memory and start execution. The use of a compressed uImage helps to reduce the size of the kernel image, making it more suitable for embedded systems with limited storage capacity.
The root filesystem is the top-level directory of the filesystem. It must contain all of the files required to boot the Linux system before other filesystems are mounted. It must include all of the required executables and libraries required to boot the remaining filesystems.
Overlay is used to create a read-only root file system that can be overlaid with a read-write file system. This allows the system to boot from a read-only file system, which is more secure and reliable, while still allowing users to make changes and store data in a separate overlay file system.
a) Clear the space on the microSD card for the backup dump
b) Insert the prepared microSD card into the camera
c) Connect the camera to the computer with the USB-UART adapter
d) Read the content of spi flash to SoC RAM with OpenIPC U-Boot uploaded with OpenIPC BURN utility to camera
e) Write the read out spi flash content from SoC RAM to the microSD card
f) Take the microSD card from the camera and insert it into the computer
g) Ignore the format proposal!
h) Read the content of the microSD card to the computer
Warning!
DO NOT IGNORE ANY OF THE STEPS! ALSO IT IS INADMISSIBLE TO HAVE ANY ERRORS DURING EXECUTION OF ACTIONS AND COMMANDS!
-
Download windows
ddutility (allows the flexible copying of data under in a win32 environment) http://www.chrysocome.net/dd direct link http://www.chrysocome.net/downloads/dd-0.6beta3.zip ( or download here) and extract it to appropriate location. -
Prepare microSD card: Connect microSD card to Windows PC. Check the letter of microSD card in windows file explorer.
After next operation all previous information on microSD card will be lost!
Open windows terminal window (cmd) and issue command:
dd if=/dev/zero of=\\.\e: bs=512 count=65536 --progress
This command clear head part of the microSD card with zeros, where e the letter of microSD card in windows file explorer. Where dd - utility itself, if - input file (with zeros), of output file (microSD card), bs - block size (bytes), count - number of blocks.
512*65536=33554432 bytes=32 MegaBytes will be cleared from the begining of microSD.
-
Insert prepared microSD card into camera microSD card slot.
-
Load OpenIPC hi3518ev200 U-Boot with OpenIPC BURN utility into SoC RAM. Videos here.
-
Execute from PuTTY command line (line by line and not all together) :
mw.b 0x82000000 ff 0x1000000
sf probe 0
sf read 0x82000000 0x0 0x1000000
mmc write 0 0x82000000 0x10 0x8000
where:
mw.b 0x82000000 ff 0x1000000 clear a section of SoC RAM 0x1000000 (hex) bytes for a 16MB chip with starting address 0x82000000 with FF
sf probe 0 select serial flash as current device
sf read 0x82000000 0x0 0x1000000 reading whole amount of data from spi flash memory chip into SoC RAM
mmc write 0 0x82000000 0x10 0x8000 save the copied data from SoC RAM to the microSD card. The data will be written directly to the microSD card registers, bypassing the partition table. To avoid conflicts when later accessing the card data from the PC, you must make an offset of 8 kilobytes from the beginning of the card (8 * 1024 = 8192 bytes or 16 blocks of 512 bytes, or 0x10 blocks in hexadecimal representation).
-
Save from microSD card to HDD: Take the microSD card from the camera and insert it into the Windows PC. Ignore the format question after insertion!!! Open windows terminal window (
cmd) and issue command:dd if=\\.\e: of=CIP37210-fullflash.bin bs=512 skip=16 count=32768 --progressThe size of the
CIP37210-fullflash.binfile should be 16777216 bytes = 16 MegaBytes. If not so, repeat from step 2. Save CIP37210-fullflash.bin file to safe place.
To make sure that the dump is correct - it is highly recommended (at your discretion) to perform this procedure at least twice (or better three times). And then compare the copies to each other for changes (e.g. by using the binary file compare program like hexcmp) - there should not be any! Note that in this case the backups must be taken without starting the factory firmware, i.e. two or more times the backup must be performed only from the OpenIPC BURN utility without a single start of the factory firmware! This is very important because otherwise the copies will be different and cannot be compared.
Each dump is unique, because it contains unique camera id and keys. If you flash someone else's dump - it will be a clone, which means that the two devices will not be able to work simultaneously in the application on the phone.
-
Connect the microSD card to the PC and divide it into two partitions. The card can be of any size, but the first partition must not exceed 2GB. Format the first partition of the microSD card as FAT/FAT16 (2GB limit). FAT stands for File Allocation Table.
-
Download
u-boot-hi3518ev200-universal.binand copy this file to the first partition of the microSD card: https://github.com/OpenIPC/firmware/releases/download/latest/u-boot-hi3518ev200-universal.bin -
Insert microSD card in to camera microSD card slot.
-
Connect the camera to the computer with the USB-UART adapter.
-
Insert prepared microSD card (with
u-boot-hi3518ev200-universal.binfile) into camera microSD card slot. If not inserted before powering up the camera then card will not appear even aftermmc rescan. -
Load OpenIPC
u-boot-hi3518ev200-universal.binU-Boot with OpenIPC BURN utility to SoC RAM. Videos here. -
From this step without a backup it will be impossible to restore the factory firmware!
Execute from PuTTY command line in OpenIPC U-boot command line (line by line and not all together):
mw.b 0x82000000 ff 0x1000000
fatls mmc 0
fatload mmc 0 0x82000000 u-boot-hi3518ev200-universal.bin
sf probe 0
sf erase 0x0 0x50000
sf write 0x82000000 0x0 ${filesize}
reset
Where:
mw.b 0x82000000 ff 0x1000000 clear a section of SoC RAM 0x1000000 (hex) bytes for a 16MB chip with starting address 0x82000000 with FF
fatls mmc 0 u-boot-hi3518ev200-universal.bin should appear in output
fatload mmc 0 0x82000000 u-boot-hi3518ev200-universal.bin load u-boot-hi3518ev200-universal.bin file from microSD card to the SoC RAM starting from address 0x82000000
sf probe 0 select serial flash as current device
sf erase 0x0 0x50000 erase 0x50000 bytes from 0x0 address on the current selected serial flash
sf write 0x82000000 0x0 ${filesize} write loaded file from 0x0 address till loaded file size to the current selected serial flash starting from address 0x82000000 in SoC RAM
reset reboot camera
No errors should appear!
If not so, repeat from step 6.
After this step the camera should boot from the spi flash with OpenIPC U-Boot.
To enter OpenIPC U-boot console hit any key during message appear.
Issue command:
run setnor16m
it will setup partion for 16 megabyte spi flash.
Camera will reboot immediatly.
To enter OpenIPC U-boot console again hit any key during message appear.
-
Download openipc.hi3518ev200-nor-lite.tgz file from:
https://github.com/OpenIPC/firmware/releases/download/latest/openipc.hi3518ev200-nor-lite.tgz
extract archive and save uImage.hi3518ev200 (kernel) and rootfs.squashfs.hi3518ev200 (root file system) files to the first partition of the microSD card.
-
Insert microSD card into camera microSD card slot.
-
Power up your camera. From this moment you should be able to boot from the spi flash OpenIPC U-Boot (without BURN utility). If not so, you should correctly re/flash OpenIPC U-Boot to the spi flash (U-boot step). To enter OpenIPC U-boot console hit any key during message appear.
-
Execute from OpenIPC U-boot command line booted from the spi flash (line by line and not all together):
mw.b 0x82000000 ff 0x1000000
fatls mmc 0
fatload mmc 0 0x82000000 uImage.hi3518ev200
sf probe 0
sf erase 0x50000 0x200000
sf write 0x82000000 0x50000 ${filesize}
Where:
mw.b 0x82000000 ff 0x1000000 clear a section of SoC RAM 0x1000000 (hex) bytes for a 16MB chip with starting address 0x82000000 with FF
fatls mmc 0 u-boot-hi3518ev200-universal.bin should appear in output
fatload mmc 0 0x82000000 uImage.hi3518ev200 load uImage.hi3518ev200 file from microSD card to the SoC RAM starting from address 0x82000000
sf probe 0 select serial flash as current device
sf erase 0x50000 0x200000 erase 0x200000 bytes from 0x50000 address on the current selected serial flash
sf write 0x82000000 0x50000 ${filesize} write loaded file from 0x50000 address till loaded file size to the current selected serial flash starting from address 0x82000000 in SoC RAM
No errors should appear!
If not so, repeat from step 3.
-
If you finish previous step and don't do anything else, then you can continue from step 6. If for some reason you want to continue from powering up stage, then:
-
You must have a properly formatted microSD card (in the U-boot step)
-
Download
openipc.hi3518ev200-nor-lite.tgzfile from:https://github.com/OpenIPC/firmware/releases/download/latest/openipc.hi3518ev200-nor-lite.tgz
extract archive and save rootfs.squashfs.hi3518ev200 (root file system) file to the first partition of the microSD card.
-
Insert microSD card into camera microSD card slot.
-
Power up your camera. At this moment you should be able to boot from the spi flash OpenIPC U-Boot (without BURN utility). If not so, you should correctly re/flash OpenIPC U-Boot to the spi flash (U-boot step). To enter OpenIPC U-boot console hit any key during message appear.
-
Execute from OpenIPC U-boot command line booted from the spi flash (line by line and not all together):
mw.b 0x82000000 ff 0x1000000
fatls mmc 0
fatload mmc 0 0x82000000 rootfs.squashfs.hi3518ev200
sf probe 0
sf erase 0x250000 0x500000
sf write 0x82000000 0x250000 ${filesize}
reset
Where:
mw.b 0x82000000 ff 0x1000000 clear a section of SoC RAM 0x1000000 (hex) bytes for a 16MB chip with starting address 0x82000000 with FF
fatls mmc 0 rootfs.squashfs.hi3518ev200 should appear in output
fatload mmc 0 0x82000000 rootfs.squashfs.hi3518ev200 load rootfs.squashfs.hi3518ev200 file from microSD card to the SoC RAM starting from address 0x82000000
sf probe 0 select serial flash as current device
sf erase 0x250000 0x500000 erase 0x500000 bytes from 0x250000 address on the current selected serial flash
sf write 0x82000000 0x250000 ${filesize} write loaded file from 0x250000 address till loaded file size to the current selected serial flash starting from address 0x82000000 in SoC RAM
reset reboot camera
No errors should appear!
If not so, repeat from step 2.
Manual setup
- Download, extract and copy WiFi
rtl8188fu.komodule to microSD card.
-
Copy WiFi
rtl8188fu.komodule to camera/lib/modules/4.9.37/extra/rtl8188fu.kovia microSD card (camera should be connected to PC via USB-UART). -
Download, extract and copy WiFi
rtl8188fufw.binfirmware file to microSD card.
-
Copy WiFi
rtl8188fufw.binfirmware file to camera/lib/firmware/rtlwifi/rtl8188fufw.binvia microSD card (camera should be connected to PC via USB-UART). -
Edit
/etc/network/interfaceson camera:
# Interfaces
auto lo
iface lo inet loopback
auto wlan0
iface wlan0 inet dhcp
pre-up echo 3 > /sys/class/gpio/export
pre-up echo out > /sys/class/gpio/gpio3/direction
pre-up echo 1 > /sys/class/gpio/gpio3/value
pre-up modprobe mac80211
pre-up sleep 1
pre-up insmod /lib/modules/4.9.37/extra/rtl8188fu.ko
pre-up sleep 1
pre-up wpa_passphrase "OpenIPC_NFS" "project2021" >/tmp/wpa_supplicant.conf
pre-up sed -i '2i \\tscan_ssid=1' /tmp/wpa_supplicant.conf
pre-up ifconfig wlan0 up
pre-up wpa_supplicant -B -Dnl80211 -iwlan0 -c/tmp/wpa_supplicant.conf
pre-up sleep 3
post-down killall -q wpa_supplicant
In this example default camera WiFi SSID for connection to router as client (not as access point): OpenIPC_NFS password: project2021
You need to change values to yours accordingly.
For this purposes you can use vi editor.
Short hints:
After you have opened file /etc/network/interfaces via vi editor (vi /etc/network/interfaces) use i character on keyboard to switch to 'edit' mode
then using arrows on keyboard to move the cursor to values names
make changes
to save your changes to the file press : -> w -> q -> enter
if you don't want to save changes and just want to exit vi editor then press : -> q -> ! -> enter
-
Reboot
-
Wait until camera boot and check on your router web page connected camera and write somewhere obtained camera's IP address.
Auto setup
-
Download, extract and copy autoconfig.zip folder to the root of microSD card.
-
Edit
autoconfig/etc/network/interfacesfile on microSD card (don’t forget save file in UTF8 encoding , for example use Notepad++):
# Interfaces
auto lo
iface lo inet loopback
auto wlan0
iface wlan0 inet dhcp
pre-up echo 3 > /sys/class/gpio/export
pre-up echo out > /sys/class/gpio/gpio3/direction
pre-up echo 1 > /sys/class/gpio/gpio3/value
pre-up modprobe mac80211
pre-up sleep 1
pre-up insmod /lib/modules/4.9.37/extra/rtl8188fu.ko
pre-up sleep 1
pre-up wpa_passphrase "OpenIPC_NFS" "project2021" >/tmp/wpa_supplicant.conf
pre-up sed -i '2i \\tscan_ssid=1' /tmp/wpa_supplicant.conf
pre-up ifconfig wlan0 up
pre-up wpa_supplicant -B -Dnl80211 -iwlan0 -c/tmp/wpa_supplicant.conf
pre-up sleep 3
post-down killall -q wpa_supplicant
In this example default camera WiFi SSID for connection to router as client (not as access point): OpenIPC_NFS password: project2021
You need to change values to yours accordingly.
-
Turn off the camera.
-
Insert prepared with files microSD card into the camera.
-
Power on a camera.
-
Wait until camera boot and check on your router web page connected camera and write somewhere obtained camera's IP address.
-
Pull out microSD card.
For the most stable operation of the device it is recommended to disable additional services: HLS, OSD, Motion and RTSP sub-stream.
Majestic configuration file sample /etc/majestic.yaml:
system:
  buffer: 1024
  staticDir: /var/www/majestic
isp:
  blkCnt: 5
image:
  mirror: false
  flip: false
  rotate: none
  contrast: 50
  hue: 50
  saturation: 50
  luminance: 50
osd:
  enabled: false
  template: "OpenIPC v.2.3 | %F %T %Z"
nightMode:
  enabled: true
  irSensorPin: 62
  irSensorPinInvert: true
  irCutPin1: 64
  backlightPin: 63
  dncDelay: 30
  nightAPI: true
records:
  enabled: false
  path: /mnt/mmcblk0p1/%Y/%m/%d/%H/%M.mp4
  maxUsage: 95
video0:
  enabled: true
  fps: 20
  codec: h264
video1:
  enabled: false
jpeg:
  enabled: true
mjpeg:
  size: 640x360
  fps: 5
  bitrate: 2048
audio:
  enabled: true
  volume: 70
  srate: 8000
  codec: alaw
  outputEnabled: true
  speakerPin: 51
  speakerPinInvert: true
rtsp:
  enabled: true
  port: 554
hls:
  enabled: false
youtube:
  enabled: false
motionDetect:
  enabled: false
  visualize: true
  debug: true
ipeye:
  enabled: false
netip:
  enabled: true
  user: admin
  password: 6V0Y4HLF
  port: 34567
  snapshots: true
  ignoreSetTime: false
onvif:
  enabled: true
watchdog:
  enabled: true
  timeout: 30
| GPIO | Purpose |
|---|---|
| 62 | irSensorPin |
| 64 | irCutPin1 |
| 63 | backlightPin |
| 51 | speakerPin |
| 2 | Reset Button |
| 3 | WiFi power |
| 0 | Red LED |
| 1 | White LED |
Restore the settings
It is enough to write the autoconfig folder to the root of the microSD card, insert it in the turned off camera microSD slot and turn on the power.
How to know what IP address of the camera and how to access it?
If the configuration file contains the correct Wi-Fi interface settings (SSID and key of your Access Point), you can find the IP address of the camera on your router in the list of connected devices marked as "OpenIPC". The control interface of the camera is available in the browser on port 85 and the SSH access is available on the standard port 22 using the root login, without a password the first time you connect.
How can I upgrade the firmware to the latest version via SSH?
Log in to the camera via SSH with the program PuTTY (login root, without password, the first connection or with the password you set in the WEB, port 22) and run the command:
sysupgrade -k -r
If you have internet, the camera will automatically connect to GitHub and download and install the latest updates.
How do I update the firmware to the latest version through the WEB?
Use your web browser to go to the camera with the IP address of the camera and the connection port 85, for example like this: http://192.168.1.10:85
Enter the default login and password (login admin, password 12345).
After logging in to the camera, set a new password (don't forget to write it down!).
In the Updates/Firmware section, follow the steps given in the prompts.
DO NOT CLOSE, REFRESH, OR NAVIGATE AWAY FROM THIS PAGE UNTIL THE PROCESS IS FINISHED!
How to flip image upside down?
- You need to switch the ISP to online mode, because this operation consumes too much memory.
/usr/bin/load_hisilicon

-b_arg_online=1
+b_arg_online=0
/etc/majestic.yaml

 image:
-  mirror: false
-  flip: false
+  mirror: true
+  flip: true
- Reboot the camera
What happens if you press and hold the reset button from the moment the camera is turned on until the image appears on the OpenIPC firmware?
Nothing.
Nothing will also happen if you press the reset button after the camera has been loaded.
-
Connect the microSD card to the PC and divide it into two partitions. The card can be of any size, but the first partition must not exceed 2GB. Format the first partition of the microSD card as FAT/FAT16 (2GB limit). FAT stands for File Allocation Table.
-
Copy fullflash file (
fullflash-CIP37210.bin) to microSD card. It is assumed that you have made a backup as indicated in the beginning. -
Connect camera to PC via USB-UART.
-
Insert microSD card with
fullflash-CIP37210.binfile into camera microSD card slot. -
Power on the camera.
-
Enter OpenIPC U-boot console by hitting
Ctrl+Cduring message appear. -
Execute from OpenIPC U-boot command line (line by line and not all together):
mw.b 0x82000000 ff 0x1000000
fatls mmc 0
fatload mmc 0 0x82000000 fullflash-CIP37210.bin
sf probe 0
sf erase 0x0 0x1000000
sf write 0x82000000 0x0 ${filesize}
reset
Where:
mw.b 0x82000000 ff 0x1000000 clear a section of SoC RAM 0x1000000 (hex) bytes for a 16MB chip with starting address 0x82000000 with FF
fatls mmc 0 fullflash-CIP37210.bin should appear in output
fatload mmc 0 0x82000000 fullflash-CIP37210.bin load fullflash-CIP37210.bin file from microSD card to the SoC RAM starting from address 0x82000000
sf probe 0 select serial flash as current device
sf erase 0x0 0x1000000 erase 0x1000000 bytes from 0x0 address on the current selected serial flash (whole 16MB spi flash)
sf write 0x82000000 0x0 ${filesize} write loaded file from 0x0 address till loaded file size to the current selected serial flash starting from address 0x82000000 in SoC RAM
reset reboot camera
No errors should appear!
If not so, repeat from step 6 or you can do it from OpenIPC BURN utility same way (in this case backup fullflash-CIP37210.bin file should already exist on microSD card and microSD card should be inserted into camera microSD card slot before powering up; if microSD card not inserted into camera microSD card slot before powering up the camera then card will not appear even after mmc rescan).
After this step the camera should boot from factory firmware.
Each dump is unique, because it contains unique camera id and keys. If you flash someone else's dump - it will be a clone, which means that the two devices will not be able to work simultaneously in the application on the phone.
More information about the project is available in our website and on the wiki.
