
- Introduction to vAMPirus
- vAMPirus Analysis Repository -- Zenodo Community
- New in vAMPirus version 2.1.0
- Getting started with vAMPirus
- Things to know before running vAMPirus
- Running the vAMPirus workflow
- Breaking it down: The vAMPirus workflow
- Read processing
- Amplicon Sequence Variants, AminoTypes and Clustering
- Sequence alignment
- Minimum Entropy Decomposition (oligotyping)
- Phylogeny-based clustering of ASV or AminoType sequences with TreeCluster
- Counts tables and percent ID matrices
- Phylogenetic analysis and model testing
- Taxonomy Inference
- EMBOSS Analyses
- Statistical tests
- vAMPirus output
- Usage examples
Viruses are the most abundant biological entities on the planet and with advances in next-generation sequencing technologies, there has been significant effort in deciphering the global virome and its impact in nature (Suttle 2007; Breitbart 2019). A common method for studying viruses in the lab or environment is amplicon sequencing, an economic and effective approach for investigating virus diversity and community dynamics. The highly targeted nature of amplicon sequencing allows in-depth characterization of genetic variants within a specific taxonomic grouping facilitating both virus discovery and screening within samples. Although, the high volume of amplicon data produced combined with the highly variable nature of virus evolution across different genes and virus-types can make it difficult to scale and standardize analytical approaches. Here we present vAMPirus (https://github.com/Aveglia/vAMPirus.git), an automated and easy-to-use virus amplicon sequencing analysis program that is integrated with the Nextflow workflow manager facilitating easy scalability and standardization of analyses.
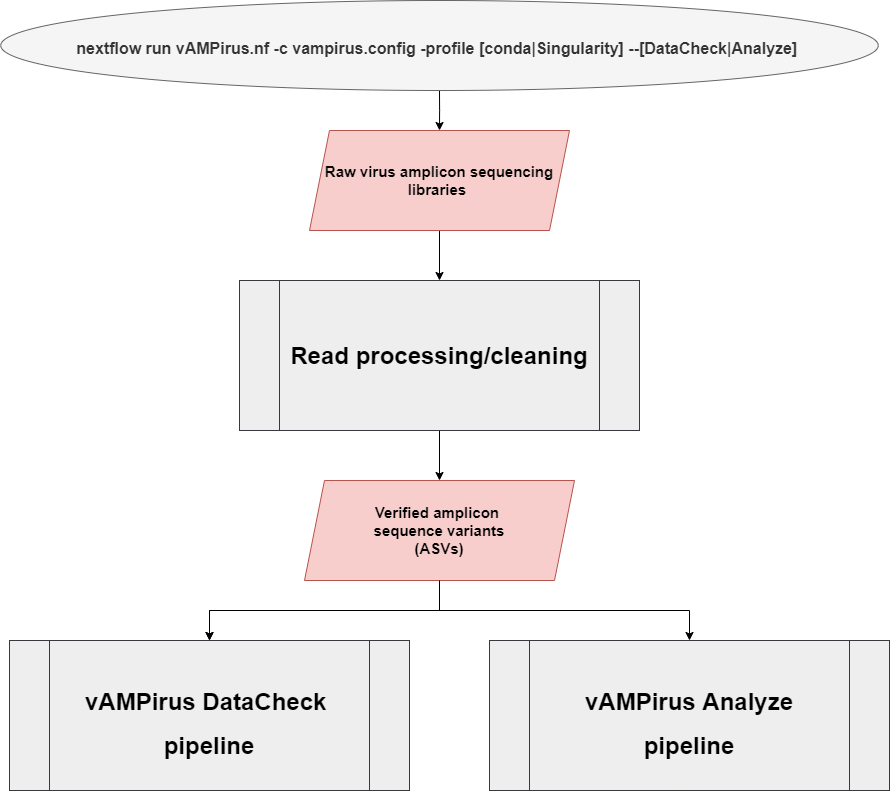
The vAMPirus program contains two different pipelines:
- DataCheck pipeline: provides the user an interactive html report file containing information regarding sequencing success per sample as well as a preliminary look into the clustering behavior of the data which can be leveraged by the user to inform analyses
- Analyze pipeline: a comprehensive analysis of the provided data producing a wide range of results and outputs which includes an interactive report with figures and statistics. Red line represents path for nucleotide sequences, blue represents path for protein sequences.
If you have a feature request or any feedback/questions, feel free to email vAMPirusHelp@gmail.com or you can open an Issue on GitHub.
"Reproducibility and research integrity are essential tenets of every scientific study and discovery. They serve as proof that an established and documented work can be verified, repeated, and reproduced.." - Diaba-Nuhoho and Amponsah-Offeh 2021 (https://tinyurl.com/279recr3)
To promote and simplify the sharing and reproduction of vAMPirus analyses we have created a Zenodo Community 'vAMPirus Analysis Repository' (zenodo.org/communities/vampirusrepo) that is meant to be a central location for all vAMPirus analyses described in a published report/preprint/manuscript. Here investigators will archive and share the non-read files in a compressed folder required to reproduce their virus amplicon analyses.
For the benefit of the field and science as a whole, we recommend uploading all non-read files needed to reproduce your analysis.
Your compressed (.zip or tar.gz) file should include at minimum:
1. The vAMPirus configuration file used for your analysis
2. A readme.txt that includes a short description of each file included and general instructions for obtaining data and running the analysis
You should also include any other files you used for the analysis which could be your metadata file and any databases used for taxonomy or ASV filtering.
As mentioned above, the readme.txt file that you include in the compressed file should include a description of your files and some general instructions for reproducing your analysis. Here is the template readme.txt (can be found in the vAMPirus repository) you should use when preparing your upload:
In this directory you will find all necessary non-read files used to run the analyses and generate the results described in:
Associated work: CITATION OF WORK HERE
This file includes:
1. file1 -> this is the metadata/database file(s) used for the vAMPirus analysis
2. vAMPirus.config -> the configuration file used for the vAMPirus analysis
... Any other files included
To run the same analysis using vAMPirus v1.0.1:
1. INSTRUCTIONS FOR OBTAINING SEQUENCING DATA HERE
2. Edit configurarion file with paths to any metadata files/databases
3. Run vAMPirus with the following launch command:

	nextflow run vAMPirus.nf -c vAMPirus.config -profile "profile" --Analyze
Once you have this together, you place all your files into a directory and compress it prior to uploading to Zenodo
To upload your file to the vAMPirus Analysis Repository you will need a Zenodo account, which is easy and quick to set up. Once you have that, you are good to move forward.
You can review previous submissions here: https://zenodo.org/communities/vampirusrepo/
You can either hit the "Upload" button there or you can follow this link to upload your file to the community: https://zenodo.org/deposit/new?c=vampirusrepo
Once you get to the upload portal here are some general instructions/things to consider/rules for information to include:
-
The first step is to upload your compressed file. You can drag and drop your file or "Choose file" to upload, then make sure you then click "Start upload" in the top right section.
-
Next, just make sure that the community you are uploading to is the correct one (you should see vAMPirus Analysis Repository with the vAMPirus logo)
-
Next, edit the basic information, here are the most important for you upload, but please add as much information you want/feel is appropriate: Title -> This should be "vAMPirus Analysy - TITLE OF YOUR STUDY" Authors -> this should include at minimum the first author, submitting author, and final author. You can include all authors if you would like. Description -> In this area you should include a brief description of what the upload is and what study it is associated with. Version -> on the first submission, you can put this as "1.0.0". If there are changes in the analysis after revisions you can update the original upload.
And that is basically it, you can add any other info you feel appropriate!
Let us know if you have any questions, thank you for sharing your methods and contributing your science to the community!!
-
Supports single-end read libraries as input.
-
Changed to have process-specific Conda evironments and Singularity/Docker containers (should help with stability).
-
Added output of R-based analyses performed during Report generation.
-
Use of Alignment Ensemble approach from musclev5 for high confidence sequence alignments
-
Added the use of Transfer Bootstrap Exptecation (TBE) in IQTREE analyses.
-
Reduced redundancy of processes and the volume of generated result files per full run (Example - read processing only done once if running DataCheck then Analyze).
-
Added further taxonomic classification of sequences using the RVDB annotation database and/or NCBI taxonomy files (see manual for more info).
-
Replaced the used of MAFFT with muscle v5 (Edgar 2021) for higher confidence virus gene alignments (see https://www.biorxiv.org/content/10.1101/2021.06.20.449169v1.full).
-
Added multiple primer pair removal to deal with multiplexed amplicon libraries.
-
ASV filtering - you can now provide a "filter" and "keep" database to remove certain sequences from the analysis
-
(EXPERIMENTAL) Added Minimum Entropy Decomposition analysis using the oligotyping program produced by the Meren Lab. This allows for sequence clustering based on sequence positions of interest (biologically meaningful) or top positions with the highest Shannon's Entropy (read more here: https://merenlab.org/software/oligotyping/ ; and below).
-
Phylogeny-based clustering ASV or AminoType sequences with TreeCluster (https://github.com/niemasd/TreeCluster; https://journals.plos.org/plosone/article?id=10.1371/journal.pone.0221068)
-
Color nodes on phylogenetic trees based on Taxonomy or Minimum Entropy Decomposition results
-
PCoA plots added to Analyze report if NMDS does not converge.
If you do use vAMPirus for your analyses, please cite the following ->
-
vAMPirus - Alex Veglia, Ramón E. Rivera-Vicéns, Carsten Grupstra, et al. vAMPirus: A versatile amplicon processing and analysis program for studying viruses. Authorea. February 09, 2023. DOI: 10.22541/au.167592965.50010700/v1
-
DIAMOND - Buchfink B, Xie C, Huson DH. (2015) Fast and sensitive protein alignment using DIAMOND. Nat Methods. 12(1):59-60. doi:10.1038/nmeth.3176
-
FastQC - Andrews, S. (2010). FastQC: A Quality Control Tool for High Throughput Sequence Data [Online]. Available online at: http://www.bioinformatics.babraham.ac.uk/projects/fastqc/
-
fastp - Chen, S., Zhou, Y., Chen, Y., & Gu, J. (2018). fastp: an ultra-fast all-in-one FASTQ preprocessor. Bioinformatics, 34(17), i884-i890.
-
Clustal Omega - Sievers, F., Wilm, A., Dineen, D., Gibson, T.J., Karplus, K., Li, W., Lopez, R., McWilliam, H., Remmert, M., Söding, J. and Thompson, J.D., 2011. Fast, scalable generation of high‐quality protein multiple sequence alignments using Clustal Omega. Molecular systems biology, 7(1), p.539.
-
IQ-TREE - Minh, B. Q., Schmidt, H. A., Chernomor, O., Schrempf, D., Woodhams, M. D., Von Haeseler, A., & Lanfear, R. (2020). IQ-TREE 2: New models and efficient methods for phylogenetic inference in the genomic era. Molecular Biology and Evolution, 37(5), 1530-1534.
-
ModelTest-NG - Darriba, D., Posada, D., Kozlov, A. M., Stamatakis, A., Morel, B., & Flouri, T. (2020). ModelTest-NG: a new and scalable tool for the selection of DNA and protein evolutionary models. Molecular biology and evolution, 37(1), 291-294.
-
muscle v5 - R.C. Edgar (2021) "MUSCLE v5 enables improved estimates of phylogenetic tree confidence by ensemble bootstrapping" https://www.biorxiv.org/content/10.1101/2021.06.20.449169v1.full.pdf
-
vsearch - Rognes, T., Flouri, T., Nichols, B., Quince, C., & Mahé, F. (2016). VSEARCH: a versatile open source tool for metagenomics. PeerJ, 4, e2584.
-
BBMap - Bushnell, B. (2014). BBTools software package. URL http://sourceforge. net/projects/bbmap.
-
trimAl - Capella-Gutiérrez, S., Silla-Martínez, J. M., & Gabaldón, T. (2009). trimAl: a tool for automated alignment trimming in large-scale phylogenetic analyses. Bioinformatics, 25(15), 1972-1973.
-
CD-HIT - Fu, L., Niu, B., Zhu, Z., Wu, S., & Li, W. (2012). CD-HIT: accelerated for clustering the next-generation sequencing data. Bioinformatics, 28(23), 3150-3152.
-
EMBOSS - Rice, P., Longden, I., & Bleasby, A. (2000). EMBOSS: the European molecular biology open software suite.
-
seqtk - Li, H. (2012). seqtk Toolkit for processing sequences in FASTA/Q formats. GitHub, 767, 69.
-
UNOISE algorithm - R.C. Edgar (2016). UNOISE2: improved error-correction for Illumina 16S and ITS amplicon sequencing, https://doi.org/10.1101/081257
-
Oligotyping - A. Murat Eren, Gary G. Borisy, Susan M. Huse, Jessica L. Mark Welch (2014). Oligotyping analysis of the human oral microbiome. Proceedings of the National Academy of Sciences Jul 2014, 111 (28) E2875-E2884; DOI: 10.1073/pnas.1409644111
-
Balaban M, Moshiri N, Mai U, Jia X, Mirarab S (2019). "TreeCluster: Clustering biological sequences using phylogenetic trees." PLoS ONE. 14(8):e0221068. doi:10.1371/journal.pone.0221068
-
Wernersson R. Virtual Ribosome--a comprehensive DNA translation tool with support for integration of sequence feature annotation. Nucleic Acids Res. 2006 Jul 1;34(Web Server issue):W385-8. doi: 10.1093/nar/gkl252. PMID: 16845033; PMCID: PMC1538826.
-
Clone vAMPirus from github
-
Before launching the vAMPirus.nf, be sure to run the vampirus_startup.sh script to install dependencies and/or databases (NOTE: You will need to have the xz program installed before running startup script when downloading the RVDB database)
-
Test the vAMPirus installation with the provided test dataset (if you have ran the start up script, you can see EXAMPLE_COMMANDS.txt in the vAMPirus directory for test commands and other examples)
-
Edit parameters in vampirus.config file
-
Launch the DataCheck pipeline to get summary information about your dataset (e.g. sequencing success, read quality information, clustering behavior of ASV or AminoTypes)
-
Change any parameters in vampirus.config file that might aid your analysis (e.g. clustering ID, maximum merged read length, Shannon entropy analysis results)
-
Launch the Analyze pipeline to perform a comprehensive analysis with your dataset
-
Explore results directories and produced final reports
vAMPirus has been set up and tested on Windows 10 using Ubuntu Sandbox (https://wiki.ubuntu.com/WSL) which is a new feature of Windows 10 - See Windows Subsystem for Linux -> https://docs.microsoft.com/en-us/windows/wsl/about
All you will need to do is set up the subsystem with whatever flavor of Linux you favor and then you can follow the directions for installation and running as normal.
Search for Linux in the Microsoft store -> https://www.microsoft.com/en-us/search?q=linux
It should be noted that vAMPirus has been mainly tested on Centos7/8.
Here are some brief instructions for setting up Ubuntu 20.04 LTS on Windows 10 sourced from https://ubuntu.com/tutorials/ubuntu-on-windows#1-overview
NOTE=> if you have an anti-virus program installed, it might block the installation of Nextflow/Conda, you will just need to allow.
To run the Ubuntu WSL on your Windows 10 computer, you first need to enable the WSL features.
Open command prompt as Administrator by:
Searching "command" in the Cortana search bar -> "Command Prompt" should show up, right click on it -> click "Run as administrator"
Now you should have a command prompt window open.
First enable WSL 1 by executing ->
dism.exe /online /enable-feature /featurename:Microsoft-Windows-Subsystem-Linux /all /norestart
Next enable WSL 2 by executing ->
dism.exe /online /enable-feature /featurename:VirtualMachinePlatform /all /norestart
Then you will have to restart your computer and come back to this point ---
After you restart your computer, you can now go to the Microsoft Store app on your laptop and download the Ubuntu app -> https://www.microsoft.com/en-us/p/ubuntu/9nblggh4msv6#activetab=pivot:overviewtab
The first time you open the Ubuntu terminal you will be asked to set up your Unix account.
Once you have your account set up, you can now move on to executing the following commands (you will be asked for your password when using sudo):
First we will update the packages list for apt-get -
sudo apt -y update && sudo apt -y upgrade
Second we will install development tools for Ubuntu -
sudo apt -y install build-essential && sudo apt install autoconf automake gdb git libffi-dev zlib1g-dev libssl-dev
Next we will install Java to be able to run Nextflow -
sudo apt -y install openjdk-8-jre
Now you have everything you need to get started as described in the * Installing vAMPirus section. However, here are some quick commands to install and set up Miniconda.
NOTE=> Windows WSL currently can not run Singularity so you will have to install and run vAMPirus with Conda.
NOTE=> You could also run the vAMPirus startup script to install Conda for your system.
Download the Miniconda3 installer ->
wget https://repo.anaconda.com/miniconda/Miniconda3-latest-Linux-x86_64.sh --no-check-certificate
Now we can launch the installer with ->
bash Miniconda3-latest-Linux-x86_64.sh
And you can then follow the on-screen instructions for installation and then you will likely need to close then re-open your Ubuntu terminal.
You can check/confirm you have conda ready to go ->
conda init
Once you have your Conda ready, you can execute the vAMPirus startup script to install Nextflow and build the vAMPirus conda environment.
If you plan to run vAMPirus on a Mac computer, it is recommended that you set up a virtual environment and use Singularity with the vAMPirus Docker image to run your analyses.
You can try to run directly on your system, but there may be errors caused by differences between Apple and GNU versions of tools like "sort".
vAMPirus was developed on a Centos7/8 operating system so we will go through how to set up a Centos7 Vagrant virtual environment with Virtual Box.
A few steps are a little long, but this is a one time process if done successfully.
There are other ways to do this so if you are more comfortable creating a virtual environment another way, please do so.
Let's first install Homebrew for your system, if you know you have it already and you've checked its not a "shallow clone" of Homebrew, you can skip this.
If you are unsure, just run this:
ruby -e "$(curl -fsSL https://github.com/raw/Homebrew/install/master/install)"
Just a heads up, there might be a message once installation has completed saying that shallow clone of Homebrew was installed.
In this situation before running the following commands be sure to execute the git command provided by Homebrew in this message to complete the full Homebrew installation (this step might take a while).
Once done with the full installation, execute:
brew doctor && brew update
(Information from https://treehouse.github.io/installation-guides/mac/homebrew)
Now we should be good to use Homebrew to install Vagrant and VirtualBox to set up the VM.
To learn more about Vagrant, visit their website - https://www.vagrantup.com/intro also look here http://sourabhbajaj.com/mac-setup/Vagrant/README.html
Be sure to keep an eye out for times that Brew is asking for your password to give permission to Vagrant to install completely
First install cask:
brew install cask
Then vagrant:
brew install vagrant
vagrant-manager:
brew install vagrant-manager
Next, we will need to install Vagrant scp plugin so you can transfer files back and forth from your host computer to the virtual machine you will create:
vagrant plugin install vagrant-scp
Virtual Box (WILL CAUSE ERROR IF ORACLE NOT GIVEN PERMISSION TO INSTALL DEPENDENCIES):
brew install virtualbox
NOTE=> In this part of the setup, you might get an error saying Oracle was denied permission to install programs. You will need to go to System Preferences->Security and Privacy->General and allow Oracle permission to download programs and then rerun the above command.
Alright, if you notice no errors during installation, you should be good to go and create the Centos7 environment
See https://gist.github.com/jakebrinkmann/4ae0a59bf6f3b0b4929499d2ab832fbd and http://sourabhbajaj.com/mac-setup/Vagrant/README.html to provide better context to commands below.
Let's make a directory for the Vagrant environment:
mkdir centos7_vampirus
Let's move into the new directory:
cd ./centos7_vampirus
To build the Centos7 virtual machine, Vagrant will need a configuration file.
We will make our own that looks like this:
  Vagrant.configure("2") do |config|

    config.vm.box = "centos/7"
    config.vm.provider "virtualbox" do |vb|
       vb.cpus = CPUSforVM
       vb.memory = MBmemoryforVM
    end
    config.vm.provision "shell", inline: <<-SHELL
       yum -y update
       yum -y group install "Development Tools"
       yum -y install wget
       yum -y install libarchive-devel
       yum -y install squashfs-tools
       yum -y install java-11-openjdk-devel
       yum -y install java-11-openjdk
       yum -y install epel-release
       yum -y install htop
       yum -y install nano
       yum -y install xz
       git clone https://github.com/Aveglia/vAMPirus.git
       yum -y install singularity
          SHELL
  end
You can copy the block of code above and paste it into a file named Vagrantfile within the centos7_vampirus directory in your new virtual machine:
nano -l Vagrantfile
Paste the block of code from above in this new file opened on your terminal window and then edit the lines with "vb.memory" and "vb.cpus" with the amount of resources you would the VM to have access to, then save the file.
To see how many CPUs and memory your computer has, just go to About this Mac-> System report and there should be the details needed to decide how much to give your VM.
So, for example, if you have a computer with 4 CPUs and 6 GB of memory and you want to give your virtual machine access to 3 CPUs and 5 GB of memory you would edit those lines to look like:
  config.vm.provider "virtualbox" do |vb|
     vb.cpus = 3
     vb.memory = 5000
  end
Little note -> 5000 = 5 GB ; 6000 = 6 GB; 30000 = 30 GB
Now you should have a Vagrant file in your current directory and we can now start "up" the new virtual machine:
vagrant up
note -> this will be a few different packages so it might take a moment
If no errors from the above command, we can now connect to our Centos7 virtual environment with:
vagrant ssh
You should now be in your fresh Centos7 virtual environment and if you ls you will see the vAMPirus directory.
You can now follow the normal directions for setting up vAMPirus with singularity.
But here is the quick overview of recommended next steps (without database/taxonomy install):
cd ./vAMPirus; bash vampirus_startup.sh -s
After running the above you should now have Nextflow installed. Now, build the Singularity image and test the installation with (be sure to run from inside the vAMPirus program directory):
./nextflow run vAMPirus.nf -c vampirus.config -profile singularity,test --DataCheck
then test the Analyze pipeline with:
./nextflow run vAMPirus.nf -c vampirus.config -profile singularity,test --Analyze --ncASV --pcASV --asvMED --aminoMED --stats
Please check out http://sourabhbajaj.com/mac-setup/Vagrant/README.html and https://www.vagrantup.com/docs/providers/virtualbox for understanding how to use Vagrant commands like "halt", "suspend" or "reload"
Being a virtual environment, all the files within your VM is not easily accessible from your host computer. To transfer files (read libraries or results) to and from your virtual environment you will need to use Vagrant scp.
Please note and be aware of the fact that when you scp to and from your VM you essentially have a duplicated
For more in depth instructions for how to use this command, see https://medium.com/@smartsplash/using-scp-and-vagrant-scp-in-virtualbox-to-copy-from-guest-vm-to-host-os-and-vice-versa-9d2c828b6197
But briefly:
Starting from your host computer (meaning not ssh'd into the Cenots7 virtual enviroment) ->
vagrant scp /Path/to/files/on/host/computer :/path/to/directory/in/virtual/environment
You should then see a notification of it being transferred 100%
Starting from your host computer (meaning not ssh'd into the Cenots7 virtual enviroment) ->
vagrant scp :/path/to/files/in/virtual/environment /Path/to/directory/on/host/computer
You should then see a notification of it being transferred 100%
Clone the most recent version of vAMPirus from github using:
git clone https://github.com/Aveglia/vAMPirus.git
vAMPirus is integrated with Nextflow which relies on Java being installed on your system.
If you know you do not have it installed, see here for instructions on installing Java for different operating software's -> https://opensource.com/article/19/11/install-java-linux ; for Debian https://phoenixnap.com/kb/how-to-install-java-ubuntu
If you are unsure, you can check using:
which java
or
java -version
The output from either of those commands should let you know if you have Java on your system.
You will also need to decide if you plan to use a container engine like Docker (https://www.docker.com/) or Singularity (https://singularity.lbl.gov/) or the package manager Conda (https://docs.conda.io/en/latest/).
The startup script provided in the vAMPirus program directory will install Conda for you if you tell it to (see below), however, you will need to install Docker or Singularity separately before running vAMPirus.
To set up and install vAMPirus dependencies, simply move to the vAMPirus directory and run the vampirus_startup.sh script.
cd ./vAMPirus; bash vampirus_startup.sh -h
You can make the vampirus_startup.sh scrip an exectuable with -> chmod +x vampirus_startup.sh ; ./vampirus_startup.sh
The start up script will check your system for Nextflow and Anaconda/Miniconda (can be skipped) and if they are not present, the script will ask if you would like to install these programs. If you answer with 'y', the script will install the missing programs and the installation is complete.
You can also use the startup script to install different databases to use for vAMPirus analyses, these include:
- NCBIs Viral protein RefSeq database
- The proteic version of the Reference Viral DataBase (RVDB) (See https://f1000research.com/articles/8-530)
- The complete NCBI NR protein database
To use the vampirus_startup.sh script to download any or all of these databases listed above you just need to use the "-d" option and you can download the NCBI taxonomy files with the option "-t" (See below).
If we take a look at the vampirus_startup.sh script usage:
General execution:
vampirus_startup.sh -h [-d 1|2|3|4] [-s] [-t]
Command line options:

    [ -h ]                       	Print help information

    [ -d 1|2|3|4 ]                Set this option to create a database directiory within the current working directory and download the following databases for taxonomy assignment:

                                                1 - Download only the proteic version of the Reference Viral DataBase (See the paper for more information on this database: https://f1000research.com/articles/8-530)
                                                2 - Download only NCBIs Viral protein RefSeq database
                                                3 - Download only the complete NCBI NR protein database
                                                4 - Download all three databases

    [ -s ]                       Set this option to skip conda installation and environment set up (you can use if you plan to run with Singularity and the vAMPirus Docker container)

    [ -t ]                       Set this option to download NCBI taxonomy files needed for DIAMOND to assign taxonomic classification to sequences (works with NCBI type databases only, see manual for more information)
For example, if you would like to install Nextflow, download NCBIs Viral Protein RefSeq database, the NCBI taxonomy files to use DIAMOND taxonomy assignment feature, and check/install conda, run:
bash vampirus_startup.sh -d 2 -t
and if we wanted to do the same thing as above but skip the Conda check/installation, run:
bash vampirus_startup.sh -d 2 -s
NOTE -> if you end up installing Miniconda3 using the script you should close and re-open the terminal window after everything is completed.
**NEW in version 2.0.0 -> the startup script will automatically download annotation information from RVDB to infer Lowest Common Ancestor (LCA) information for hits during taxonomy assignment. You can also use "-t" to download NCBI taxonomy files to infer taxonomy using the DIAMOND taxonomy classification feature.
Any protein database can be used while running vAMPirus, however, it needs to be in fasta format and the headers for reference sequences need to match one of two patterns:
RVDB format -> ">acc|GENBANK|AYD68780.1|GENBANK|MH171300|structural polyprotein [Marine RNA virus BC-4]"
NCBI NR/RefSeq format -> ">KJX92028.1 hypothetical protein TI39_contig5958g00003 [Zymoseptoria brevis]"
To set/inform vAMPirus of which header format for the reference database is being used, you can edit the vampirus.config file at line 122 "dbtype="NCBI"" for NCBI header format or "dbtype="RVDB"" for RVDB format.
An example of custom headers in RVDB format if you plan to use a custom database:
`>acc|Custom|VP100000.1|Custom|VP100000|capsid protein [T4 Phage isolate 1]`
 AMINOACIDSEQUENCE
`>acc|Custom|VP100000.1|Custom|VP100000|capsid protein [T4 Phage isolate 2]`
 AMINOACIDSEQUENCE
`>acc|Custom|VP2000.1|Custom|VP2000| capsid protein [T7 phage isolate]`
 AMINOACIDSEQUENCE
Or in NCBI format the same sequences would be:
`>VP100000.1 capsid protein [T4 Phage isolate 1]`
 AMINOACIDSEQUENCE
`>VP100000.1 capsid protein [T4 Phage isolate 2]`
 AMINOACIDSEQUENCE
`>VP2000.1 capsid protein [T7 phage isolate]`
 AMINOACIDSEQUENCE
For Linux users you can install Singularity following the instructions here -> https://singularity.lbl.gov/install-linux
Enable NeuroDebian repository ->
   sudo wget -O- http://neuro.debian.net/lists/xenial.us-ca.full | sudo tee /etc/apt/sources.list.d/neurodebian.sources.list

   sudo apt-key adv --recv-keys --keyserver hkp://pool.sks-keyservers.net:80 0xA5D32F012649A5A9
update ->
sudo apt-get update
Install singularity ->
sudo apt-get install -y singularity-container
Test its installed ->
   singularity --version

   output should look like : 2.6.1-distro
Using the yum package manager ->
sudo yum -y install singularity
After running the startup script, you can then test the vAMPirus installation with the supplied test dataset.
The startup script will generate a text file (EXAMPLE_COMMANDS.txt) that has instructions and example commands to test the installation.
NOTE => If using Singularity, when you run the test command calling for singularity (-profile singularity) Nextflow will set up the dependencies.
Launch commands for testing (you do not need to edit anything in the config files for test commands):
NOTE=> if using conda to run vAMPirus, you might need to activate the vAMPirus conda environment before launching with Nextflow to do so:
conda activate vAMPirus
You can try to launch without the environment activated and if you see an error, its likely fixed by activating first.
You can test without activating anything if you plan to run with Singularity.
DataCheck test =>
/path/to/nextflow run /path/to/vAMPirus.nf -c /path/to/vampirus.config -profile conda,test --DataCheck
OR
nextflow run vAMPirus.nf -c vampirus.config -profile singularity,test --DataCheck
Analyze test =>
/path/to/nextflow run /path/to/vAMPirus.nf -c /path/to/vampirus.config -profile conda,test --Analyze --ncASV --pcASV --asvMED --aminoMED --stats
OR
nextflow run vAMPirus.nf -c /path/to/vampirus.config -profile singularity,test --Analyze --ncASV --pcASV --asvMED --aminoMED --stats
If an analysis is interrupted, you can use Nextflows "-resume" option that will start from the last cached "check point".
For example if the analysis launched with the test DataCheck launch command above was interrupted, all you would need to do is add the "-resume" to the end of the command like so:
nextflow run vAMPirus.nf -c vampirus.config -profile conda,test --DataCheck -resume
vAMPirus is deployed using the Nextflow pipeline manager which "enables scalable and reproducible scientific workflows using software containers. It allows the adaptation of pipelines written in the most common scripting languages. Its fluent DSL simplifies the implementation and the deployment of complex parallel and reactive workflows on clouds and clusters." With vAMPirus being integrated into Nextflow it is just as easy to run vAMPirus on a HPC as it is to run locally on your personal machine. It also makes it very easy to "resume" analyses after altering some parameters or even adding analyses.
For example, say we want to first run the Analyze pipeline with only ASV-related analyses:
nextflow run vAMPirus.nf -c vampirus.config -profile conda --Analyze --stats --skipAminoTyping
Once the analysis launched
To learn more about Nextflow and to learn more how to monitor your submitted jobs from a web portal with Nextflow Tower, visit nextflow.io.
Here is a basic "launch" command to deploy the vAMPirus pipeline:
      1             2                   3                       4                  5
   nextflow run vAMPirus.nf -c vampirus.config -profile [conda,singularity] --Analyze|DataCheck
In the command above, there are five necessary pieces of information needed to successfully launch the vAMPirus workflow:
-
The first is the location of the "nextflow" executable (could be in your $PATH, if so, just call like above).
-
Second, you must tell Nextflow to "run" the vAMPirus program which is described in the "vAMPirus.nf" file. Depending on where you plan to submit this command, you may have to specify the path to the vAMPirus.nf file or you can copy the file to your working directory.
-
Next, we need to tell Nextflow what configuration file we would like to use for the vAMPirus run which is illustrated by the "-c vampirus.config" segment of the command. NOTE: config file can be called "anything".config.
-
The next piece of information Nextflow needs is whether you plan to use the vAMPirus conda environment or the vAMPirus Docker container with singularity.
-
Specify which vAMPirus pipeline you would like to launch
Now that we have an understanding on how to deploy vAMPirus with Nextflow, let's look at how to set both analysis- and resource-related parameters for your vAMPirus runs.
When submitting a launch command to start your vAMPirus run, Nextflow will spit out something that looks like this (example below from older verions):
    executor >  local (57)
    [8a/75e048] process > Build_database                                  [100%] 1 of 1 ✔
    [b4/c08216] process > QualityCheck_1DC                                [100%] 9 of 9 ✔
    [5c/ed7618] process > Adapter_Removal_DC                              [100%] 9 of 9 ✔
    [25/56a27d] process > Primer_Removal_DC                               [100%] 9 of 9 ✔
    [fa/736d66] process > QualityCheck_2_DC                               [100%] 9 of 9 ✔
    [d8/4b0c4e] process > Read_Merging_DC                                 [100%] 9 of 9 ✔
    [93/f5d315] process > Compile_Reads_DC                                [100%] 1 of 1 ✔
    [4d/8d83dd] process > Compile_Names_DC                                [100%] 1 of 1 ✔
    [0a/fdd8e8] process > Length_Filtering_DC                             [100%] 1 of 1 ✔
    [b6/097dd8] process > Extract_Uniques_DC                              [100%] 1 of 1 ✔
    [1b/1c4476] process > Identify_ASVs_DC                                [100%] 1 of 1 ✔
    [2e/9101c3] process > Chimera_Check_DC                                [100%] 1 of 1 ✔
    [14/365745] process > NucleotideBased_ASV_clustering_DC               [100%] 1 of 1 ✔
    [99/938f26] process > Translation_For_ProteinBased_Clustering_DC      [100%] 1 of 1 ✔
    [34/9eb77a] process > Protein_clustering_DC                           [100%] 1 of 1 ✔
    [26/1143ba] process > combine_csv_DC                                  [100%] 1 of 1 ✔
    [2e/e5fea3] process > Report_DataCheck                                [100%] 1 of 1 ✔
Nextflow allows for interactive monitoring of submitted workflows, so in this example, we see the left column containing working directories for each process being executed, next to that we see the process name, and the final column on the right contains the status and success of each process. In this example each process has been executed successfully and has been cached.
You can also remotely monitor a run using Nextflow tower (see tower.nf) which will allow you to monitor your run (and even launch new runs) from a portal on your browser.
The amazing thing about Nextflow is that it caches previously run processes done with the same samples. For example, in the case that you received an error during a run or run out of walltime on an HPC, you can just add "-resume" to your Nextflow launch command like so:
nextflow run vAMPirus.nf -c vampirus.config -profile [conda,singularity] --Analyze|DataCheck -resume
Nextflow will then pick up where the previous run left off.
You can even use this feature to change a parameter/add a type of clustering or add Minimum Entropy Decomposition analysis, you would just rerun the same command as above with minor changes:
nextflow run vAMPirus.nf -c vampirus.config -profile [conda,singularity] --Analyze|DataCheck --ncASV --asvMED -resume
With this command, you will then add nucleotide-level clustering of ASVs and Minimum Entropy Decomposition analyses to your results directory, all without rerunning any processes.
Nextflow deployment of vAMPirus relies on the use of the configuration file (vampirus.config - can be renamed to anything as long as its specified in the launch command) that is found in the vAMPirus program directory. The configuration file is a great way to store parameters/options used in your analyses. It also makes it pretty easy to set and keep track of multiple parameters as well as storing custom default values that you feel work best for your data. You can also have multiple copies of vAMPirus configuration files with different parameters, you would just have to specify the correct file with the "-c" argument shown in the section before.
Furthermore, the configuration file contains analysis-specific parameters AND resource-specific Nextflow launching parameters. A benefit of Nextflow integration, is that you can run the vAMPirus workflow on a large HPC just as easily as you could on your local machine.
If you look at line 233 and greater in the vampirus.config file, you will see resource-specific parameters that you can alter before any run. Nexflow is capable of submitting jobs automatically using slurm and PBS, check out the Nextflow docs to learn more (https://www.nextflow.io/docs/latest/executor.html)!
There are two ways to set parameters with Nextflow and vAMPirus:
- Edit the config file:
Here we have a block from the vampirus.config file that stores information related to your run:
        // Project specific information

            // Project name - Name that will be used as a prefix for naming files by vAMPirus
                 projtag="vAMPirusAnalysis"
            // Path to metadata spreadsheet file to be used for plot
                 metadata="/PATH/TO/vampirus_meta.csv"
            // reads directory, must specify the path with "R{1,2}" for reads to be properly read by Nextflow
                 reads="/PATH/TO/reads/"
            // PATH to working directory of your choosing, will automatically be set to vAMPirus installation
                 workingdir="VAMPDIR"
            // Name of directory created to store output of vAMPirus analyses (Nextflow will create this directory in the working directory)
                 outdir="results"
The first one in the block is the project tag or "projtag" which by default, if unchanged, will use the prefix "vAMPirusAnalysis". To change this value, and any other parameter value, just edit right in the configuration file so if you wanted to call the run "VirusRun1" you would edit the line to:
        // Project/analyses- specific information
            // Project name - Name that will be used as a prefix for naming files by vAMPirus
                 projtag="VirusRun1"
- Set the value within the launch command itself:
Instead of editing the configuration file directly, you could set parameters within the launching command itself. So, for example, if we wanted to run the analysis with nucleotide-based clustering of ASVs at 95% similarity, you would do so like this:
nextflow run vAMPirus.nf -c vampirus.config -profile [conda|singularity] --Analyze --ncASV --clusterNuclID .95
Here we use the "--Analyze" option that tells vAMPirus that we are ready to analyze some data. Then the "--ncASV" argument with the "--clisterNuclID .95" tells vAMPirus we would like to cluster our ASVs based on 95% nucleotide similarity. The default ID value is stored at line 66 in the vampirus.config file (currently 85%), but as soon as you specify and provide a value in the command, the value within the config file is ignored.
NOTE: Nextflow also has options in the launch command. To tell them apart, Nextflow options uses a single dash (e.g. -with-conda or -profile) while vAMPirus options are always with a double dash (e.g. --Analyze)
Each process within the vAMPirus workflow is tagged with either "low_cpus", "norm_cpus", or "high_cpus" (see below) which let's Nextflow know the amount of cpus and memory required for each process, which will then be used for when Nextflow submits a given job or task. Nexflow actively assesses the amount of available resources on your machine and will submit tasks only when the proper amount of resources can be requested.
From line 241-261 in the vAMPirus.config file is where you can edit these values for whichever machine you plan to run the workflow on.
    process {
        withLabel: low_cpus {
            cpus='2'
            memory='15 GB'
            //executor='slurm'
            //clusterOptions='--cluster=cm2 --partition=cm2_tiny --qos=cm2_tiny --nodes=1'
        }
        withLabel: norm_cpus {
            cpus='4'
            memory='15 GB'
            //executor='slurm'
            //clusterOptions='--cluster=cm2 --partition=cm2_tiny --qos=cm2_tiny --nodes=1'
        }
        withLabel: high_cpus {
            cpus='6'
            memory='15 GB'
            //executor='slurm'
            //clusterOptions='--cluster=cm2 --partition=cm2_tiny --qos=cm2_tiny --nodes=1'
        }
        errorStrategy='finish'
    }
Proceed to modify processes if needed and note that "//" is the Nextflow equivalent to "#" meaning that the executor and clusterOptions lines above are currently commented out.
As stated before, you can launch vAMPirus on either your personal laptop OR a larger HPC, you would just have to remove the "//" from the executor and clusterOptions lines to set the scheduler and options for submitting jobs. Review the Nextflow documentation about executors and running on HPCs here https://www.nextflow.io/docs/latest/executor.html.
To specify certain parts of the vAMPirus workflow to perform in a given run, you can use skip options to have vAMPirus ignore certain processes. Here are the current skip options you can specify within the launch command:
        // Skip options
            // Skip all Read Processing steps
                skipReadProcessing=false
            // Skip quality control processes only
                skipFastQC = false
            // Skip adapter removal process only
                skipAdapterRemoval=false
            // Skip primer removal process only
                skipPrimerRemoval=false
            // Skip AminoTyping
                skipAminoTyping=false
            // Skip Taxonomy
                skipTaxonomy=false
            // Skip phylogeny
                skipPhylogeny = false
            // Skip EMBOSS analyses
                skipEMBOSS = false
            // Skip Reports
                skipReport = false
            // Skip Merging steps
                skipMerging = false
To utilize these skip options, just add it to the launch command like so:
nextflow run vAMPirus.nf -c vampirus.config -profile [conda|singularity] --Analyze --ncASV --clusterNuclID .95 --skipPhylogeny --skipTaxonomy
With this launch command, vAMPirus will perform ASV generation and nucleotide-based clustering to produce ncASVs, then will generate counts tables, matrices and the final report for you.
- Clone vAMPirus from github
- Run the vAMPirus start up script to download Nextflow and create conda environment
- Edit vAMPirus configuration file
- Run DataCheck mode with dataset
- Run Analyze mode with desired clustering technique and %ID
Once you have everything set up and you have edited the parameters of interest in your configuration file you can run the following launch command for a full analysis:
nextflow run vAMPirus.nf -c vampirus.config -profile [conda|singularity] --Analyze --stats
This launch command will run all aspects of the vAMPirus workflow on your data and spit out final reports for each clustering %ID and technique.
Input can be raw or processed compressed or non-compressed fastq files with names containing "_R1" or "_R2". You can specify the directory containing your reads in line 20 of the vampirus.config file. New in 2.1.0 you can now input single-end libraries as well.
NOTE: Sample names are extracted from read library names by using the string to the left of the "_R" in the filename automatically. So:
        Example files in a "reads" directory:

            set reads="/PATH/TO/reads/*_R{1,2}*" in the vampirus.config

            example library names:
                exampleA_R1.fastq
                exampleA_R2.fastq

            Nextflow with recognize that exampleA is one sample.
For every analysis, vAMPirus generates a final report and uses a user supplied metadata file with sample names and treatment. Treatment is how vAMPirus groups samples in downstream statistical analyses performed to generate for the final report. For example, if comparing samples from different species of corals, you would set up a metadata file like so:
    sample,treatment
    Coral1,Ofaveolata
    Coral2,Ofaveolata
    Coral3,Ofaveolata
    Coral4,Mcavernosa
    Coral5,Mcavernosa
    Coral6,Mcavernosa
The metadata file needs to be comma separated with the first column being "sample" and the second column must be "treatment". These species names could easily be replaced with "Heat"/"Control" or any other way you would like to categorize the samples.
The sample name in the metadata files must match the library names. For example, the read library names for the samples in the example above would need to be:
Coral1_R1.fastq.gz; Coral2_R2.fastq.gz; Coral2_R1.fastq.gz; Coral2_R2.fastq.gz; etc. etc.
ALSO, important to not have treatments be only numbers to avoid errors in the statistical analyses.
To run the vAMPirus workflow, you must specify one or two mandatory arguments:
- "--DataCheck"
Usage example:
nextflow run vAMPirus.nf -c vampirus.config -profile [conda|singularity] --DataCheck
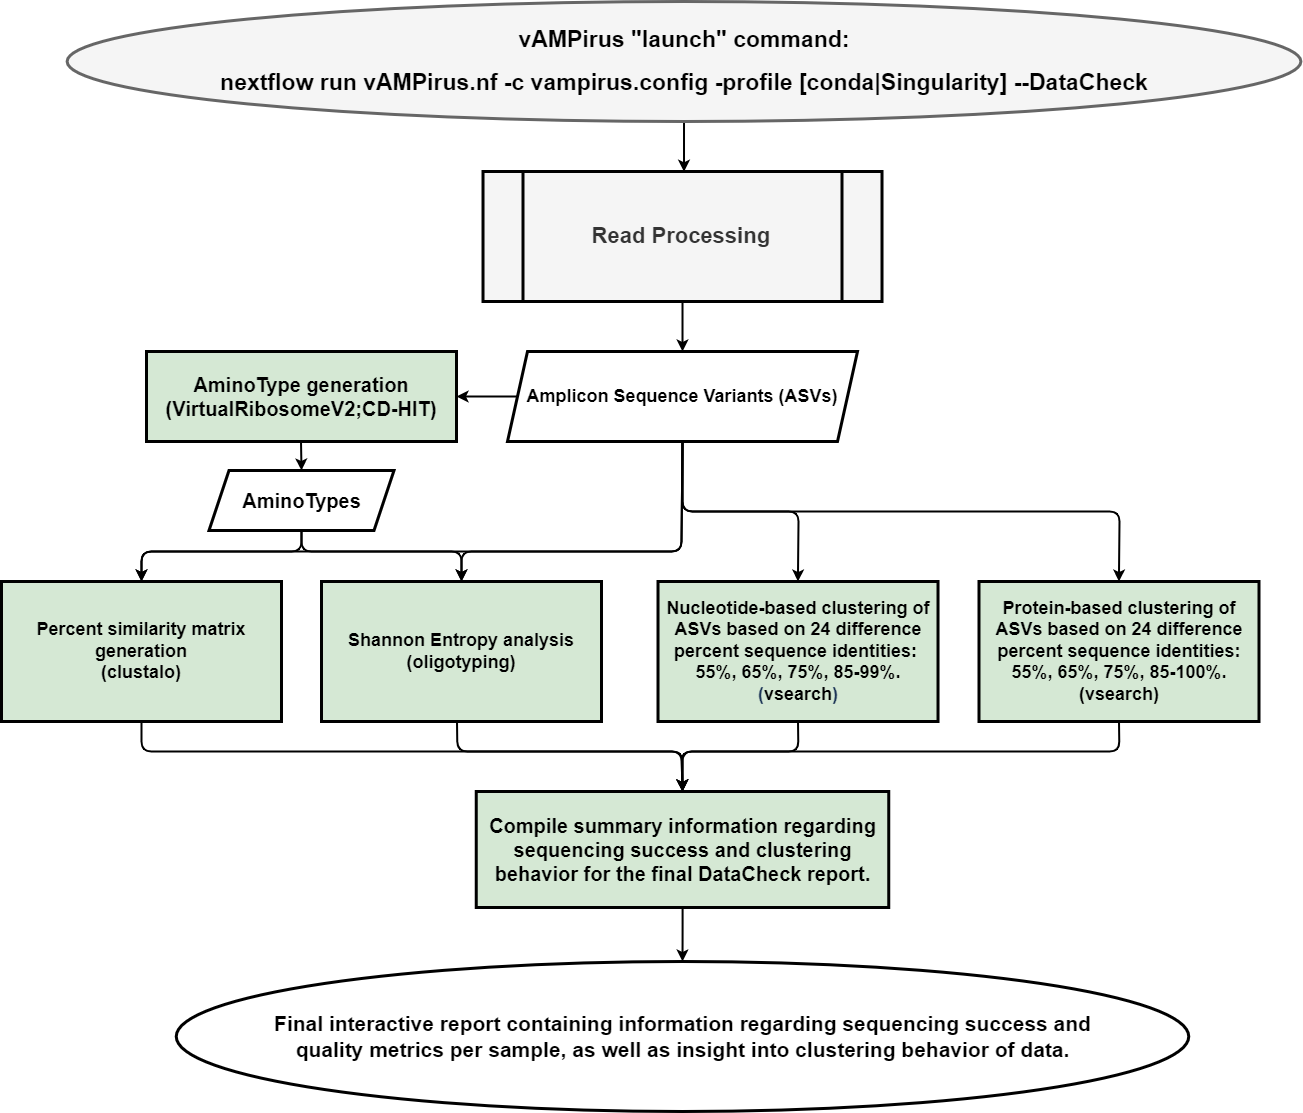
The DataCheck feature of vAMPirus is meant to give the user some information about their data so they can tailor their final analysis appropriately. In DataCheck mode, vAMPirus performs all read processing operations then generates ASVS and performs nucleotide- and protein-based clustering at 24 different clustering percentages ranging from 55-99% ID. vAMPirus then generates an html report that displays and visualizes read processing and clustering stats. It is recommended that before running any dataset through vAMPirus, you run the data through the DataCheck.
Here is how Nextflow will display the list of processes vAMPirus will execute during DataCheck (executed with the launch command above; below is an example from an older version of vAMPirus):
            executor >  local (57)
            [8a/75e048] process > Build_database                                  [100%] 1 of 1 ✔
            [b4/c08216] process > QualityCheck_1DC                                [100%] 9 of 9 ✔
            [5c/ed7618] process > Adapter_Removal_DC                              [100%] 9 of 9 ✔
            [25/56a27d] process > Primer_Removal_DC                               [100%] 9 of 9 ✔
            [fa/736d66] process > QualityCheck_2_DC                               [100%] 9 of 9 ✔
            [d8/4b0c4e] process > Read_Merging_DC                                 [100%] 9 of 9 ✔
            [93/f5d315] process > Compile_Reads_DC                                [100%] 1 of 1 ✔
            [4d/8d83dd] process > Compile_Names_DC                                [100%] 1 of 1 ✔
            [0a/fdd8e8] process > Length_Filtering_DC                             [100%] 1 of 1 ✔
            [b6/097dd8] process > Extract_Uniques_DC                              [100%] 1 of 1 ✔
            [1b/1c4476] process > Identify_ASVs_DC                                [100%] 1 of 1 ✔
            [2e/9101c3] process > Chimera_Check_DC                                [100%] 1 of 1 ✔
            [14/365745] process > NucleotideBased_ASV_clustering_DC               [100%] 1 of 1 ✔
            [99/938f26] process > Translation_For_ProteinBased_Clustering_DC      [100%] 1 of 1 ✔
            [34/9eb77a] process > Protein_clustering_DC                           [100%] 1 of 1 ✔
            [26/1143ba] process > combine_csv_DC                                  [100%] 1 of 1 ✔
            [2e/e5fea3] process > Report_DataCheck                                [100%] 1 of 1 ✔
Every time you launch vAMPirus with Nextflow, you will see this kind of output that refreshes with the status of the different processes during the run.
**Add "--asvMED" or "aminoMED" to the launch command above to get Shannon Entropy analysis resutls for ASVs and AminoTypes
- "--Analyze"
Usage example:
nextflow run vAMPirus.nf -c vampirus.config -profile [conda|singularity] --Analyze --stats
Example Nextflow output for this launch command:
            executor >  local (8)
            [8a/75e048] process > Build_database                      [100%] 1 of 1 ✔
            [8f/5bf47f] process > QualityCheck_1                      [100%] 9 of 9 ✔
            [1e/d40d5f] process > Adapter_Removal                     [100%] 9 of 9 ✔
            [-        ] process > Primer_Removal                      [100%] 9 of 9 ✔
            [-        ] process > QualityCheck_2                      [100%] 9 of 9 ✔
            [-        ] process > Read_Merging                        [100%] 9 of 9 ✔
            [-        ] process > Compile_Reads                       [100%] 1 of 1 ✔
            [-        ] process > Compile_Names                       [100%] 1 of 1 ✔
            [-        ] process > Length_Filtering                    [100%] 1 of 1 ✔
            [-        ] process > Extract_Uniques                     [100%] 1 of 1 ✔
            [-        ] process > Identify_ASVs                       [100%] 1 of 1 ✔
            [-        ] process > Chimera_Check                       [100%] 1 of 1 ✔
            [-        ] process > ASV_Taxonomy_Assignment             [100%] 1 of 1 ✔
            [-        ] process > Generate_ASV_Counts_Tables          [100%] 1 of 1 ✔
            [-        ] process > Generate_ASV_Matrix                 [100%] 1 of 1 ✔
            [-        ] process > ASV_Phylogeny                       [100%] 1 of 1 ✔
            [-        ] process > Translate_For_AminoTyping           [100%] 1 of 1 ✔
            [-        ] process > Generate_AminoTypes                 [100%] 1 of 1 ✔
            [-        ] process > Generate_AminoType_Matrix           [100%] 1 of 1 ✔
            [-        ] process > AminoType_EMBOSS_Analyses           [100%] 1 of 1 ✔
            [-        ] process > Taxonomy_Assignment_AminoTypes      [100%] 1 of 1 ✔
            [-        ] process > AminoType_Phylogeny                 [100%] 1 of 1 ✔
            [-        ] process > Generate_AminoTypes_Counts_Table    [100%] 1 of 1 ✔
            [-        ] process > combine_csv                         [100%] 1 of 1 ✔
            [-        ] process > Report_ASVs                         [100%] 1 of 1 ✔
            [-        ] process > Report_AmynoType                    [100%] 1 of 1 ✔
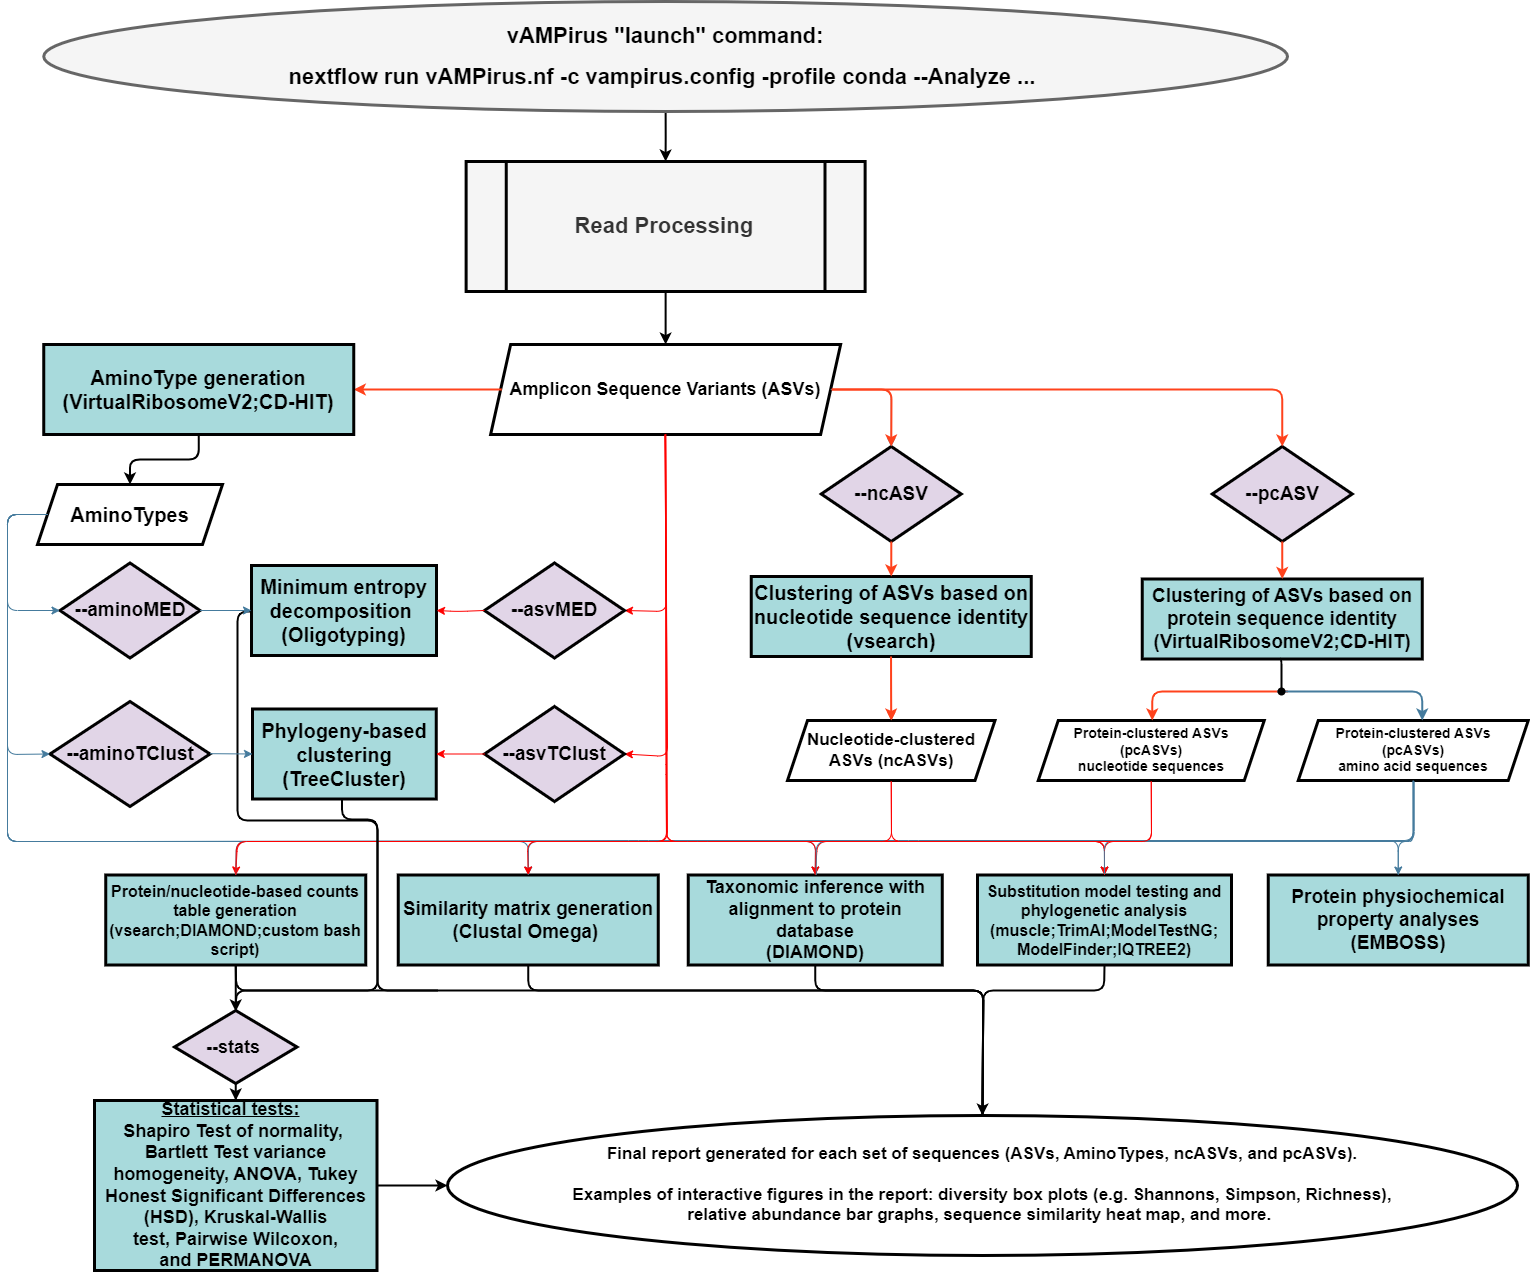
The Analyze option allows vAMPirus to know that you plan to analyze your data with the given parameters either within the launch command or sourced from the configuration file. On its own, "--Analyze" will run all read processing operations, generate ASVs, ASV counts files/matrices, ASV phylogeny, ASV taxonomy assignment, generate AminoTypes, AminoType counts/matrices, AminoType phylogeny, AminoType taxonomy assignment and EMBOSS analyses. vAMPirus will also produce final reports for ASV and AminoType analyses.
To generate ncASVs (nucleotide clustered ASVs) or pcASVs (protein clustered ASVs) and run all subsequent analyses including stats with them (phylogeny, taxonomy assignment), you would just need to add the "--ncASV" and "--pcASV" options like so:
nextflow run vAMPirus.nf -c vampirus.config -profile [conda|singularity] --Analyze --ncASV --pcASV --stats
Here is what the Nextflow output would look like for this launch command:
            executor >  local (8)
            [-        ] process > Build_database                      [  0%] 0 of 1
            [-        ] process > QualityCheck_1                      -
            [-        ] process > Adapter_Removal                     -
            [-        ] process > Primer_Removal                      -
            [-        ] process > QualityCheck_2                      -
            [-        ] process > Read_Merging                        -
            [-        ] process > Compile_Reads                       -
            [-        ] process > Compile_Names                       -
            [-        ] process > Length_Filtering                    -
            [-        ] process > Extract_Uniques                     -
            [-        ] process > Identify_ASVs                       -
            [-        ] process > Chimera_Check                       -
            [-        ] process > NucleotideBased_ASV_clustering      -
            [-        ] process > Nucleotide_Taxonomy_Assignment      -
            [-        ] process > Generate_Counts_Tables_Nucleotide   -
            [-        ] process > Generate_Nucleotide_Matrix          -
            [-        ] process > Nucleotide_Phylogeny                -
            [-        ] process > Translate_For_AminoTyping           -
            [-        ] process > Generate_AminoTypes                 -
            [-        ] process > Generate_AminoType_Matrix           -
            [-        ] process > AminoType_EMBOSS_Analyses           -
            [-        ] process > Taxonomy_Assignment_AminoTypes      -
            [-        ] process > AminoType_Phylogeny                 -
            [-        ] process > Generate_AminoTypes_Counts_Table    -
            [-        ] process > Translation_For_pcASV_Generation     -
            [-        ] process > Generate_pcASVs                      -
            [-        ] process > pcASV_Nucleotide_Taxonomy_Assignment -
            [-        ] process > Generate_Nucleotide_pcASV_Counts     -
            [-        ] process > Generate_pcASV_Nucleotide_Matrix     -
            [-        ] process > pcASV_Nucleotide_Phylogeny           -
            [-        ] process > pcASV_AminoAcid_Matrix               -
            [-        ] process > pcASV_EMBOSS_Analyses                -
            [-        ] process > pcASV_AminoAcid_Taxonomy_Assignment  -
            [-        ] process > pcASV_Protein_Phylogeny              -
            [-        ] process > Generate_pcASV_Protein_Counts        -
            [-        ] process > combine_csv                         -
            [-        ] process > Report_ASV                          -
            [-        ] process > Report_ncASV                         -
            [-        ] process > Report_AmynoTypes                   -
            [-        ] process > Report_pcASV_AminoAcid               -
            [-        ] process > Report_pcASV_Nucleotide              -
You can see that there are a few more processes now compared to the output of the previous launch command which is what we expect since we are asking vAMPirus to do a little bit more work for us :).
The read processing segment of both vAMPirus pipelines include FastQC report generation, adapter removal with fastp, primer removal with bbduk.sh, read merging with vsearch, and a final length filtering/global trimming with fastp and bbduk.sh.
Adapter contamination in reads are automatically detected with fastp. Overrepresentation analysis and quality filtering is also ran during this process prior to primer removal. Adapter contamination removal can be skipped using the "--skipAdapterRemoval" option, but is not recommended as even if you already performed adapter removal, it doesn't hurt to check again.
There are two ways that vAMPirus is able to remove primer sequences from reads with bbduk.sh:
- Primer removal by chopping off specified number of bases from each read (global trimming) -
This is the default action of vAMPirus if no primer sequences are provided, to set the number of bases to remove from forward and reverse reads, use the "--GlobTrim" option in the launch command and specify the number of bases in the launch command like so:
nextflow run vAMPirus.nf -c vampirus.config -profile [conda|singularity] --Analyze --ncASV --pcASV --GlobTrim 23,26
The command above is telling vAMPirus to have bbduk.sh remove primers by trimming 23 bases from the forward reads and 26 bases from the reverse reads. The other way to initiate this method of primer removal is to add the same information at lime 38 in the configuration file:
      // Primer Removal parameters
          // If not specifying primer sequences, forward and reverse reads will be trimmed by number of bases specified using --GlobTrim #basesfromforward,#basesfromreverse
             GlobTrim="23,26"
By adding the information to lime 38, vAMPirus will automatically use this method and these parameters for primer removal until told otherwise.
If you want to change the number of bases without editing the configuration file, all you would need to do is then specify in the launch command with "--GlobTrim 20,27" and vAMPirus will ignore the "23,26" in the configuration file.
NOTE: Specifying global trimming by editing lime 38 in the config file or using "--GlobTrim" in the launch command will also override the use of primer sequences for removal if both are specified
- Primer removal by specifying primer sequences -
You can tell vAMPirus to have bbduk.sh search for and remove either a single primer pair or multiple.
In the case where you are using a single primer pair, similar to the previous method, you could edit the configuration file or specify within the launch command.
To specify in launch command, we would need to used the "--fwd" and "--rev" options:
nextflow run vAMPirus.nf -c vampirus.config -profile [conda|singularity] --Analyze --ncASV --pcASV --fwd FWDPRIMER --rev REVPRIMER
vAMPirus will then provide these sequences to bbduk.sh for them to be detected and removed.
The primer sequences could also be stored in the configuration file in lines 43-46:
        // Specific primer sequence on forward reads to be removed
            fwd="FWDPRIMER"
            // Reverse primer sequence
            rev="REVPRIMER"
If you have multiple primer sequences to be removed, all you need to do is provide a fasta file with your primer sequences and signal multiple primer removal using the "--multi" option like so:
nextflow run vAMPirus.nf -c vampirus.config -profile [conda|singularity] --Analyze --multi --primers /path/to/primers.fa
You can set the path to the primer sequence fasta file within the launch command above or you can have it in the configuration file at lime 44:
        // Path to fasta file with primer sequences to remove (need to specify if using --multi option )
            primers="/PATH/TO/PRIMERS.fasta"
There are also a few other options you can change to best match what your data would need (lines 45-52):
        // Primer length (default 26)- If trimming primers with the --multi option or by specifying primer sequences above, change this to the length of the longer of the two primer sequences
            primerLength="26"
        // Maximum kmer length for primer removal (must be shorter than your primer length; default = 13)
            maxkmer="13"
        // Minimum kmer length for primer removal (default = 3)
            minkmer="3"
        // Minimum read length after adapter and primer removal (default = 200)
            minilen="200"
Read merging in the vAMPirus workflow is performed by vsearch and afterwards, reads are trimmed to the expected amplicon length (--maxLen) and any reads with lengths below the user specified minimum read length (--minLen) are discarded. There are five parameters that you can edit to influence this segment of vAMPirus. If we look at lines 26-33:
    // Merged read length filtering parameters

        // Minimum merged read length - reads with lengths greater than minLen and below the specified maximum read length will be used for counts only
            minLen="400"
        // Maximum merged read length - reads with length equal to the specified max read length will be used to generate uniques and ASVs (safe to set at expected amplicon size to start)
            maxLen="420"
        // Maximum expected error for vsearch merge command - vsearch discard sequences with more than the specified number of expected errors
            maxEE="3"
        // Maximum number of non-matching nucleotides allowed in overlap region
            diffs="20"
        // Maximum number of "N"'s in a sequence - if above the specified value, sequence will be discarded
            maxn="20"
The user can edit the minimum length (--minLen) for reads to be used for counts table generation, maximum length (--maxLen) for reads used to generate uniques and subsequent ASVs, and the expected error rate (--maxEE) for overlapping region of reads during read merging with vsearch. The values above are default and should be edited before running your data with --Analyze.
This is where the DataCheck report is very useful, you can review the report and see the number of reads that merge per library and you can edit the expected error value to be less stringent if needed. The DataCheck report also contains a read length distribution that you can use to select an ideal maximum/minimum read length.
The goal of vAMPirus was to make it easy for the user to analyze their data is many different ways to potentially reveal patterns that would have been missed if limited to one method/pipeline.
A major, and sometimes difficult, step in analyzing virus amplicon sequence data is deciding the method to use for identifying or defining different viral "species" in the data. To aid this process, vAMPirus has the DataCheck mode discussed above and has several different options for sequence clustering/analysis for the user to decide between.
vAMPirus relies on vsearch using the UNOISE3 algorithm to generate Amplicon Sequencing Variants (ASVs) from dereplicated amplicon reads. ASVs are always generated by default and there are two parameters that the user can specify either in the launch command or by editing the configuration file at lines 45-49:
 // ASV generation and clustering parameters
     // Alpha value for denoising - the higher the alpha the higher the chance of false positives in ASV generation
         alpha="2"
     // Minimum size or representation for sequence to be considered in ASV generation
         minSize="8"
The smaller the alpha value (--alpha) the more stringent vsearch is ASV generation while minimum size is the minimum representation of a unique sequence to have to be considered in the ASV generation.
Launch command to produce only ASV-related analyses:
nextflow run vAMPirus.nf -c vampirus.config -profile [conda|singularity] --Analyze --stats --skipAminoTyping
New to version 2 you can now filter ASVs to remove sequences that belong to taxonomic groups that are not of interest for a given run.
A great example of when this feature is useful is Prodinger et al. 2020 (https://www.mdpi.com/2076-2607/8/4/506). In this study they looked to amplify and analyze Mimiviridae polB sequences, however, polB is also found in cellular genomes like bacteria. In this case, Prodinger et al. looked to avoid including any bacterial polB in their final results and thus used a filtering step to remove microbial sequences. The ASV filtering feature can be used to do exactly this type of filtering where you provide paths to a "filter database" containing sequences belonging to non-target groups (e.g. microbial polB) and a "keep database" containing sequences belonging to the target group (e.g. Mimiviridae polB). Any ASVs that match non-target sequences will then be filtered from the ASV file prior to running the DataCheck or Analyze pipeline.
Here are the options stored within the configuration file:
// ASV filtering parameters - You can set the filtering to run with the command --filter


    // Path to database containing sequences that if ASVs match to, are then removed prior to any analyses
        filtDB=""
    // Path to database containing sequences that if ASVs match to, are kept for final ASV file to be used in subsequent analyses
        keepDB=""
    // Keep any sequences without hits - for yes, set keepnohit to ="true"
        keepnohit="true"

    //Parameters for diamond command for filtering

            // Set minimum percent amino acid similarity for best hit to be counted in taxonomy assignment
                filtminID="80"
            // Set minimum amino acid alignment length for best hit to be counted in taxonomy assignment
                filtminaln="30"
            // Set sensitivity parameters for DIAMOND aligner (read more here: https://github.com/bbuchfink/diamond/wiki; default = ultra-sensitive)
                filtsensitivity="ultra-sensitive"
            // Set the max e-value for best hit to be recorded
                filtevalue="0.001"
Depending on the virus type/marker gene, ASV-level results can be noisy and to combat this vAMPirus has three different approaches to clustering ASV sequences:
- AminoTyping -
vAMPirus by default, unless the --skipAminoTyping option is set, will generate unique amino acid sequences or "AminoTypes" from generated ASVs. These AminoTypes, barring any skip options set, will run through all the same analyses as ASVs.
vAMPirus will translate the ASVs with Virtual Ribosome (v2), which considers all potential reading frames and reports the longest translation. Given the nature of virus amplicon sequencing data (i.e., same gene/region being amplified) the correct reading frame is expected to produce a translation at or right near the expected/minimum amino acid sequence length set by user. vAMPirus then relies on the user-set expected or minimum amino acid sequence length parameter (--minAA) to be identify and remove inaccurate translations or those that are the result of a mutation that would cause a mid-ORF stop codon prior to AminoTyping and pcASV generation (discussed below). For example, if you amplicon size is ~422 bp long, you would expect the amino acid translations to be ~140. Thus, you would either edit the --minAA value to be 140 in the configuration file or in the launch command.
You can make it shorter if you would like, but based on personal observation, a shorter translation is usually the result of stop codons present which would usually be removed from subsequent analyses. If there are any sequences below the minimum amino acid sequence length the problematic sequence(s) and its translation will be stored in a directory for you to review. You can confirm that the reading frame that produced the output translation is accurate using the taxonomy results (it should show that the sequences look like the targeted virus group).
Example launch command using the --minAA option:
nextflow run vAMPirus.nf -c vampirus.config -profile [conda|singularity] --Analyze --minAA 140
- Nucleotide-based clustering of ASVs (ncASVs) -
In this technique, as the name infers, the clustering of ASVs into cASVs is based on nucleotide identity. To signal vAMPirus to generate ncASVs, we just add the "--ncASV" option to our launch command:
nextflow run vAMPirus.nf -c vampirus.config -profile [conda|singularity] --Analyze --ncASV
With ncASV analysis specified, vAMPirus will still generate ASVs and produce ASV-related results with a report, so you are not losing any results when you the clustering and this way, you can compare the reports afterwards.
vAMPirus allows you to specify either one or multiple clustering percentages that can be specified in the configuration file or the launch command. For each ID% specified, ncASVs will be generated and will be ran through all subsequent processes (e.g. counts, phylogeny, taxonomy, report generation, etc.)
        // Percent similarity to cluster nucleotide ASV sequences
            clusterNuclID=".85"
        // List of percent similarities to cluster nucleotide ASV sequences - must be separated by a comma (ex. ".95,.96")
            clusterNuclIDlist=""
Above, the specified clustering percentage (--clusterNuclID) for ncASV generation is 85%. The value must always be in decimal format and can be put into the launch command like so:
nextflow run vAMPirus.nf -c vampirus.config -profile [conda|singularity] --Analyze --ncASV --clusterNuclID .85 --stats
You could also have a list of percentages to cluster by:
nextflow run vAMPirus.nf -c vampirus.config -profile [conda|singularity] --Analyze --ncASV --clusterNuclIDlist .85,.90,.96 --stats
Using "--clusterNuclIDlist" will override the single percentage clustering and vAMPirus will generate separate ncASVs fastas based on 85%, 90% and 96% nucleotide similarity, you could theoretically cluster by any amount of percentages between 1-100 that your data requires or your heart desires.
- Protein-based clustering of ASVs (pcASVs)
For this clustering method, ASVs are translated into amino acid sequences and clustered based on shared amino acid similarity, %ID is user specified in a similar manner to ncASV cluster options:
        Lines 54-57 in vampirus.config ->

        // Default percent similarity to cluster aminoacid sequences
            clusterAAID=".97"
        // List of percent similarities to cluster aminoacid sequences - must be separated by ".95,.96"
            clusterAAIDlist=""
When clustering for pcASVs, vAMPirus will create nucleotide and protein versions and both will go through the rest of the analyses within the pipeline (phylogeny, taxonomy, etc.).
It should be noted that the --minAA option described above in the AminoType section also applies to pcASV generation. If there are any sequences below the minimum amino acid sequence length, the problematic sequence(s) and its translation will be stored in a file for you to review.
Example launch command:
nextflow run vAMPirus.nf -c vampirus.config -profile [conda|singularity] --Analyze --pcASV --clusterAAIDlist .85,.90,.96 --stats
Accurate sequence alignment is crucial for downsteam analyses (MED, TreeCluster, model testing, phylogenies) and to produce the highest confidence alignments vAMPirus employs musclev5 and its alighnment Ensemble approach. Read more here: https://drive5.com/muscle/
Using musclev5 you can decide if you would like to perform single replicate alignment or Ensemble alignment methods (read more here: https://drive5.com/muscle)
NOTE: if srep and ensemble below are either both true or both false, vAMPirus will default to doing single rep with the default muscle parameters
// Single replicate alignment options
    // Set this = to "true" for single replicate sequence alignment with musclev5 -- if < 300 sequences, muscle will use MPC algorithm; > 300 sequences muscle will use Super5 algorithm
        srep="false"
    // Set guide tree permutation for muscle (default for muscle is none; other options include "abc, acb, bca")
        perm="none"
    // Set the pertubation seed "0, 1, 2 ..." (default for muscle is 0 = don't perterb)
        pert="0"

// Ensemble alignment options
    // Set this = to "true" for Ensemble sequence alignent approach
        ensemble="true"
    // Set "stratified" or "diversified" in ensemble alignment command -- When extracting best alignment from ensemble, diversified input is recommended
        fied="diversified"
    // Number of replicates for ensemble alignment -- Default for stratified is 4; for diversified is 100
        N="100"
See -> https://merenlab.org/2012/05/11/oligotyping-pipeline-explained/
In vAMPirus v2, we added the ability for the user to use the oligotyping program employing the Minimum Entropy Decomposition (MED) algorithm developed by Eren et al. 2015 (read more about MED here - https://www.nature.com/articles/ismej2014195#citeas) to cluster ASV or AminoType sequences.
The MED algorithm provides an alternative way of grouping and differentiating marker gene sequences using "information theory-guided decomposition" - "By employing Shannon entropy, MED uses only the information-rich nucleotide positions across reads and iteratively partitions large datasets while omitting stochastic variation." -Eren et al. 2015
When you run the DataCheck pipeline with your dataset, the report will include a figure and table that breakdown the Shannon Entropy analysis results for both ASVs and AminoTypes. The figure visualizes entropy values per sequence position revealing positions or regions of high entropy. The table beneath the figure breaks down the number of positions with entropy values above "0.x". Although, if you know the positions on your sequence that have the potential to contain biologically or ecologically meaningful mutations, you can specify decomposition based on these positions.
If you decide to use MED, vAMPirus will run all the same analyses that would be done with the ASV or AminoType sequences (e.g. diversity analyses, statistics) and be appended results to the ASV or AminoType report. The ASV or AminoType sequence nodes on the phylogenetic tree will also be colored based on which MED group they were assigned to.
To add MED analysis to either the DataCheck or Analyze run you must add "--asvMED" and/or "--aminoMED" to the launch command (see considerations and examples below).
Considerations when using MED on your data:
Early Applications and Collective Learning in Viral Amplicon Data Analysis: As the integration of Minimum Entropy Decomposition (MED) with aminotyping in the vAMPirus platform represents a novel application within the realm of virus amplicon sequencing, it's important to acknowledge the pioneering stage of this endeavor. The broader adoption of MED in microbial ecology, while substantial, has not yet resulted in a wealth of resources specifically tailored for viral applications. This scenario underscores the pioneering role of vAMPirus in offering guidance and support for leveraging MED in the analysis of viral sequences.
Given this nascent stage, the journey into applying MED and aminotyping for virus amplicon data is one of collective exploration and learning within the scientific community. Researchers embarking on this path are encouraged to approach the analysis with an open mind and a willingness to delve into uncharted territories. As we navigate these early applications, the field will evolve through shared experiences, discoveries, and the development of best practices.
In light of this, researchers might find it beneficial to actively seek out external resources or engage with experts in related areas. These actions can enrich the understanding and application of MED in virus amplicon sequencing, contributing to a growing body of knowledge and expertise. Remember, the exploration of MED's utility in virology is a collaborative endeavor, and as a field, we will learn and advance together. Embracing this perspective, users of vAMPirus are not only applying an advanced tool to their research but also contributing to the broader scientific understanding of viral diversity and its implications. Keep in mind the pioneering nature of this work and seek collaboration, share insights, and remain open to learning from the collective experiences of the scientific community.
Adaptation for Viral Sequences: Although MED was initially designed with bacterial communities in mind, its application extends to the realm of virology within vAMPirus. However, given the distinct genetic dynamics and diversity of viruses compared to bacteria, researchers should exercise caution. Understanding the method's original context and considering how viral sequences' variability and conservation levels might influence entropy-based partitioning are important steps in adapting MED for viral analyses.
Navigating Limited Viral-Specific Resources: The broader adoption of MED in microbial ecology does not directly translate to an abundance of resources tailored for viral applications. This scarcity underscores the importance of vAMPirus in providing guidance and support for applying MED to virus amplicon sequencing. Researchers new to using MED for viral analyses may need to seek out additional resources or consult with experts when necessary.
Capturing Viral Diversity: A notable feature of MED is its ability to illuminate the rare biosphere by discerning minor, yet potentially significant, differences among closely related taxa. This sensitivity is a double-edged sword in virology, where the rare biosphere's full diversity is paramount yet challenging to capture. Users should be aware that while MED excels in delineating fine-scale diversity, its focus on specific nucleotide positions could, in some cases, lead to underrepresentation of low-abundance sequences. Ensuring a balanced view of viral community composition may require complementary analyses.
Understanding Protein Function for Effective Application of MED and Aminotyping: Incorporating Minimum Entropy Decomposition (MED) with aminotyping into the vAMPirus platform significantly enhances the potential to dissect and understand virus community diversity. To leverage this combination effectively, a deep understanding of the protein encoded by the target gene and the implications of non-synonymous mutations is paramount.
Non-synonymous mutations lead to changes in the amino acid sequence of the protein, potentially altering its function, structure, interaction with host molecules, or immunogenicity. These mutations can have profound effects on viral pathogenicity, transmission, and resistance to treatments. Therefore, recognizing and interpreting these mutations within the context of MED and aminotyping analysis requires a solid foundation in molecular biology and genetics, specifically:
Protein Functionality- Knowledge of the biological role and mechanism of action of the protein under study is crucial. Understanding how specific amino acid changes might impact the protein’s function can provide insights into the physiological and ecological significance of the virus variants identified.
Evolutionary Implications- Awareness of how non-synonymous mutations have influenced viral evolution and adaptation can guide the interpretation of MED and aminotyping results. This includes understanding the selective pressures that might favor certain mutations over others in different environmental or host contexts.
Disease Association- For pathogens, correlating specific mutations with changes in disease manifestation, severity, or treatment outcomes can be particularly informative. This association helps in identifying clinically relevant virus variants.
Experimental Validation- Whenever possible, coupling MED and aminotyping analyses with experimental validation of the predicted effects of non-synonymous mutations on protein function can provide a more comprehensive understanding of their implications.
Anyway... there are two ways to utilize MED within the vAMPirus pipeline:
    (1) Decomposition based on all sequence positions with an entropy value above "0.x" - Useful approach to preliminarily test influence of MED on your sequences

            Example -> Entropy value table from the DataCheck report shows I have 23 ASV sequence positions that have Shannon entropy values above 0.1 and I would like to oligotype using all of these high entropy positions.

                      To use these 23 positions for MED clustering of ASVs, all I need to do is add the options "--asvMED" (signals use of MED on ASV sequences) and "--asvc 23" (specifies the number of high entropy positions to be used for MED - could also be done by editing "asvc="23"" in config file) to the launch command:

                            nextflow run vAMPirus.nf -c vampirus.config -profile [conda|singularity] --Analyze --asvMED --asvC 23

                      After this run completes successfully and you move the ASV report file to a safe area for review, if I wanted to see what happens if just the top 5 high entropy positions were used instead, I can use the "-resume" option and run:

                            nextflow run vAMPirus.nf -c vampirus.config -profile [conda|singularity] --Analyze --asvMED --asvC 5 -resume


    (2) Decomposition based on specific sequence positions that may contain biologically/ecologically meaningful differences.

            Example -> I know that amino acid differences at certain positions on my AminoTypes are ecologically meaningful (e.g. correlate with host range) and I would like to perform MED with these positions only.

                       To do this, similar to the example above, I will add "--aminoMED" and "--aminoC" to the launch command:

                            nextflow run vAMPirus.nf -c vampirus.config -profile [conda|singularity] --Analyze --aminoMED --aminoC 2,3,4,25,34,64 -resume
MED related options within the configuration file:
    // Minimum Entropy Decomposition (MED) parameters for clustering (https://merenlab.org/2012/05/11/oligotyping-pipeline-explained/)

    // If you plan to do MED on ASVs using the option "--asvMED" you can set here the number of entopy peak positions or for oligotyping to take into consideration.
        // Decomposition of sequences based on specific positions in sequences -- either a single (asvC="1"; meaning decompose sequences based on position 1) or a comma seperated list of biologically meaningful positons (asvC="35,122,21"; meaning decompose sequences based on positions 35, 122, 21). If value given for asvC, it will overide asvc.
            asvC=""
        // Decomposition of sequences based on the top "x" amount of sequence positions with the highest entropy values. So if asvc = 10 it will decompose based on positions with the top ten highest entropy values.
            asvc=""

    // If you plan to do MED on ASVs using the option "--aminoMED" you can set here the number of positions for oligotyping to take into consideration.
        // Decomposition of sequences based on specific positions in sequences -- either a single (asvC="1"; meaning decompose sequences based on position 1) or a comma seperated list of biologically meaningful positons (aminoC="35,122,21"; meaning decompose sequences based on positions 35, 122, 21). If value given for aminoC, it will overide aminoc.
            aminoC=""
        // Decomposition of sequences based on the top "x" amount of sequence positions with the highest entropy values. So if asvc = 10 it will decompose based on positions with the top ten highest entropy values.
            aminoc=""
See https://github.com/niemasd/TreeCluster; https://journals.plos.org/plosone/article?id=10.1371/journal.pone.0221068
New in version 2.0.1, you can now use the program TreeCluster to cluster ASV or AminoType sequences based on phylogenetic relationship.
From the TreeCluster GitHub (https://github.com/niemasd/TreeCluster):
"TreeCluster is a tool that, given a tree T (Newick format) and a distance threshold t, finds the minimum number of clusters of the leaves of T such that some user-specified constraint is met in each cluster. The user can also specify a branch support threshold s such that no pair of leaves in any cluster can be connected by branches with support less than or equal to s. Note that all leaves given a cluster of -1 are singletons, meaning they did not cluster with any other leaves (i.e., each leaf with a cluster of -1 is in its own cluster).
TreeCluster was motivated by Cluster Picker.
The default method is "Max Clade" (see Clustering Methods). There is no explicit default distance threshold, but because Cluster Picker recommends a distance threshold of 0.045 and because the same objective function is optimized by both Cluster Picker and TreeCluster "Max Clade", we currently recommend 0.045 as well."
If you plan to use this form of clustering, be sure to read through the TreeCluster manuscript and help documentation linked above to use the most appropriate command.
To signal the use of phylogeny-based clustering, add "--asvTClust" to cluster ASVs and "--aminoTClust" to cluster aminotypes. You will then need to check and edit the TreeClust command you would like to use in the configuration file:
  // Phylogeny-based ASV/AminoType clustering parameters using the program TreeCluster (https://github.com/niemasd/TreeCluster)

    // Add the "--asvTClust" option to the launch command to run phylogeny-based clustering of ASVs ; Add "--aminoTClust" to launch command for phylogeny-based clustering on AminoTypes
    // NOTE: you can't use "--skipPhylogeny" when doing this form of sequence clustering

      // TreeCluster command options for ASV clustering (--asvTClust) -- (Example: asvTCopp="-option1 A -option2 B -option3 C -option4 D") - See TreeCluster paper and github page to determine the best options (a good start is what is below)
          asvTCopp="-t 0.045 -m max_clade -s 0.5"

      // TreeCluster command options for AminoType clustering (--aminoTClust) -- (Example: aminoTCopp"-option1 A -option2 B -option3 C -option4 D") - See TreeCluster paper and github page to determine the best options
          aminoTCopp="-t 0.045 -m max_clade -s 0.5"
NOTE:: If planning to use this approach, it is recommended to use the ensemble sequence alignment approach ith musclev5
vAMPirus generates nucleotide-based counts tables using vsearch and protein-based counts tables using DIAMOND and a custom bash script. Counts tables, pairwise distance, and percent ID matrices are always produced for each ASV, AminoType and all cASV fasta files produced.
Here are the parameters you can edit at lines 61-70:
// Counts table generation parameters
    // Percent similarity to use for ASV/ncASV counts table generation with vsearch
        asvcountID=".97"
    // Protein counts table parameters
        // Minimum Bitscore for counts
            ProtCountsBit="50"
        // Minimum aminoacid sequence similarity for hit to count
            ProtCountID="85"
        // Minimum alignment length for hit to count
            ProtCountsLength="50"
The "--asvcountID" is the percent ID during global alignment that vsearch would use to classify a hit to a given ASV. For all cASVs, the specified clustering percentage is used for counts.
Protein-based counts file generation has a few more parameters the user can alter: "--ProtCountsBit" is the minimum bitscore for an alignment to be recorded, "--ProtCountID" is the minimum percent amino acid similarity an alignment needs to have to be recorded, and "--ProtCountsLength" is the minimum alignment length for a hit to be recorded.
Phylogenetic trees are produced automatically for ASVs (unless --ncASV specified), ncASVs, pcASVs and aminotypes using IQ-TREE. All produced sequence fastas are aligned using the MAFFT algorithm then alignments are trimmed automatically using TrimAl.
Post alignment and trimming, there is some flexibility in this process where you can specify a few different aspects of the analysis:
You can tell vAMPirus to color nodes on produced phylogenies based on taxonomy or Minimum Entropy Decomposition Group ID. Edit the option below in the config file.
// Color nodes on phylogenetic tree in Analyze report with MED Group information (nodeCol="MED") or taxonomy (nodeCol=TAX) hit. If you would like nodes colored by sequence ID, leave nodeCol="" below. nodeCol=""
ModelTest-NG is always ran to determine the best substitution model and all of its output is stored for the users review.
vAMPirus uses IQTREE for phylogenetic analyses, and the user can decide if they would prefer to use the substitution model selected by ModelTest-NG for the IQTREE analysis by using the "--ModelTnt" and "--ModelTaa" options:
nextflow run vAMPirus.nf -c vampirus.config -profile [conda|singularity] --Analyze --pcASV --clusterAAIDlist .85,.90,.96 --ModelTnt --ModelTaa
The launch command above will have IQTREE use the substitution model determined by ModelTest-NG in both nucleotide-based (--ModelTnt) and amino acid-based (--ModelTaa) phylogenetic analyses. If you didn't want to use it for both nucleotide and amino acid trees, you would just use the "--ModelTnt" or "--ModelTaa" alone in the launch command.
By default IQTREE will determine the best model to use with ModelFinder Plus.
IQ-TREE is capable of performing parametric or non-parametric bootstrapping. You can specify which one using "--parametric" or "--nonparametric" and to set how many bootstraps to perform, you would use "--boots #ofbootstraps" or edit lime 114 in the vampirus.config file. New in vAMPirus 2.1.0 you can have IQTREE use Transfer Bootstrap Expectation (TBE) which was developed for trees with a large number of sequences.
Here is an example for creating a tree using the model determined by ModelTest-NG, non-parametric bootstrapping and 500 bootstraps:
nextflow run vAMPirus.nf -c vampirus.config -profile [conda|singularity] --Analyze --pcASV --clusterAAIDlist .85,.90,.96 --ModelTnt --ModelTaa --nonparametric --boots 500
The default IQ-TREE command looks like this:
iqtree -s {alignment} --prefix {samplename} -m {model} --redo -nt auto -b {#bootstraps}
If you were to input your custom IQ-TREE command, you would add on to:
iqtree -s {alignment} --prefix {samplename} --redo -T auto {YOUR_CUSTOM_COMMAND_HERE}
To add your custom part of the IQ-TREE command, you would edit lines 82 and 83 for nucleotide and amino acid tree command, respectively:
    // Phylogeny analysis parameters
        // Customs options for IQ-TREE (Example: "-option1 A -option2 B -option3 C -option4 D")
            iqCustomnt="-your Custom -IQ tree -command here"
            iqCustomaa="-your Custom -IQ tree -command here"
So, for example, if you set the configuration file like so:
    // Phylogeny analysis parameters
        // Customs options for IQ-TREE (Example: "-option1 A -option2 B -option3 C -option4 D")
            iqCustomnt="-option1 A -option2 B -option3 C"
            iqCustomaa="-option1 A -option2 B -option3 C"
And you used a launch command similar to:
nextflow run vAMPirus.nf -c vampirus.config -profile [conda|singularity] --Analyze --nonparametric --boots 500
The IQTREE commands for the ASV and AminoType phylogenetic analyses would be:
ASV IQTREE command ->
iqtree -s asv_alighnment.fasta --prefix TestRun --redo -T auto -option1 A -option2 B -option3 C
AminoType IQTREE command ->
iqtree -s aminotype_alighnment.fasta --prefix TestRun --redo -T auto -option1 A -option2 B -option3 C
vAMPirus uses DIAMOND blastx/blastp and the provided protein database to infer taxonomy of amplicons to ASVs/cASVs/AminoTypes. There are summary files generated, one in the format compatible with phyloseq and the other as a .tsv with information in a different arrangement. Results are also visualized as a donut graph in the final reports.
First, lets take a look at the taxonomy section of the configuration file:
Block 1 -
    // Taxonomy inference parameters

        //Parameters for diamond command
            // Set minimum bitscore for best hit in taxonomy assignment
                bitscore="50"
            // Set minimum percent amino acid similarity for best hit to be counted in taxonomy assignment
                minID="40"
            // Set minimum amino acid alignment length for best hit to be counted in taxonomy assignment
                minaln="30"
            // Set sensitivity parameters for DIAMOND aligner (read more here: https://github.com/bbuchfink/diamond/wiki; default = ultra-sensitive)
                sensitivity="ultra-sensitive"
The first block of options are related to the DIAMOND command.
Block 2 -
    // Database information
        // Specify name of database to use for analysis
            dbname="DATABASENAME"
        // Path to Directory where database is being stored - vAMPirus will look here to make sure the database with the name provided above is present and built
            dbdir="DATABASEDIR"
        // Set database type (NCBI or RVDB). Lets vAMPirus know which sequence header format is being used and must be set to NCBI when using RefSeq or Non-Redundant databases. -> dbtype="NCBI" to toggle use of RefSeq header format; set to "RVDB" to signal the use of Reverence Viral DataBase (RVDB) headers (see manual)
            dbtype="TYPE"
The second block of options is regarding the database that will be used for the analysis. "dbname" should be the name of the reference fasta file, for example if using the RVDB, dbname would = "U-RVDBv21.0-prot.fasta". The "dbtype" option signals which sequence header format is being used in the reference database. To use the DIAMOND taxonomy assignment feature (see below), you must be using the NCBI style sequence headers.
The database, currently, needs to be protein sequences and be in fasta format. The database can be a custom database but for proper reporting of the results, the headers need to follow either RVDB or NCBI/RefSeq header formats:
-
RVDB format (default) -> ">acc|GENBANK|AYD68780.1|GENBANK|MH171300|structural polyprotein [Marine RNA virus BC-4]"
-
NCBI NR/RefSeq format -> ">KJX92028.1 hypothetical protein TI39_contig5958g00003 [Zymoseptoria brevis]"
Block 3 -
    // Classification settings - if planning on inferring LCA from RVDB annotation files OR using NCBI taxonomy files, confirm options below are accurate.
        // Path to directory RVDB hmm annotation .txt file - see manual for information on this. Leave as is if not planning on using RVDB LCA.
            dbanno="DATABASEANNOT"
        // Set lca="T" if you would like to add "Lowest Common Ancestor" classifications to taxonomy results using information provided by RVDB annotation files (works when using NCBI or RVDB databases) - example: "ASV1, Viruses::Duplodnaviria::Heunggongvirae::Peploviricota::Herviviricetes::Herpesvirales::Herpesviridae::Gammaherpesvirinae::Macavirus"
            lca="LCAT"
        // DIAMOND taxonomy inference using NCBI taxmap files (can be downloaded using the startup script using the option -t); set to "true" for this to run (ONLY WORKS WITH dbtype="NCBI")
            ncbitax="false"
The third block of options is regarding the two different methods thats could be used to get putative taxonomic classifications for your sequences:
- Grabbing "Lowest Common Ancestor" (LCA) information from the annotation files associated with the Reference Virus DataBase (RVDB; https://rvdb-prot.pasteur.fr/).
By default, these annotation files are downloaded when you use the startup script to download any of the possible three databases. The "dbanno" variable refers to the path to the annotation files, if using the startup script, this will automatically be edited.
The LCA feature works by searching the RVDB annotation files for the accession number of the aligned-to reference sequence so this feature can be used when "dbtype" equals either "NCBI" or "RVDB". Please note, however, that the aligned-to reference sequence might not be found in the annotation files and some sequences may not have the LCA information available within its annotation file. This is a quick way to assign some degree of classification that might help in future binning or figure making.
You can turn on this feature of the pipeline by editing lime 121 in the vampirus.config file making "lca="true"" or you can set this in the launch command like so:
nextflow run vAMPirus.nf -c vampirus.config -profile [conda|singularity] --Analyze --stats --lca true
- Using the NCBI taxonomy files (https://www.ncbi.nlm.nih.gov/taxonomy ; https://www.ncbi.nlm.nih.gov/books/NBK53758/) and the DIAMOND taxonomy assignment feature.
You can tell vAMPirus to use the DIAMOND taxonomy assignment feature that leverages the taxonomy identifier (TaxId) of aligned-to reference sequences. It will then add putative taxonomic information to your sequences in the *quick_TaxBreakdown.csv file stored in the vAMPirus results directory.
NOTE=> To use the DIAMOND taxonomy feature and the NCBI taxonomy files you must be using the NCBI header format. So, this feature will only be used when "dbtype="NCBI"" and "ncbitax="true"" within the configuration file.
For pcASV protein files and AminoTypes, vAMPirus will run different protein physiochemical property analyses using scripts within EMBOSS. To skip this process, just add "--skipEMBOSS" to the launch command.
The vAMPirus Analyze pipeline will generate an interactive html report which includes all produced results and can also include statistical tests:
a. Shapiro Test of normality
b. Bartlett Test variance homogeneity
c. ANOVA
d. Tukey Honest Significant Differences (HSD)
e. Kruskal-Wallis test
f. Pairwise Wilcoxon
g. PERMANOVA
To have these statistical tests ran and included in the final vAMPirus report, you will need to add the add "--stats" to the launch command:
nextflow run vAMPirus.nf -c vampirus.config -profile [conda|singularity] --Analyze --stats
NOTE=> Be sure that there is more than 1 sample in each treatment category or there will be errors
There are several files created throughout the vAMPirus pipeline that are stored and organized in directories within the specified results/output directory (ex. ${working_directory}/results; line 24 in the configuration file). We will go through the structure of the output directory and where to find which files here:
Nextflow produces a couple files that breakdown how and what parts of the vAMPirus pipeline was ran. The first file is a report that contains information on how the pipeline performed along with other pipeline performance-related information like how much memory or CPUs were used during certain processes. You can use this information to alter how many resources you would request for a given task in the pipeline. For example, the counts table generation process may take a long time with the current amount of resources requested, you can see this in the report then edit the resources requested at lines 144-183 in the vAMPirus configuration file. The second file produced by Nextflow is just the visualization of the workflow and analyses ran as a flowchart.
Within the ReadProcessing directory you will find all files related to each step of read processing:
- FastQC - ${working_directory}/results/DataCheck/ReadProcessing/FastQC
In this directory you will find FastQC html reports for pre-cleaned and post-cleaned individual read libraries.
- AdapterRemoval - ${working_directory}/results/DataCheck/ReadProcessing/AdapterRemoval
Here we have resulting fastq files with adapter sequences removed. Fastp also generates its own reports which can also be found in "./fastpOut".
- PrimerRemoval - ${working_directory}/results/DataCheck/ReadProcessing/PrimerRemoval
Similar to the adapter removal directory, here you have the clean read libraries that have had adapter and primer sequences removed.
- ReadMerging - ${working_directory}/results/DataCheck/ReadProcessing/ReadMerging
There is a little bit more going on in this directory compared to the others. The first major file to pay attention to here is the file *_merged_clean_Lengthfiltered.fastq. This is the "final" merged read file that contains all merged reads from each samples and is used to identify unique sequences and then ASVs. "Pre-filtered" and "pre-cleaned" combined merged read files can be found in "./LengthFiltering". If you would like to review or use the separate merged read files per sample, these fastq files are found in the "./Individual" directory. Finally, a fasta file with unique sequences are found in the "./Uniques" directory and the "./Histograms" directory is full of several different sequence property (length, per base quality, etc.) histogram files which can be visualized manually and reviewed in the DataCheck report.
The DataCheck performed by vAMPirus includes "ReadProcessing", "Clustering", and "Report" generation. Here again is the launch command to run the DataCheck mode:
`nextflow run vAMPirus.nf -c vampirus.config -profile [conda|singularity] --DataCheck`
As the name would suggest, the files within this directory are related to the clustering process of "--DataCheck". There isn't too much in here, but here is the breakdown anyway:
- ASVs - ${working_directory}/results/DataCheck/Clustering/ASVs
In this directory, there is the fasta file with the generated ASV sequences and there is another directory "./ChimeraCheck" where the pre-chimera filered ASV fasta sits.
- Nucleotide - ${working_directory}/results/DataCheck/Clustering/Nucleotide
This directory stores a .csv file that shows the number of clusters or ncASVs per clustering percentage. The file can be visualized manually or can be reviewed in the DataCheck report. In this directory you will also find Shannon Entropy analysis results files.
- Aminoacid - ${working_directory}/results/DataCheck/Clustering/Aminoacid
Similar to Nucleotide, the Aminoacid directory contained the .csv that shows the number of clusters or pcASVs per clustering percentage. The file can be visualized manually or can be reviewed in the DataCheck report. In this directory you will also find Shannon Entropy analysis results files.
In this directory, you will find a .html DataCheck report that can be opened in any browser. The report contains the following information and it meant to allow the user to tailor their vAMPirus pipeline run to their data (i.e. maximum read length, clustering percentage, etc.):
- Pre- and post-adapter removal read statistics
This is the first section of the DataCheck report which has (i) a read stats table which includes read lengths/number of reads/gc content, (ii) a box plot comparing overall read length distribution before and after adapter removal, and (iii) another box plot showing the influence of adapter removal on read length.
- Post-merging statistics
The second section of the report displays several plots tracking the changes in certain data-related properties before and after the final read cleaning steps (e.g. length filtering and global trimming). These properties include (i) pre/post-filtering reads per sample, (ii) pre/post-filtering base frequency per position on reads, (iii) pre/post-filtering mean quality score per position, (iv) pre/post-filtering GC-content, (v) pre/post-filtering reads per quality score, (vi) pre/post-filtering merged read length distribution.
- Clustering statistics
In this section of the report, vAMPirus is showing the number of nucleotide- and protein-based cASVs assigned per clustering percentage. vAMPirus clusters ASVs and ASV translations by 24 different clustering percentages between 55-100%. The "100% clustering" data point in the "Number of ncASVs per clustering percentage" plot is the number of ASVs, it is important to know that ASV generation and clustering based on 100% is not the same, but we felt the number of ASVs is an important stat to know when comparing to the clustered data.
NOTE: Most, if not all, plots in vAMPirus reports are interactive meaning you can select and zoom on certain parts of the plot or you can use the legend to remove certain samples.
Depending on which optional arguments you add to your analyses (e.g. --pcASV, --ncASV, skip options), you will have different files produced, here we will go through the output of the full analysis stemming from this launch command:
nextflow run vAMPirus.nf -c vampirus.config -profile [conda|singularity] --Analyze --ncASV --pcASV --stats
The clustering directory will contain all files produced for whichever clustering technique you specified (with the launch command above, all are specified):
-
ASVs -- ${working_directory}/results/Analyze/Clustering/ASVs -- In this directory, there is the fasta file with the generated ASV sequences and there is another directory "./ChimeraCheck" where the pre-chimera filered ASV fasta sits. In this directory, if --asvMED was set to run, you will be a MED/ directory containing all output files from oligotyping analyses.
-
AminoTypes -- ${working_directory}/results/Analyze/Clustering/AminoTypes -- The AminoTypes directory has a few different subdirectories, in the main directory, however, is the fasta file with the AminoTypes used in all subsequent analyses. The first subdirectory is called "Translation" which includes the raw ASV translation file along with a report spit out by VirtualRibosome. The next subdirectory is "Problematic", where any translations that were below the given "--minAA" length will be reported, if none were deemed "problematic" then the directory will be empty. All problematic amino acid sequence AND their corresponding ASVs are stored in fasta files for you to review. The final subdirectory is "SummaryFiles" where you can find a "map" of sorts to track which ASVs contributed to which AminoTypes and a .gc file containing information on length of translated sequences. In this directory, if --aminoMED was set to run, you will be a MED/ directory containing all output files from oligotyping analyses.
-
ncASV -- ${working_directory}/results/Analyze/Clustering/ncASV -- In this directory, you will find the fasta files corresponding to the clustering percentage(s) you specified for the run.
-
pcASV -- ${working_directory}/results/Analyze/Clustering/pcASV -- Looking in this directory, you probably notice some similar subdirectories. The pcASV directory also contains the Summary, Problematic, and Translation subsirectories we saw in the AminoType directory. The other important files in this directory is the nucleotide and amino acid versions of the pcASVs generated for whichever clustering percentage(s) specified.An important note for when creating pcASVs is that the subsequent analyses (phylogenies, taxonomy assignment, etc.) are run on both nucloetide and amino acid pcASV fastas. To create these files, vAMPirus translates the ASVs, checks for problematic sequences, then clusters the translated sequences by the given percentage(s). After clustering, vAMPirus will go pcASV by pcASV extracting the nucleotide sequences of the ASVs that clustered within a given pcASV. The extracted nucleotide sequences are then used to generate a consensus nucleotide sequence(s) per pcASV.
For each clustering technique (i.e. ASVs, AminoTypes, ncASVs and pcASVs) performed in a given run, resulting taxonomic unit fastas will go through the following analyses (unless skip options are used):
-
Counts -- ${working_directory}/results/Analyze/Analyses/${clustertechnique}/Counts -- The Counts directory is where you can find the counts tables as .csv files (and .biome as well for nucleotide counts tables).
-
Phylogeny -- ${working_directory}/results/Analyze/Analyses/${clustertechnique}/Phylogeny -- Unless told otherwise, vAMPirus will produce phylogenetic trees for all taxonomic unit fastas using IQ-TREE. The options for this analysis was discussed in a previous section of the docs. In the phylogeny output directory, you will find three subdirectories: (i) ./Alignment - contains trimmed MAFFT alignment used for tree, (ii) ./ModelTest - contains output files from substitution model prediction with ModelTest-NG, and (iii) ./IQ-TREE - where you can find all output files from IQ-TREE with the file of (usual) interest is the ".treefile".
-
Taxonomy -- ${working_directory}/results/Analyze/Analyses/${clustertechnique}/Taxonomy -- vAMPirus uses DIAMOND blastp/x and the supplied PROTEIN database for taxonomy assignment of sequences. In the Taxonomy directory, you will find (i) a subdirectory called "DIAMONDOutput" which contains the original output file produced by DIAMOND, (ii) a fasta file that has taxonomy assignments within the sequence headers, and (iii) three different summary files (one being a phyloseq object with taxonomic information, a tab-separated summary file for review by the user and a summary table looking at abundance of specific hits).
-
Matrix -- ${working_directory}/results/Analyze/Analyses/${clustertechnique}/Matrix -- The Matric directory is where you can find all Percent Identity matrices for produced ASV/cASV/AmintoType fastas.
-
EMBOSS -- ${working_directory}/results/Analyze/Analyses/${clustertechnique}/EMBOSS -- Several different protein physiochemical properties for all amino acid sequences are assessed using EMBOSS scripts (http://emboss.sourceforge.net/apps/release/6.6/emboss/apps/groups.html). There are four different subdirectories within EMBOSS, these include (i) ./ProteinProperties - contains files and plots regarding multiple different physiochemical properties (http://emboss.sourceforge.net/apps/release/6.6/emboss/apps/pepstats.html), (ii) ./IsoelectricPoint - contains a text file and a .svg image with plots showing the isoelectric point of protein (http://emboss.sourceforge.net/apps/release/6.6/emboss/apps/iep.html), (iii) ./HydrophobicMoment - information related to hydrophobic moments of amino acid sequences (http://emboss.sourceforge.net/apps/release/6.6/emboss/apps/hmoment.html), and (iv) ./2dStructure - information about 2D structure of proteins (http://emboss.sourceforge.net/apps/release/6.6/emboss/apps/protein_2d_structure_group.html).
vAMPirus produces final reports for all taxonomic unit fastas produced in the run. These reports contain the following information:
- Pre- and post-adapter removal read statistics
This is the first section of the final report and similar to the DataCheck report,there is (i) a read stats table which includes read lengths/number of reads/gc content, (ii) a box plot comparing overall read length distribution before and after adapter removal, and (iii) another box plot showing the influence of adapter removal on read length.
- Number of reads per sample
This is a plot that looks at number of reads per sample, similar to what is seen in the DataCheck report.
-
Rarefaction curves
-
Diversity analyses box Plots
The plots in order are (i) Shannon Diversity, (ii) Simpson Diversity, (iii) Richness.
Stats tests included with "--stats":
a. Shapiro Test of normality
b. Bartlett Test variance homogeneity
c. ANOVA
d. Tukey Honest Significant Differences (HSD)
e. Kruskal-Wallis test
f. Pairwise Wilcoxon
g. PERMANOVA
-
Distance to centroid box plot
-
NMDS plots (2D and 3D) -- PCoA (2D and 3D) if NMDS does not converge
-
Relative sequence abundance per sample bar chart
-
Absolute sequence abundance per treatment bar chart
-
Pairwise percent ID heatmap
-
Taxonomy results visualized in a donut plot
-
Visualized phylogenetic tree
-
Post-Minimum Entropy Decomposition Analyses (combination of above)
Usage:
nextflow run vAMPirus.nf -c vampirus.config -profile [conda|singularity] --[Analyze|DataCheck] [--ncASV] [--pcASV] [--asvMED] [--aminoMED] [--asvTClust] [--aminoTClust] [--stats]
--Help options--
    --help                          Print help information

    --fullHelp                      Print even more help information
--Mandatory arguments (choose one)--
    --Analyze                       Run absolutely everything

    --DataCheck                     Assess how data performs with during processing and clustering
--Other important to know about, but not mandatory, arguments--
--ASV clustering arguments--
    --ncASV                          Set this option to have vAMPirus cluster nucleotide amplicon sequence variants (ASVs) into nucleotide-based operational taxonomic units (ncASVs) - See options below to define a single percent similarity or a list

    --pcASV                          Set this option to have vAMPirus cluster nucleotide and translated ASVs into protein-based operational taxonomic units (pcASVs) - See options below to define a single percent similarity or a list
--Oligotyping Minimum Entropy Decomposition arguments--
    --asvMED                        Set this option to perform Minimum Entropy Decomposition on ASV sequences, see manual for more information. You will need to set a value for --asvC to perform this analysis

    --aminoMED                     Set this option to perform Minimum Entropy Decomposition on AminoType sequences, see manual for more information. You will need to set a value for --aminoC to perform this analysis
--TreeCluster arguments--
    --asvTClust                     Phylogeny-based ASV clustering parameters using the program TreeCluster (https://github.com/niemasd/TreeCluster)

    --aminoTClust                   Phylogeny-based AminoType clustering parameters using the program TreeCluster (https://github.com/niemasd/TreeCluster)
--Skip options--
    --skipReadProcessing            Set this option to skip all read processing steps in the pipeline

    --skipFastQC                    Set this option to skiip FastQC steps in the pipeline

    --skipAdapterRemoval            Set this option to skip adapter removal in the pipeline

    --skipPrimerRemoval             Set this option to skip primer removal process

    --skipMerging                   Set this option to skip read merging

    --skipAminoTyping               Set this option to skip AminoTyping processes

    --skipTaxonomy                  Set this option to skip taxonomy assignment processes

    --skipPhylogeny                 Set this option to skip phylogeny processes

    --skipEMBOSS                    Set this option to skip EMBOSS processes

    --skipReport                    Set this option to skip html report generation
NOTE Most opitons below can be set using the configuration file (vampirus.config) to avoid a lengthy launch command.
--Project/analysis information--
    --projtag                       Set project name to be used as a prefix for output files

    --metadata                      Set path to metadata spreadsheet file to be used for report generation (must be defined if generating report)

    --reads                         Path to directory containing read libraries, must have *R{1,2}* in the library names

    --workingdir                    Path to working directory where Nextflow will put all Nextflow and vAMPirus generated output files

    --outdir                        Name of results directory containing all output from the chosen pipeline (will be made within the working directory)
--Quality filter/trimming options--
    --avQ                          Average read quality - forward or reverse reads will be discarded if average base quality across the read is below the number set below (25 is a good start)

    --mN                            Maximum number of "N"s acceptable in the forward or reverse reads (default for fastp is 5)

    --trimq                         Minmum base quality to be trimmed (fastp default is 15)
--Merged read length filtering--
    --minLen                        Minimum merged read length - reads below the specified maximum read length will be used for counts only

    --maxLen                        Maximum merged read length - reads with length equal to the specified max read length will be used to identifying unique sequences and  subsequent Amplicon Sequence Variant (ASV) analysis

    --maxEE                         Use this option to set the maximum expected error rate for vsearch merging. Default is 1.

    --diffs                         Maximum number of non-matching nucleotides allowed in overlap region.

    --maxn                          Maximum number of "N"'s in a sequence - if above the specified value, sequence will be discarded.

    --minoverlap                    Minimum length of overlap for sequence merging to occur for a pair.
--Primer removal--
General primer removal parameters

    --primerLength                  Use this option to set the max primer length to restrict bbduk.sh primer trimming to the first x number of bases

    --maxkmer                       Maximum kmer length for bbduk.sh to use for primer detection and removal (must be shorter than your primer length; default = 13)

    --minkmer                       Minimum kmer length for primer removal (default = 3)

    --minilen                       Minimum non-merged read length after adapter and primer removal (default = 100)

Single primer set removal-

    --gtrim                      Set this option to perform global trimming to reads to remove primer sequences. Example usage "--GlobTrim #basesfromforward,#basesfromreverse"

    --fwd                           Forward primer sequence for reads to be detected and removed from reads (must specify reverse sequence if providing forward)

    --rev                           Reverse primer sequence for reads to be detected and removed from reads (must specify forward sequence if providing reverse)

Multiple primer set removal-

    --multi                         Use this option to signal multiple primer sequence removal within the specified pipeline

    --primers                       Use this option to set the path to a fasta file with all of the primer sequences to be detected and removed from reads
--Amplicon Sequence Variant (ASV) genration--
    --alpha                         Alpha value for denoising - the higher the alpha the higher the chance of false positives in ASV generation (1 or 2)

    --minSize                       Minimum size or representation in the dataset for sequence to be considered in ASV generation
--ASV filtering parameters - You can set the filtering to run with the command
    --filter                        Use this option to signal ASV filtering suing the databases below

    --filtDB                        Path to database containing sequences that if ASVs match, are then removed prior to any analyses. Keep empty if only using a "keep" database.

    --keepDB                        Path to database containing sequences that if ASVs match to, are kept for final ASV file to be used in susequent analyses. Keep empty if only using a "filter" database.

    --keepnohit                     Keep any sequences without hits - for yes, set keepnohit to ="true". All sequences without an alignment will kept if no "keep" database provided.
--Parameters for diamond command for ASV filtering--
    --filtminID                     Set minimum percent amino acid similarity for best hit to be counted in taxonomy assignment

    --filtminaln                    Set minimum amino acid alignment length for best hit to be counted in taxonomy assignment

    --filtsensitivity               Set sensitivity parameters for DIAMOND aligner (read more here: https://github.com/bbuchfink/diamond/wiki; default = ultra-sensitive)

    --filtevalue                    Set the max e-value for best hit to be recorded
--ASV clustering options--
    --clusterNuclID                 With --ncASV set, use this option to set a single percent similarity to cluster nucleotide ASV sequences into ncASVs by [ Example: --clusterNuclID .97 ]

    --clusterNuclIDlist             With --ncASV set, use this option to perform nucleotide clustering with a comma separated list of percent similarities [ Example: --clusterNuclIDlist .95,.96,.97,.98 ]

    --clusterAAID                   With --pcASV set, use this option to set a single percent similarity for protein-based ASV clustering to generation pcASVs  [ Example: --clusterAAID .97 ]

    --clusterAAIDlist               With --pcASV set, use this option to perform protein-based ASV clustering to generate pcASVs with a comma separated list of percent similarities [ Example: --clusterAAIDlist .95,.96,.97,.98 ]

    --minAA                         With --pcASV set, use this option to set the expected or minimum amino acid sequence length of open reading frames within your amplicon sequences
--Minimum Entropy Decomposition (MED) parameters for clustering (https://merenlab.org/2012/05/11/oligotyping-pipeline-explained/)--
    --asvC                          Decomposition of sequences based on specific positions in sequences -- either a single (asvC="1"; meaning decompose sequences based on position 1) or a comma seperated list of biologically meaningful positons (asvC="35,122,21"; meaning decompose sequences based on positions 35, 122, 21). If value given for asvC, it will overide asvc.

    --asvc                          Decomposition of sequences based on the top "x" amount of sequence positions with the highest entropy values. So if asvc = 10 it will decompose based on positions with the top ten highest entropy values.

    --aminoC                        Decomposition of sequences based on specific positions in sequences -- either a single (asvC="1"; meaning decompose sequences based on position 1) or a comma seperated list of biologically meaningful positons (aminoC="35,122,21"; meaning decompose sequences based on positions 35, 122, 21). If value given for aminoC, it will overide aminoc.

    --aminoc                        Decomposition of sequences based on the top "x" amount of sequence positions with the highest entropy values. So if asvc = 10 it will decompose based on positions with the top ten highest entropy values.
--Sequence alignment options - Using musclev5 you can decide if you would like to perform single replicate alignment or Ensemble alignment methods (read more here: https://drive5.com/muscle)--
NOTE: if srep and ensemble below are either both true or both false, vAMPirus will default to doing single rep with the default muscle parameters
    Single replicate alignment options

    --srep                          Use this option to make srep = "true" signalling single replicate sequence alignment with musclev5 -- if < 300 sequences, muscle will use MPC algorithm; > 300 sequences muscle will use Super5 algorithm

    --perm                          Set guide tree permutation for muscle (default for muscle is none; other options include "abc, acb, bca")

    --pert                          Set the pertubation seed "0, 1, 2 ..." (default for muscle is 0 = don't perterb)

    Ensemble alignment options

    --ensemble                      Use this option to make ensemble = "true" signalling Ensemble sequence alignent approach

    --fied                          Set "stratified" or "diversified" in ensemble alignment command -- When extracting best alignment from ensemble, diversified input is recommended

    --N                             Number of replicates for ensemble alignment -- Default for stratified is 4; for diversified is 100
--Phylogeny-based ASV/AminoType clustering parameters using the program TreeCluster (https://github.com/niemasd/TreeCluster)--
    --asvTCopp                      TreeCluster command options for ASV clustering (--asvTClust) -- (Example: "-option1 A -option2 B -option3 C -option4 D") - See TreeCluster paper and github page to determine the best options (a good start is what is below)

    --aminoTcopp                    TreeCluster command options for AminoType clustering (--aminoTClust) -- (Example: "-option1 A -option2 B -option3 C -option4 D") - See TreeCluster paper and github page to determine the best options
--Counts table generation--
    --exact                         Use --search_exact algorithm in vsearch to generate ASV counts tables. Change to "true" below or use --exact in the launch command.

    --id                            If not using --search_exact (exact = false above), you will use --usearch_global. Set the minimum percent ID (97% = ".97") to count as a hit in counts table generation.

    --minLencount                   Minimum length of query read to be used in ASV/ncASV counts table generation with vsearch

    --ProtCountID                   Minimum amino acid sequence similarity for hit to count

    --ProtCountsLength              Minimum alignment length for hit to count

    --ProtCountsBit                 Minimum bitscore for hit to be counted
--Taxonomy inference parameters--
Parameters for diamond command

    --measurement                   Set which measurement to use for a minimum threshold in taxonomy inference - must be either "evalue" or "bitscore"

    --evalue                        Set maximum e-value for hits to be counted

    --bitscore                      Set minimum bitscore for best hit in taxonomy assignment (default = 30)

    --minID                         Set minimum percent amino acid similarity for best hit to be counted in taxonomy assignment

    --minaln                        Set minimum amino acid alignment length for best hit to be counted in taxonomy assignment

    --sensitivity                   Set sensitivity parameters for DIAMOND aligner (read more here: https://github.com/bbuchfink/diamond/wiki; default = ultra-sensitive)

    Database information

    --dbname                        Specify name of database to use for analysis

    --dbdir                         Path to Directory where database is being stored - vAMPirus will look here to make sure the database with the name provided above is present and built

    --dbtype                        Set database type (NCBI or RVDB). Lets vAMPirus know which sequence header format is being used and must be set to NCBI when using RefSeq or Non-Redundant databases. -> dbtype="NCBI" to toggle use of RefSeq header format; set to "RVDB" to signal the use of Reverence Viral DataBase (RVDB) headers (see manual)

Classification settings - if planning on inferring LCA from RVDB annotation files OR using NCBI taxonomy files, confirm options below are accurate.

    --dbanno                        Path to directory RVDB hmm annotation .txt file - see manual for information on this. Leave as is if not planning on using RVDB LCA.

    --lca                       Set lca="T" if you would like to add "Least Common Ancestor" classifications to taxonomy results using information provided by RVDB annotation files (works when using NCBI or RVDB databases) - example: "ASV1, Viruses::Duplodnaviria::Heunggongvirae::Peploviricota::Herviviricetes::Herpesvirales::Herpesviridae::Gammaherpesvirinae::Macavirus"

    --ncbitax                   DIAMOND taxonomy inference using NCBI taxmap files (can be downloaded using the startup script using the option -t); set to "true" for this to run (ONLY WORKS WITH dbtype="NCBI")
--Phylogeny analysis parameters--
Setting customs options for IQ-TREE (Example: "-option1 A -option2 B -option3 C -option4 D") - might be easier to set in the vampirus.config file at lines 108/109
    --iqCustomnt                   Use option to set custom options to use in all IQTREE analyses with nuceoltide sequences

    --iqCustomaa                   Use option to set custom options to use in all IQTREE analyses with amino acid sequences
These options below you can set at the command, for example, to set to use model from ModelTest-NG with parametric bootstrapping --ModelTnt --ModelTaa --parametric
    --ModelTnt=false               Signal for IQ-TREE to use model determined by ModelTest-NG for all IQTREE analyses with nuceoltide sequences (Default is IQ-TREE will do automatic model testing with ModelFinder Plus)

    --ModelTaa=false               Signal for IQ-TREE to use model determined by ModelTest-NG for all IQTREE analyses with amino acid sequences

    --crit                         Choose best model from ModelTest-NG based on BIC, AIC, or AICc (select one)

    --parametric                   Set to use parametric bootstrapping in IQTREE analyses

    --nonparametric                Set to use parametric bootstrapping in IQTREE analyses

    --tbe                          Set to use the Transfer Bootstrap Expectation (TBE; https://www.nature.com/articles/s41586-018-0043-0) in IQTREE analyses

    --boots                        Number of bootstraps (recommended 1000 for parametric and 100 for non-parametric)
--Statistics options--
    --stats                        Set "--stats" to signal statstical tests to be performed and included in the final report

    --minimumCounts                Minimum number of hit counts for a sample to have to be included in the downstream statistical analyses and report generation

    --trymax                       Maximum number of iterations performed by metaMDS
Here are some example launch commands:
nextflow run vAMPirus.nf -c vampirus.config -profile [conda|singularity] --DataCheck [--asvMED] [--aminoMED]
Just submit this launch command with the correct paths and vAMPirus will run the DataCheck and produce a report for you to review. Para
nextflow run vAMPirus.nf -c vampirus.config -profile [conda|singularity] --Analyze --ncASV --pcASV --minLen 400 --maxLen 420 --clusterNuclIDlist .91,.92,.93 --clusterAAIDlist .91,.93,.95,.98
With this launch command, you are specifying that you would like to generate ncASVs and pcASVs by clustering at multiple percentages for each. You are also setting the minimum read length at 400 and maximum read length at 420. All analyses will be ran as well.
Run --Analyze with no clustering, no taxonomy assignment, and parametric bootstrapping with 1500 bootstraps
nextflow run vAMPirus.nf -c vampirus.config -profile [conda|singularity] --Analyze --skipTaxonomy --skipAminoTyping --parametric --boots 1500
For this command, you will run ASV generation alone generating counts tables, matrices and a phylogenetic tree.
nextflow run vAMPirus.nf -c vampirus.config -profile [conda|singularity] --Analyze --pcASV --clusterAAID .97 --skipAminoTyping --minLen 400 --maxLen 430
This command will produce results for ASVs and pcASVs.
nextflow run vAMPirus.nf -c vampirus.config -profile [conda|singularity] --Analyze --ncASV --clusterNuclID .97 --skipAminoTyping --minLen 400 --maxLen 430 --asvcountID .95