LinkedList 是 Java 集合框架中一个常用的集合类,底层采用双向链表结构。和 ArrayList 一样,LinkedList 也支持空值和重复值。
由于 LinkedList 基于链表实现,存储元素过程中,无需像 ArrayList 那样进行扩容。但有得必有失,LinkedList 存储元素的节点需要额外的空间存储前驱和后继的引用。另一方面,LinkedList 在链表头部和尾部插入效率比较高,但在指定位置进行插入时,效率一般。原因是,在指定位置插入需要定位到该位置处的节点,此操作的时间复杂度为 O(N)。
最后,LinkedList 是非线程安全的,并发环境下,多个线程同时操作 LinkedList,会引发不可预知的错误。
我们先来看下 LinkedList 的常用操作:
LinkedList<String> dataList = new LinkedList<>(); // 创建 LinkedList
dataList.add("test"); // 添加数据
dataList.add(1, "test1"); // 指定位置,添加数据
dataList.addFirst("first"); // 添加数据到头部
dataList.addLast("last"); // 添加数据到尾部
dataList.get(0); // 获取指定位置数据
dataList.getFirst(); // 获取头部数据
dataList.getLast(); // 获取尾部数据
dataList.remove(1); // 移除指定位置的数据
dataList.removeFirst(); // 移除头部数据
dataList.removeLast(); // 移除尾部数据
dataList.clear(); // 清空数据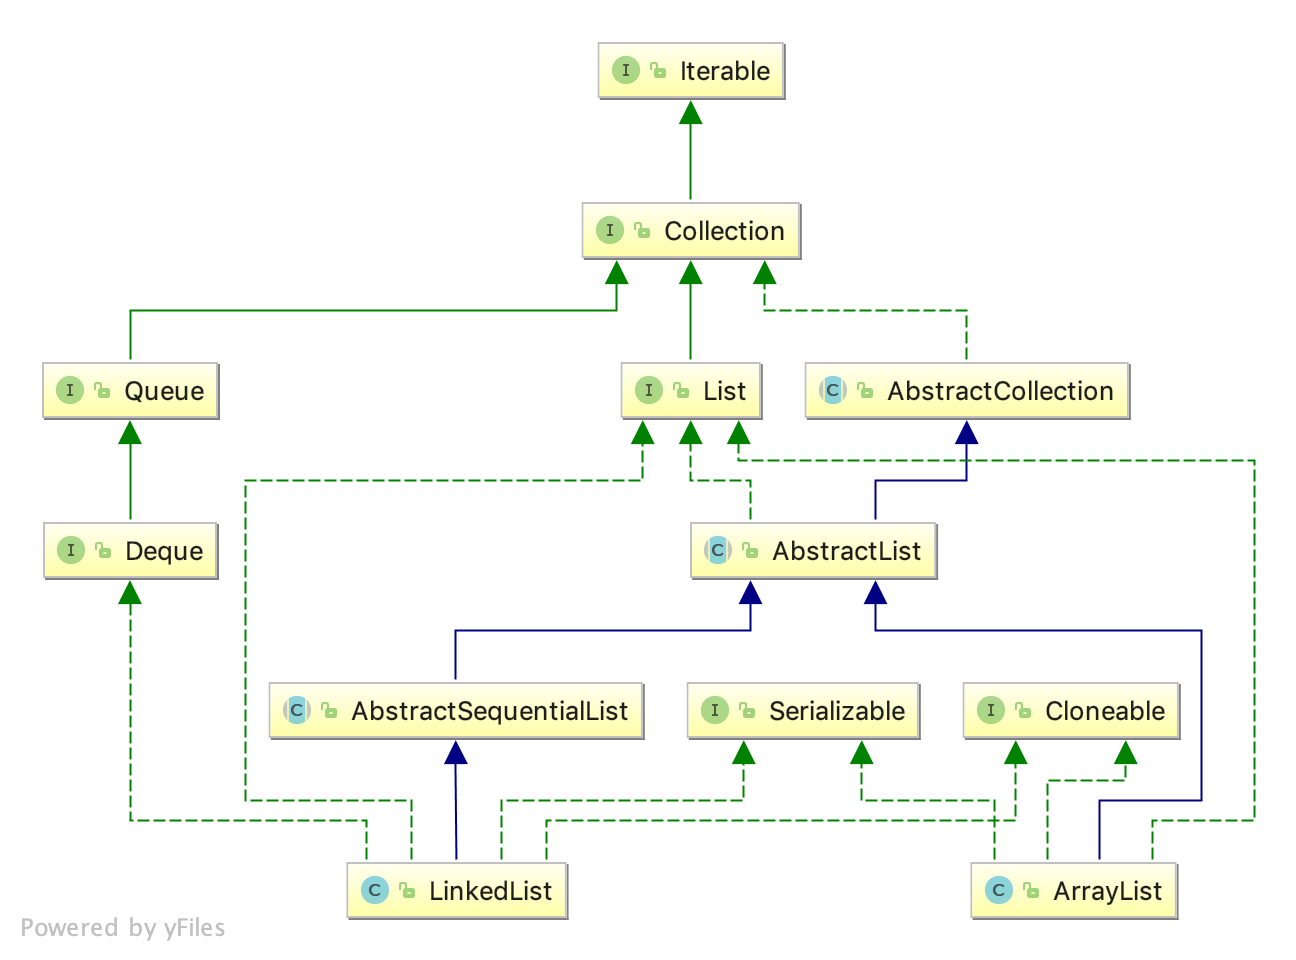
LinkedList 与 ArrayList 不同的是 LinkedList 没有直接继承 AbstractList,而是继承的 AbstractSequentialList 双向链表,AbstractSequentialList 提供了一套基于顺序访问的接口。
LinkedList 实现了 Deque 接口,也可以当队列使用。
transient int size = 0; // 当前列表的节点个数
transient Node<E> first; // 第一个节点
transient Node<E> last; // 最后一个节点

/* 构造方法一 */
public LinkedList() {
}
/* 构造方法二 */
public LinkedList(Collection<? extends E> c) {
  this();
  addAll(c);
}
可以看到 LinkedList 有 三个成员变量和两个构造方法,这里需要注意一下成员变量前面的 transient 关键字。
transient 关键字:当对象被序列化时(写入字节序列到目标文件)时,transient阻止实例中那些用此关键字声明的变量持久化;当对象被反序列化时(从源文件读取字节序列进行重构),这样的实例变量值不会被持久化和恢复。
为什么要有这个关键字呢?因为这里要告诉虚拟机,这三个成员变量不是 LinkedList 的永久性变量。
下面来分析一下构造方法二中的 addAll() 方法。
public boolean addAll(Collection<? extends E> c) {
  return addAll(size, c);
}

public boolean addAll(int index, Collection<? extends E> c) {
  // 检查 index 是否越界
  checkPositionIndex(index);

  Object[] a = c.toArray();
  int numNew = a.length;
  if (numNew == 0) // 需要添加的集合为空,直接返回
    return false;

  Node<E> pred, succ;
  if (index == size) { // 插入位置与当前列表数量相同,表示为尾部插入
    succ = null;
    pred = last;
  } else { // 否则,寻找 index 所在节点
    // 找到 index 所在位置的节点,
    // 也就是插入集合后的后一个节点
    succ = node(index);
    // index 所在位置的前一个节点,
    // 也就是插入集合后的前一个节点
    pred = succ.prev;
  }

  // 遍历需要添加的集合,逐个插入
  for (Object o : a) {
    // 创建一个新的节点,以 pred 为前一个节点,值为 e,null 为后一个节点
    @SuppressWarnings("unchecked") E e = (E) o;
    Node<E> newNode = new Node<>(pred, e, null);
    if (pred == null) // 如果 pred 为空,说明是在头部插入
      first = newNode; // 也就是说新建的节点是第一个节点
    else // pred 不为空,说明是在中间或者尾部从插入
      pred.next = newNode; // pred 的下一个节点连接上新创建的节点
    pred = newNode; // 依次插入
  }

  if (succ == null) { // 如果 succ 为空,说明是在尾部插入
    last = pred; // 所以最后插入的元素就是最后一个元素
  } else { // succ 不为空,说明是在中间插入
    pred.next = succ; // 最后插入的元素连接上后面的一段
    succ.prev = pred; // 后面的一段第一个元素连接上前面的一段
  }

  size += numNew; // 数量合并
  modCount++;
  return true;
}
我们来看下 checkPositionIndex() 方法:
private void checkPositionIndex(int index) {
  if (!isPositionIndex(index))
    throw new IndexOutOfBoundsException(outOfBoundsMsg(index));
}

private boolean isPositionIndex(int index) {
  return index >= 0 && index <= size;
}
看到了很熟悉的异常 IndexOutOfBoundsException,就是根据链表大小检查一下,逻辑很简单。
我们继续分析 add() 方法:
public boolean add(E e) {
  linkLast(e);
  return true;
}

public void add(int index, E element) {
  // 检查 index 是否越界,上面分析过了
  checkPositionIndex(index);

  if (index == size) // 插入位置与当前数量相同,说明是尾部插入
    linkLast(element);
  else
    linkBefore(element, node(index));
}

public void addFirst(E e) {
  linkFirst(e);
}

public void addLast(E e) {
  linkLast(e);
}
这里主要是调用了 linkFirst()、linkLast()、linkBefore 三个方法,我们继续分析。
private void linkFirst(E e) {
  final Node<E> f = first; // 当前第一个节点
  // 创建了一个新节点,以 null 为前一个节点、e 为值、当前第一个节点为下一个节点
  final Node<E> newNode = new Node<>(null, e, f);
  first = newNode; // 设置新建的节点为第一个节点
  if (f == null) // 当前第一个节点为空,说明列表为空
    last = newNode; // 所以最后一个节点为当前插入的节点
  else // 当前第一个节点不为空,说明列表不为空
    f.prev = newNode; // 当前列表头部连接上插入的节点
  size++;
  modCount++;
}
linkFirst() 逻辑很简单,就是头部插入节点的操作。
void linkLast(E e) {
  final Node<E> l = last;
  final Node<E> newNode = new Node<>(l, e, null);
  last = newNode;
  if (l == null)
    first = newNode;
  else
    l.next = newNode;
  size++;
  modCount++;
}
linkLast() 的逻辑与 linkFirst() 的逻辑相似这里不再分析,大家自己分析一下。
void linkBefore(E e, Node<E> succ) {
  // assert succ != null;
  final Node<E> pred = succ.prev; // 获取到 succ 的上一个节点
  // 创建一个新的节点,连接到 succ 上一个节点后面
  final Node<E> newNode = new Node<>(pred, e, succ);
  succ.prev = newNode; // 将 succ 连接到 newNode 后面
  if (pred == null) // 如果 succ 的上一个节点为空,说明 succ 为头部节点
    first = newNode; // 直接将 newNode 设为头部节点
  else // 如果 succ 的上一个节点不为空,说明 succ 为中间或者尾部节点
    pred.next = newNode; // 将 succ 的上一个节点关联到 newNode 上
  size++;
  modCount++;
}
linkBefore() 的逻辑也很简单,就是在某个节点前面插入一个节点。
我们接着来看 get() 方法。
public E get(int index) {
  // 检查 index 是否越界,上面分析过了
  checkElementIndex(index);
  return node(index).item;
}
get() 中调用了 node() 方法。
Node<E> node(int index) {
  // 如果 index 小于 size 的一半,从开头开始查找
  if (index < (size >> 1)) {
    Node<E> x = first;
    // 抽头开始查找,直到 i == index
    for (int i = 0; i < index; i++)
      x = x.next;
    return x;
  } else { // 如果 index 大于 size 的一半,从尾部开始查找
    Node<E> x = last;
    for (int i = size - 1; i > index; i--)
      x = x.prev;
    return x;
  }
}
node() 方法的就是根据 index 查找到对应节点,这里用到了折半查找,算是一个小优化。大家可以思考一下这里为什么只折半了一次,而不是一直折半下去呢?
public E getFirst() {
  final Node<E> f = first;
  if (f == null)
    throw new NoSuchElementException();
  return f.item;
}

public E getLast() {
  final Node<E> l = last;
  if (l == null)
    throw new NoSuchElementException();
  return l.item;
}
另外两个 getFirst()、getLast() 方法比较简单,大家看一下就行,不再分析。
我们继续分析 remove() 方法。
public E remove(int index) {
  // 检查 index 是否越界,上面分析过了
  checkElementIndex(index);
  return unlink(node(index));
}

public E removeFirst() {
  final Node<E> f = first;
  if (f == null)
    throw new NoSuchElementException();
  return unlinkFirst(f);
}

public E removeLast() {
  final Node<E> l = last;
  if (l == null)
    throw new NoSuchElementException();
  return unlinkLast(l);
}
可以看到 remove() 方法中分别调用了 unlink()、unlinkFirst()、unlinkLast() 我们分别来看下。
E unlink(Node<E> x) {
  // assert x != null;
  final E element = x.item; // 获取到当前节点的元素
  final Node<E> next = x.next; // 获取到下一个节点
  final Node<E> prev = x.prev; // 获取到前一个节点

  if (prev == null) { // 如果当前节点前一个节点为空,说明为头部节点
    first = next; // 直接设置下一个节点为首节点即可
  } else { // 不为空,说明是中间节点或者尾节点
    prev.next = next; // 将前一个节点连接到下一个节点
    x.prev = null; // 当前节点断开与前一个节点的连接
  }

  if (next == null) { // 如果当前节点下一个节点为空,说明是尾部节点
    last = prev; // 尾部节点移除了,所以将前一个节点设为尾部节点
  } else { // 不为空,说明是中间节点
    next.prev = prev; // 将前一个节点连接到下一个节点
    x.next = null; // 当前节点断开与下一个节点的连接
  }

  x.item = null; // 当前节点元素设置为空,方便 GC
  size--;
  modCount++;
  return element;
}
可以看到 unlink() 方法就是移除链表上的某个节点。
private E unlinkFirst(Node<E> f) {
  // assert f == first && f != null;
  final E element = f.item; // 获取到当前节点的元素
  final Node<E> next = f.next; // 获取到当前节点的下一个元素
  f.item = null;
  f.next = null; // help GC
  first = next; // 将当前节点的下一个节点设置为头部节点
  if (next == null) // 如果下一个节点为空,说明链表只有一个节点
    last = null; // 清空尾部节点
  else // 否则,说明还有其他节点
    // 下一个节点已经设置为头部节点了
    // 所以清空一下与前一个节点的 关联
    next.prev = null;
  size--; // 数量 -1
  modCount++;
  return element;
}
unlinkFirst() 方法主要是移除头部节点的操作。
private E unlinkLast(Node<E> l) {
  // assert l == last && l != null;
  final E element = l.item;
  final Node<E> prev = l.prev;
  l.item = null;
  l.prev = null; // help GC
  last = prev;
  if (prev == null)
    first = null;
  else
    prev.next = null;
  size--;
  modCount++;
  return element;
}
unlinkLast() 方法与 unlinkFirst() 方法的逻辑相似,这里不再赘述,大家自己分析下就好。
我们最后分析下 clear() 方法:
public void clear() {
  // 遍历一遍全部设置为空
  for (Node<E> x = first; x != null; ) {
    Node<E> next = x.next;
    x.item = null;
    x.next = null;
    x.prev = null;
    x = next;
  }
  first = last = null;
  size = 0;
  modCount++;
}
可以看到 clear() 方法操作很简单,就是遍历一下全部设置为空。
通过上面的分析,大家对 LinkedList 的底层实现应该很清楚了。总体来看 LinkedList 的源码并不复杂,大家耐心看一下,一般都能看懂。好了本文就到这里了,希望对大家有所帮助。